To enable an HTTPS-supported S3 Service, you generate Key, Certificate Signing Request (CSR), and Digital Certificate (CRT) files before you deploy the Hedvig Storage Proxy.
Procedure
Note
If you have existing key and certificate files, you can skip step 1.
-
Generate three files: Key, Certificate Signing Request (CSR), and Digital Certificate (CRT).
-
Key
openssl genrsa -out ~/hedvigs3.key 2048 -
CSR
openssl req -new -sha256 -key ~/hedvigs3.key -out ~/hedvigs3.csrImportant
Put the storage proxy hostname or * to match all hostnames in this field, for example:
Common Name (name or server hostname): s3proxyhost.hedviginc.com -
CRT
openssl x509 -req -days 365 -in ~/hedvigs3.csr -signkey ~/hedvigs3.key -out hedvigs3.crt
-
-
Deploy the Hedvig Storage Proxy.
-
Copy both the hedvigs3.crt and hedvigs3.key files to the /var/log/hedvig directory on the Hedvig Storage Proxy.
-
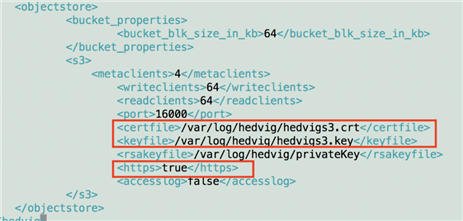
Update the <objectstore><s3> nested tag section of the Hedvig Storage Proxy configuration file (/var/log/hedvig/config.xml), as follows:
-
<certfile> – Insert the path to the Certificate Signing Request (CSR) file.
-
<keyfile> – Insert the path to the key file.
-
<https> – Set to true to enable HTTPS.
-
-
-
Restart the S3 Service.
service hedvigs3 restart