You can re-image the Remote Office Appliance RO1200.
Before You Begin
-
Create a bootable USB drive with the software needed to re-image the appliance. For more information, see Creating a Bootable USB Drive For Re-Imaging the Remote Office Appliance RO1200.
-
The re-imaging process will preserve the data which is stored in C:\DiskStorage and E:\ (DDB)(INDEXCACHE) folders.
If you would like to erase the data prior to re-imaging the appliance, use the CVDiskEraser tool as follows:
-
Stop the services and verify that all the services are stopped. For more information on stopping services, see Restarting Services on a File Server or a Server.
-
Using the CVDiskEraser tool, erase the contents in E:\ containing the DDB and INDEXCACHE folders, and C:\DiskStorage containing the backed up data.
For more information about using the CVDiskEraser tool, see Sanitizing the Disk by Using the CVDiskEraser tool.
-
Procedure
-
Connect the bootable USB drive to the Remote Office Appliance RO1200.
-
Turn on the appliance and during the boot sequence, change the BIOS settings to boot from the USB drive.
Once you save the BIOS settings, the imaging will start automatically.
This process may take some time (approximately 15 - 20 minutes) to complete.
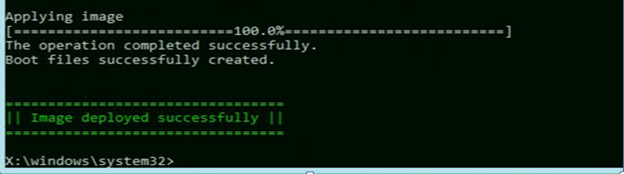
When the imaging is completed, the following message will be displayed:
-
Type Exit.
The appliance will be restarted.
-
During the reboot sequence, verify the BIOS settings to ensure that the hard drive is set at the top of the boot sequence list.
Important
The USB drive should not be at the top of the boot sequence list, as this will restart the imaging process.