You can perform 1-Touch recovery to restore a single node or the entire cluster.
Prerequisites
-
Windows File System Agent is installed on all the physical nodes of the cluster. For more information, see Installing Windows File System Agent on the Client Computer.
-
The Windows Cluster Client is created in the Command Center. For more information, refer to Cluster File Server for Microsoft and UNIX Clusters.
-
To perform 1-Touch recovery of physical nodes, you must run a system state backup along with a Full backup of the physical nodes.
-
Your backup must contain all files required to turn on the computer and run applications. Do not filter out any OS directories or application files.
If filters are added to the subclient configuration and they filter out operating system components, then the restored machine may encounter operating system issues.
Restore Entire Cluster Set Up That Includes the Cluster Shared Disk
To restore the entire cluster set up that includes the cluster shared disks, use the following procedure:
-
Restore all the physical nodes using the 1-Touch recovery operation.
-
Create the cluster shared disk with the same drive letters that were used in the source client computer.
-
Restore the data from the source cluster client computers.
-
Open the failover cluster manager and repair the cluster disks using the Repair option. For more information, see Microsoft article Replacing a Shared Disk on a 2008 Failover Cluster.
Recover Any One Node in the Cluster
When any one node (passive or active) of the cluster is down, you can restore the node as follows:
-
Use the 1-Touch Live CD to boot the node.
If an active node of the cluster is down, once you boot the node, the quorum disk and shared disks will move to the other node of the cluster. The other node will then become the active node.
-
Perform Interactive Restore or Non-interactive restore to restore the node.
Recover All the Nodes of the Cluster
If all the nodes are down and quorum disk is uncorrupted, you can follow the steps given below to restore the nodes:
Restoring Active Node
You must perform an interactive restore of the active node. Follow the steps give below to restore the active node:
-
Use the 1-Touch Live CD to boot the active node.
-
In the Language SelectionDialog dialog box, select a language from the list. To use the same language for the keyboard, click Use default keyboard for the selected language check box and click OK.
-
Click Next.
-
Click Yes if all disk devices are detected.
-
Enter CommServe Host Name.
-
Enter CommServe IP address.
-
Click Get Clients.
-
Select the client host name from the Client Name list.
-
Click Next.
-
Review network information for CommServe and restored client.
-
Click Next.
-
Enter CommCell User Name.
-
Enter CommCell Password. Enter the credentials that are used to login to CommCell from the client.
-
Click Next.
-
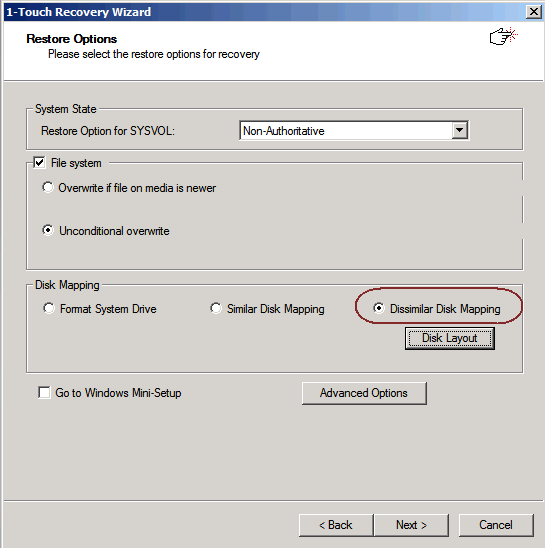
Select Dissimilar Disk Mapping. For more information, see Disk Mapping Options.
-
Manually clean and create system disk. Do not format shared or quorum disk.
-
Complete the Interactive Restore.
Recovering Passive Nodes
You can perform interactive restore or non-interactive restore to recover the passive nodes. For more information, refer to Performing Interactive Restoresor Performing Non-interactive Restores.
Recover all the Nodes of the Cluster and Quorum Disk
If all the nodes of a cluster are down and the quorum disk is also inaccessible, follow the steps given below to restore the nodes and quorum disk:
Recover Active Node
You can perform interactive restore or non-interactive restore to recover the active node. For more information, refer to Performing Interactive Restoresor Performing Non-interactive Restores.
Recover quorum disk
Once the Active Node is restored, you can restore the data on the quorum disk or shared disk from the Command Center. Follow the steps given below:
-
Go to the Files tab, and then click the file server.
The file server page appears.
-
Go to the Subclients tab.
-
In the Actions column for the default subclient, click the action button
 , and then click Restore.
The Backup content page appears.
-
Click Restore.
The Restore options dialog box appears.
-
From the Destination list, choose the destination computer to which you want to restore the data.
-
If you have selected a NAS client as the restore destination, then follow these steps:
-
Select the Protocol to restore to a CIFS share or an NFS export location.
-
From the Access node list, select the access nodes that you want to use to restore the data.
-
You can restore CIFS backup data using either Windows or Linux access nodes.
-
You can restore NFS backup data using only Linux access nodes.
-
To use multiple access nodes for restoring the data, you must select access nodes of the same type of OS.
-
-
-
Select the restore location on the destination client.
-
To restore to the original backup location, select the Restore to original folder check box.
-
To restore to a different location, clear the Restore to original folder check box, and then follow these steps:
-
In the Destination path box, type the full path to the destination folder.
For AIX and Linux file servers, to restore to an NFS export path that is currently not mounted, enter path in the format file_server_name:/export_path.
-
If the destination path you entered is a UNC Path, then enable the Impersonate user toggle key.
From the Credential list, select existing credentials or create new credentials required to access the UNC path.
Steps to add new credentials
To add credentials to the Credential Manager, click the plus button (+), and then specify the following in the Add Credential dialog box.
-
In the Credential name box, enter the name of the credential.
-
In the User account box, enter the name of the user account.
-
In the Password box, enter the password.
-
In the Description box, you can enter a description of the credentials.
-
Click Save.
-
-
-
You can also browse the restore destination path. Follow these steps:
-
If the restore destination is a CIFS share, then enable the Impersonate user toggle key.
From the Credential list, select existing credentials or create new credentials required to access the CIFS share.
Steps to add new credentials
To add credentials to the Credential Manager, click the plus button (+), and then specify the following in the Add Credential dialog box.
-
In the Credential name box, enter the name of the credential.
-
In the User account box, enter the name of the user account.
-
In the Password box, enter the password.
-
In the Description box, you can enter a description of the credentials.
-
Click Save.
-
-
Click Browse.
The Browse Options dialog box appears.
-
In the Interface path box, enter the Host name of the restore destination client.
-
Click Browse to browse the destination location.
-
Select the restore destination folder, and then click Save.
-
-
-
To overwrite the existing data, select the Unconditionally overwrite if it already exists check box.
-
Optional: To receive an email when the restore operation completes, select the When the job completes, notify me via email check box.
-
Click Restore.
Recover Passive Nodes
You can perform interactive restore or non-interactive restore to recover the passive nodes. For more information, refer to Performing Interactive Restoresor Performing Non-interactive Restores.