Understanding the Expert Storage Configuration
The Expert Storage Configuration dialog box displays several tabs. Each of these tabs are used for distinct purposes as described in the following sections.
Libraries
The Libraries tab displays the configured devices such as the libraries, library controllers, drives and drives controllers. This view provides a physical view of a library and its drive along with information on the library and drive controllers accessing them. This view facilitates faster browsing of devices especially in a SAN environment and for libraries with dual HBA cards.
Data Paths
The Data Paths tab displays a detailed view of a library and its drives which includes all the master drive pools and drive pools that are configured to access them. Once configured the dialog box displays all the logical data paths to the devices.
The following table lists the levels in the Data Paths tab tree, together with the information that is presented at each level.
|
Level in Tree |
Information Displayed |
Details |
|---|---|---|
|
Library (tape library only) |
Library Name |
The default library name includes the library manufacturer and model. |
|
Media Changer SCSI ID |
Complete SCSI ID (including SCSI card number, bus, target and LUN) of the libraries media changer. |
|
|
Associated MediaAgent |
The MediaAgent that controls the media changer in the library |
|
|
Configuration and Detection Status |
See Detection and Configuration for details information. |
|
|
Master Drive Pool (tape library only) |
Master Drive Pool Name |
The default drive pool name. |
|
Configuration Status |
See Detection and Configuration for details information. |
|
|
Drive Pool (tape library only) |
Drive Pool Name |
The default drive pool name. |
|
Associated MediaAgent |
The MediaAgent that controls the drives belonging to this drive pool. |
|
|
Drive (tape library only) |
Physical Location |
The number by which the library identifies the drive internally. |
|
Drive Name |
The default drive name includes the drive manufacturer and model. |
|
|
SCSI ID |
Complete SCSI ID (including SCSI card number, bus, target, and LUN) of the drive. |
|
|
Configuration and Detection Status |
See Detection and Configuration for details information. |
|
|
Library (disk) |
Library Name |
The default library name includes the library manufacturer and model. |
|
Associated MediaAgent |
The MediaAgent that controls the disk library. |
|
|
Mount Path (disk only) |
Mount Path number |
The number by which the MediaAgent identifies the mount path, internally. |
|
Path |
File system path for disk storage. |
Shared Disk Device
The Shared Disk Device tab allows you to detect and configure the shared disk devices in the CommCell. Once configured the configured devices are displayed in the dialog box.
Understanding SCSI Mappings in the Expert Storage Configuration
In order to understand the information that follows, you should be able to differentiate between the following items of drive-related information:
-
Drive numbers
Libraries with multiple drives, number the drives, based on its physical location. (Drive slots) This is used by the MediaAgent for internal identification.
Different libraries follow different conventions. Drives may be numbered from left to right or top to bottom, physically labeled on the outside of the library, etc.
See the library’s vendor documentation for the numbering conventions used.
-
SCSI address
This is the complete SCSI address (including bus, target, logical unit number (LUN) and PCI port number) through which the MediaAgent attempts to access a device.
-
Drive name
The MediaAgent initially assigns a drive name which is derived from the drive manufacturer and model.
You can change the name of a drive by providing an alias at any point. We recommend that you give each drive a descriptive name, for easier system administration.
Note
-
Although the library’s display of the drive numbers may start with a number other than 1 (e.g., 0), the MediaAgent always starts numbering physical locations within a library from 1.
-
Ensure that the actual SCSI numbers and drive numbers in the library correspond to the SCSI numbers and drive numbers displayed for the library in the Expert Storage Configuration dialog box. If you are not sure, or if there is a mismatch, run the exhaustive detection process.
-
For information on performing exhaustive detection on libraries and drives, see below sections on how to run the exhaustive detection.
-
Device Detection
Detection is the process by which the selected set of MediaAgents, on which the detection process is run, establishes hardware communications with storage devices. Device detection is of two types:
-
Detection
-
Exhaustive Detection
Detection
When a device has detect success status, it indicates that the system has all of the information necessary to use the device. Note that the system only detects devices for which device drivers are loaded. A device may also have the following status:
-
partially configured, detect fail \- connection errorstatus when the detection fails due to an error connecting to the MediaAgent -
partially configured, detect fail \- device not foundstatus if the detection fails due to a missing device -
cannot find a matching devicestatus if the SCSI address for the device is changedNote
Some devices (e.g., the library associated with a stand-alone drive) have no detection status, since they are virtual entities and as such have no hardware components that can be detected.
Use the following steps to detect the devices attached to a MediaAgent.
-
Before detection a device make sure:
-
To verify that the necessary SCSI adapters and drivers for the library attached to the MediaAgent computer are installed.
-
To check and verify that the hardware is visible to the operating system.
-
To verify that the CommServe computer and library are accessible.
Note
RECOMMENDED
Before configuring the libraries and drives in SAN, we strongly recommend you to verify and ensure that proper hardware zoning of tape drives be implemented, especially when you have HBA fail over implemented in your environment. For more information on zoning of HBA fail over, contact your HBA software vendor.
-
-
On the ribbon in the CommCell Console, click the Storage tab, and then click Expert Storage Configuration.
-
Under Available MediaAgents, select the MediaAgents that are attached to the library and on which the library needs to be configured and then click Add >>.
Click OK.
Note
-
To configure any shared library, make sure that you select all of the MediaAgents that share the library.
-
If a device has already been configured for the MediaAgent, the device appears in the Expert Storage Configuration dialog box.
-
For cluster, select the cluster server as the MediaAgent.
-
-
If a library is not configured, a message appears that asks you to configure the library. Click OK.
If a library is already configured, this message does not appear. Subsequently, the detected devices are displayed with the detection status detect success in the Expert Storage Configuration dialog box.
-
On the Expert Storage Configuration dialog box, click the Start menu and choose Detect/Config Devices.
-
In the Detect Library dialog box, choose the appropriate options:
-
SCSI Devices - If your library is attached to the SCSI or Fibre Channel (FC) Adapter.
-
Detect on Selected MediaAgents in Parallel - If you are performing the detection for multiple MediaAgents.
-
Automatically create DDS Drivepools - If your library is attached to multiple MediaAgents in a SAN environment.
-
NDMP Devices - If your library is attached to a NAS filer.
-
Exhaustive Detection - Only for libraries without Drive IDs support.
Click OK.
-
-
Optionally, from the Processing dialog box you can perform the following operations:
-
Click Abort to stop the exhaustive detection operation and then unmount any mounted media from the drives.
-
Click View Log to display the Log dialog box that reports the status of each task that is performed during the exhaustive detection operation.
-
-
When the detection process is completed, the log file is displayed. Click Close to proceed.
-
A message appears, that asks you to right-click the device for configuration. Click OK.
-
If the library supports SCSI 3 drive identification, the system detects the devices and displays them with detection status detect success, in the Expert Storage Configuration dialog box.
-
If the library does not support SCSI 3 drive identification, the system detects the Library with Empty Drive Slots and the drives as StndAln Library.
Perform an Exhaustive Detection before configuring the library.
-
Exhaustive Detection
Exhaustive detection is a process of associating drive numbers to its correct SCSI address. This is done by mounting a media to each of the drives in the library to obtain the drive(s) SCSI address. Due to the nature of this operation and depending on the number of drives, the time it takes to complete this operation may vary.
Note
RECOMMENDED
We strongly recommend that you perform an exhaustive detection of the devices the first time you configure the libraries and drives. When you start the exhaustive detection operation, the system will detect all the libraries (and drives) attached to selected MediaAgent(s).
After the initial configuration, exhaustive detection can be performed at the Library/Drive/Library Controller levels, in the following situations:
-
When you make changes to the existing devices. e.g., adding or removing drives or libraries.
-
When you configure libraries with missing devices.
If the Expert Storage Configuration has changed extensively and the library does not support the drive identifiers then perform the operation at the library level; for minor changes at the drive level, perform the operation at the drive level.
The following icons are displayed in the Expert Storage Configuration dialog box, depending on whether devices were successfully identified:
|
Icon |
Description |
|---|---|
|
|
This icon is displayed for libraries and drives that were successfully identified during the exhaustive detection process. This indicates that the devices were successfully detected but not configured. (all configured devices have no icons.) |
|
|
This icon is displayed for drive slots that are either empty, not detected or cannot be detected on the selected MediaAgent |
|
|
This icon indicates that the exhaustive detection option was not selected and hence the detection process has performed a SCSI detect of the devices and made a best guess by associating drives and libraries to arrive at a tree structure. |
Use the following steps to detect devices using exhaustive detection on all devices controlled by the MediaAgent(s).
-
Before performing exhaustive detection make sure to verify that:
-
The necessary SCSI adapters and drivers for the library attached to the MediaAgent computer are installed.
If you have two libraries with different drive types (e.g. AIT and DLT 4000 drive types) and even if you do not plan to use some of the drives, ensure that all the drivers associated with all the drives types are installed. In some cases, if you do not install all the appropriate drivers, the device configuration may fail.
Consider the following:
-
In a SAN environment you may have libraries with two different drive types connected to your bridge or switch (e.g., AIT and DLT 4000 drive types) If you planned on using only the DLT 4000 drives and hence only installed the drivers for the DLT 4000 drives, you would not be able to configure these drives in the Expert Storage Configuration dialog box, until you install the drivers associated with all the other drive types (AIT) in the libraries.
-
If you have an existing library (e.g. a library with DLT 4000 drives) which is already configured, and if you add another library with another drive type into your environment (e.g. a library with AIT drives) the SCSI ID of the configured library may change and you may need to edit the address in the properties of the devices in the Expert Storage Configuration dialog box.
-
-
The hardware is visible to the operating system.
-
The CommServe computer and library are accessible.
-
The media is available in the library because this operation may involve the mounting of a media in a drive. Also ensure that the media is not a cleaning media.
-
No media is mounted in the drives available in the libraries connected to the selected MediaAgent(s).
Note
RECOMMENDED
Before configuring the libraries and drives in SAN, we strongly recommend you to verify and ensure that proper hardware zoning of tape drives be implemented, especially when you have HBA fail over implemented in your environment. For more information on zoning of HBA fail over, contact your HBA software vendor.
-
-
Exhaustive detection should not be performed when other jobs are using the drives in the library.
Stop all jobs before performing an exhaustive detection.
-
On the ribbon in the CommCell Console, click the Storage tab, and then click Expert Storage Configuration.
-
Under Available MediaAgents, select the MediaAgents that are attached to the library and on which the library needs to be configured and then click Add >>.
Click OK.
Note
-
To configure any shared library, make sure that you select all of the MediaAgents that share the library.
-
If a device has already been configured for the MediaAgent, the device appears in the Expert Storage Configuration dialog box.
-
For cluster, select the cluster server as the MediaAgent.
-
-
If a library is not configured, a message appears that asks you to configure the library. Click OK.
If a library is already configured, this message does not appear. Subsequently, the detected devices are displayed with the detection status detect success in the Expert Storage Configuration dialog box.
-
On the Expert Storage Configuration dialog box, click the Start menu and choose Detect/Config Devices.
-
In the Detect Library dialog box, select Exhaustive Detection (Only for libraries without Drive IDs support) and then click OK.
Alternatively, to perform an exhaustive detection for the Library/Drive/Library Controller, right-click the Library, Drive or the Library Controller, select Advanced Options and click Exhaustive Detection.
-
The Confirm Exhaustive Detection dialog box will appear. Click Yes.
-
On the Device Selection dialog box, select the libraries and drives you wish to detect and then click OK.
The detection process will attempt to detect the devices by mounting the media in each of the selected drives to determine the correct drive to library mapping.
-
Optionally, from the Processing dialog box you can perform the following operations:
-
Click Abort to stop the exhaustive detection operation and then unmount any mounted media from the drives.
-
Click View Log to display the Log dialog box that reports the status of each task that is performed during the exhaustive detection operation.
-
-
When the exhaustive detection process is completed, the log file is displayed.
Click Close.
-
A message appears, that asks you to right-click the device for configuration. Click OK.
Note
Exhaustive detection may not be able to unload a drive, if it is not detected. If this occurs manually remove the media from the drive.
The unconfigured devices controlled by MediaAgent are displayed when you expand the tree.
Note that if the devices are not configured at this point, the detection information will not be saved if you exit from the Expert Storage Configuration dialog box now.
Detection for Libraries That Support SCSI 3 Drive Identification Information
If a tape library or stand-alone drive supports SCSI 3, the library or stand-alone drive can be configured without performing exhaustive detection. To verify whether the library or stand-alone drive supports SCSI 3, run the ScanScsiTool.exe from the command prompt.
This tool is available in the following locations:
-
Windows: <Software Installation Path>\Base
-
Unix: <Software Installation Path>/Base/ScanScsiTool
Icon
Description

If SCSI 3 is supported, the Drive Identifiers will be displayed under the Library Information. You will notice that when SCSI 3 is present, a regular detection (as opposed to an exhaustive detection) will display the yellow question mark icon in the Expert Storage Configuration dialog box, when the devices were successfully identified.
The Scanscsitool can be used to configure Shared Disk, tape libraries and stand-alone drives from command line. The following section describes the command line and the option available to this tool:
Use the following steps to configure a tape library or a stand-alone drive:
-
From the command prompt, navigate to <Software_Installation_Directory>\Base folder.
-
Run the following command:
Usage:
C:\Program Files\Company\Software\Base> ScanScsiTool.exe [option1|option2|...]
Use the following steps to configure Disk Library:
-
From the command prompt, navigate to <Software_Installation_Directory>\Base folder.
-
Run the following command:
Usage:
ScanSCSITool -h <MediaAgent Name> -a <Disk_Library_Name> -f <Mount Path>
Example:
C:\Program Files\Company\Software\Base>scanscsitool -h giant -a "SCSIMagLib" -f "D:\0113\Maglib_mountpath"
 C:\Program Files\Company\Software\Base>scanscsitool -h giant -a "SCSIMagLib" -f "\\scorpio\D\01132011\Magli_mountpath" -u scorpio\administrator -p password1
Note
Scanscsi tool is used to create a shared disk library with one MediaAgent. To share the device with multiple MediaAgents, see Configure Multiple MediaAgents for a Disk Device for step-by-step instruction.
-
Options:
Host Options:
\-h\<hostname\>MediaAgent Name
\-i\<instanceName\>Instance Name
Auto Configuration options for MediaAgent (with '-h' option):
\-n\<libraryName\>Library Alias Name, if set, only configure the matched library
\-l\<libraryID\>Library ID, if libraryID = 0, all detected libraries will be configured
\-s\<libSerial\#\>Library serial number, if not set, all detected libraries will be configured
\-a\<magLibraryName\>Disk Library Alias Name, if set, only configure the matched disk library
\-m\<magLibraryId\>Disk Library ID, if not set, a new Disk Library will be configured
\-f\<mountpath\>Mount path
\-u\<username\>User name for network mount path
\-p\<password\>Password for network mount path
Detecting Devices in Solaris
-
If you have the QLOGIC Sun FC HBA with Sun drivers (qlgc driver by SUN), you may not be able to detect the devices from the Expert Storage Configuration dialog box.
Use one of the following procedures to attach the WA Driver to the Solaris MediaAgent in the above environment:
-
Your devices may have LUNS greater than 7. Follow the procedure described in Scan Devices with LUNs greater than 7 to correct this problem.
Attach wa drivers when the library is attached to QLOGIC FC HBA by SUN
-
Ensure that the tape devices are visible to the Solaris kernel.
You can do this using the following commands:
Run cfgadm -al
 grep/look for type as tape devices
Note
If (cfgadm -al) displays all the devices configured on system, look for the word tape to identify tape devices.
For example, the output of the cfgadm -al command may be as follows:
Ap\_IdTypeReceptacleOccupantConditionc0scsi\-busconnectedconfiguredunknownc0::dsk\/c0t0d0diskconnectedconfiguredunknownc0::dsk\/c0t10d0diskconnectedconfiguredunknownc0::dsk\/c0t6d0CD\-ROMconnectedconfiguredunknownc0::dsk\/c0t8d0diskconnectedconfiguredunknownc0::dsk\/c0t9d0diskconnectedconfiguredunknownc3scsi\-busconnectedunconfiguredunknownc6fc\-fabricconnectedconfiguredunknownc6::100000d08000167dtapeconnectedconfiguredunknownc6::100000d080001986tapeconnectedconfiguredunknownc6::100000e00221b69array\-ctrlconnectedunconfiguredunknownc6::100000e00221d909diskconnectedunconfiguredunknownc6::2100002037194c51diskconnectedconfiguredunknownc6::210000203719599ediskconnectedconfiguredunknownc7fcconnectedunconfiguredunknownc8fcconnectedunconfiguredunknownIf you do not see the devices as shown in the above example, make sure that the devices are visible to the Solaris kernel before proceeding any further.
-
If you see the tape devices, as shown in the above example, run the following script:
<software installation path>/WA/wa_sunqlc_add
After running the script, you will be able detect the devices from the Expert Storage Configuration dialog box.
Attach wa drivers when the library is attached to QLOGIC FC HBA by SUN with a storage router
-
Ensure that the tape devices are visible to the Solaris kernel.
You can do this using the following commands:
cfgadm -al
 grep/look for type as array-ctrl
For example, the output of the cfgadm -al command would be as follows:
c6::100000e00221b691 array-ctrl connected unconfigured unknownIf you do not see the devices as shown in the above example, make sure that the devices are visible to the Solaris kernel before proceeding any further.
-
If you see the array-ctrl as shown in the above example, you will have to add the necessary information in the following file:
/usr/kernel/drv/wa.conf -
Add the necessary entries using the following pattern to add each device.
name="wa" parent="fp" target=16 lun=0 fc-port-wwn="WWPN"Using the above example, it will be as follows:
name="wa" parent="fp" target=16 lun=0 fc-portwwn="100000e00221b691"Add 8 entries from lun=0-7
Example:
name="wa"parent="fp"target=16lun=0fc\-port\-wwn="100000e00221b691";name="wa"parent="fp"target=16lun=1fc\-port\-wwn="100000e00221b691";name="wa"parent="fp"target=16lun=2fc\-port\-wwn="100000e00221b691";name="wa"parent="fp"target=16lun=3fc\-port\-wwn="100000e00221b691";name="wa"parent="fp"target=16lun=4fc\-port\-wwn="100000e00221b691";name="wa"parent="fp"target=16lun=5fc\-port\-wwn="100000e00221b691";name="wa"parent="fp"target=16lun=6fc\-port\-wwn="100000e00221b691";name="wa"parent="fp"target=16lun=7fc\-port\-wwn="100000e00221b691"; -
Save the changes.
-
Stop the services in the MediaAgent in which the entries were added.
-
Execute the following commands to create the device nodes:
rem_drv wa add_drv wa -
Start the services in the MediaAgent in which the entries were added.
You will now be able detect the devices from the Expert Storage Configuration window.
Scan devices with LUNs Greater than 7
By default the MediaAgent scans for devices with LUNs 0-7. If the devices are over these values they will not be detected. Perform the following steps to correct this problem:
-
Edit the following file:
/usr/kernel/drv/wa.conf -
Add an additional line across all targets to add a specific LUN. For example, to add LUN 8 and assuming that you have one target - Target 0 - you need the following line:
name="wa" class="scsi" target=0 lun=8;
Exhaustive Detection for Stand-Alone Drives
Exhaustive detection is not supported for detecting stand-alone drives.
Configuring Devices
Configuration is the process by which the MediaAgent software collects the information that is needed for software support of a device. When a device has a configured status, it indicates that the MediaAgent has all of the information necessary to use the device.
Note
If you have to share the same physical library between multiple CommCells, the library needs to be virtualized so that one virtual partition is assigned to a given CommCell. This can be achieved using library vendor provided options.
Use the following steps to configure devices attached to a MediaAgent or NAS File Server.
-
In the Expert Storage Configuration dialog box, right-click the library that you want to configure, and then click Configure.
The Configuration dialog box appears.
-
Select one of the following options, and then click OK.
-
Library only if you want to configure the drives individually.
-
Library and all drives if you want to configure all of the drives within the library (for example if you are doing a typical library installation).
-
-
If you have not already performed an exhaustive detection, or if your exhaustive detection did not detect one or more of the existing devices, the Device Configuration dialog box is displayed.
Select one of the following:
-
Click the Do Exhaustive Detection Now option if you want to perform the exhaustive detection operation. If you select this option, follow steps 8 to 13 in the Exhaustive Detection procedure.
-
Click Configure Devices without Exhaustive Detection if you do not want to perform the exhaustive detection operation.
-
-
A Confirm dialog box appears, that asks you if your library has a barcode reader.
-
Click Yes if the library has a barcode reader. (Sighted library)
-
Click No if the library does not have a barcode reader. (Blind library)
On Windows MediaAgents, this dialog box is displayed only in the following situations:
-
When the media changer is disabled in the operating system.
-
When the media changer is enabled, but the operating system detects an unknown media changer.
If Windows detects the correct media changer, this prompt does not appear.
-
-
If the library has a barcode reader, the Discover Media Options dialog box is displayed. Perform one of the following:
-
To discover the media in the library automatically, select the default media type, and then click Yes.
-
To manually discover the media manually, click No.
Ensure that media is discovered before you use the library for backup operations.
-
-
If the library does not have a barcode reader, the Discover Media Options dialog box is displayed.
Select the correct media type available in the library and then click OK.
For libraries without a barcode reader, see Blind Library Configuration.
-
The status of the library changes to configured.
If you chose to configure all associated drives, the status of the drives (and of the drive pool that contains them) changes to Configured.
The Library tab provides the physical view of the devices (library and drives).
Detecting and Configuring SAS-2 Libraries with a Solaris MediaAgent
To detect and configure SAS-2 libraries with a Solaris MediaAgent, unload and unbind the st and sgen drivers from the WA device before running device detection and configuration.
Before you begin
Before detecting and configuring the SAS-2 library with a Solaris MediaAgent, you must unload and unbind the st and sgen drivers. From the MediaAgent, type the following commands from the command prompt:
-
update_drv -d -i "scsiclass,01" st
-
update_drv -d -i "scsiclass,08" sgen
-
rem_drv wa
-
add_drv -i "scsiclass,01 scsiclass,08" wa
Procedure
-
To detect the SAS-2 library as the device attached to the Solaris MediaAgent, run the detection process.
For more information, see Device Detection.
-
Configure the SAS-2 library.
For more information, see Configuring Devices.
-
After the library is configured, from the CommCell Browser, expand Storage Resources | MediaAgents.
-
Right-click the appropriate MediaAgent, and click Properties.
-
On the Control tab, clear the Use Native device driver for data transfer for tape media check box, and click OK.
Validating the Drives in a Library
When the validation process is performed the system identifies the drives in the library. During the validation process, for each drive, the system randomly picks up a media from one of the slots in the library and uses it to validate the drives. Every drive may use the same or a different media, depending on the randomization. Validation can be performed from the library, master drive pool, drive pool or from the individual drive.
Use the following steps for validating drives in a library.
Note
For Virtual Tape Libraries (VTL) use the TapeToolGui tool to run performance related tests, instead of using the Validate Drive option.
-
Before validating drives in a library:
-
You should have discovered at least one new media before attempting to validate a drive
-
Validation of drives cannot be performed if media is in the drives. Therefore, do not validate the devices until you remove the media from the drives.
-
Do not validate drives when a job is in progress in the library.
-
Do not run any jobs when you validate drives. Disable all scheduled jobs in the library you wish to validate. You can do this by disabling the jobs in the Activity Control dialog box at the appropriate level in the CommServe tree.
-
Validation may fail because of a mount or unmount problem. For an unmount error, unload the media manually and Reset the library.
-
-
On the ribbon in the CommCell Console, click the Storage tab, and then click Expert Storage Configuration.
-
Under Available MediaAgents, select the MediaAgent (s) whose devices you want to detect or display and then click Add >>.
Click OK.
-
In the Information dialog box, click OK.
-
From the Expert Storage Configuration dialog box, right-click the configured library, master drive pool, drive pool or drive that you want to validate, and then click Validate.
Note that the library must contain discovered media. For information on discovering media, see Discover Media from the CommCell Console.
-
A prompt appears, informing you that validation may take several minutes per drive and asking if you want to continue. Click Yes to start the validation process.
-
The system attempts to mount a media in each drive within the library, master drive pool, drive pool or drive. A progress bar reports the progress of the validation job.
Click on the View Log button to display the Log dialog box which reports the status of each task that is performed during the storage validation operation.
-
A status message reporting the success or failure of the operation appears in the Status Bar at the bottom of the Expert Storage Configuration dialog box.
Validating Drive for Libraries with WORM Media/NAS File Server
Drive validation is not supported for libraries with WORM media and libraries attached to a NAS File Server.
Enabling Automatic Media Discovery During Library Configuration
Before using a new media, the system must collect certain information about it through a process known as discovery. When a media has been discovered its information is entered into the CommServe database. Media can be discovered from both the Expert Storage Configuration dialog box and the CommCell Browser. For comprehensive information on discovering media, see Discover Media.
Use the following steps to discover media with in a library.
-
In the Expert Storage Configuration dialog box, right-click the library that you want to configure, and then click Configure.
The Configuration dialog box appears.
-
Select one of the following options, and then click OK.
-
Library only if you want to configure the drives individually.
-
Library and all drives if you want to configure all of the drives within the library (for example if you are doing a typical library installation).
-
-
If the library has a barcode reader, the Discover Media Options dialog box is displayed. Perform one of the following:
-
To discover the media in the library automatically, select the default media type, and then click Yes.
-
To manually discover the media manually, click No.
Ensure that media is discovered before you use the library for backup operations.
See Discover Media from the CommCell Console for step-by-step procedure.
-
-
If the library does not have a barcode reader, another Discover Media Options dialog box is displayed.
Select the correct media type available in the library and then click Yes.
-
The status of the library changes to configured.
Configuring Library for Solaris Zones
You can configure a library or a device in a global zone and then access the same library from a local zone. Use the SCSiZone tool to configure the library in the global zone. Follow the steps given below to configure the library:
-
Install the MediaAgent on the computer hosting the global zone and on the local zone. For more information, refer to MediaAgent Installation
-
On the computer hosting the global zone, go to the following location:
<Install Directory>/WAEnter the following command to detect the devices:
./wa_sunqlc_addThe library and tape drive devices are detected. To confirm this, navigate to /var/adm/ and view the messages file. It displays the list of detected devices.
-
On the local zone, enter the following command to stop the Commvault services:
commvault stop -
On the global zone, navigate to <Install Directory>/Base and enter the following command:
./ScsiZoneTool -i <local zone name> -
Restart the services on the local zone using the following command:
commvault start -
Configure the devices. See Configuring Devices for step-by-step procedure.
Deconfiguring Libraries and Drives
Deconfiguring a library or drive disables software communications between the MediaAgent and the device. Deconfiguring a library also releases the license associated with the library. You may deconfigure a library or drive if:
-
The device is irreparably damaged.
-
You want to remove the library from the CommCell altogether.
You cannot perform any operation (e.g., backup, restore, maintenance operations) using a deconfigured library or drive. You can however re-use the media and the data available in the media by importing them to another library with similar or compatible drive types and then adding a data path to the new library from the storage policy copy that was originally used to perform backup.
Note
-
If you do not have library with compatible drive types in the CommCell, and wish to preserve the data for future restore/recover purposes, perform an Auxiliary Copy operation using another library to create secondary copies, before deconfiguring the library.
-
All the counters and history information associated with the library or drive will be lost, when it is deconfigured.
Consider the following, when you deconfigure libraries or drives:
-
To re-use all the media in another library with similar or compatible drive types, add a data path to the new library from the storage policy copies that were originally used to perform data protection. (See View the Storage Policies Accessing a Library for step-by-step instructions on how to view the storage policies associated with a library.)
You do not have to delete the storage policy to deconfigure the library. Keep in mind that all the data in the media will be lost and media will be recycled when a storage policy copy is deleted.
-
Before you deconfigure a library, verify and ensure that none of the Storage Policy Copy's default data path points to the library. See View the Storage Policies Accessing a Libraryfor step-by-step instructions on how to view the storage policies associated with a library.
If necessary, set an alternate data path as the default data path before deconfiguring the library.
If you have a storage policy copy with no default data path, use Change Data Path option to migrate the storage policy to point to another data path. See Change Data Path for more information.
-
As the number of configured drives in a drive pool cannot be smaller than the largest number of streams used by any storage policy that accesses that drive pool, verify and if necessary reduce the number of streams in storage policy copies to be equal to the number of functional drives in the drive pool. For example, assume that a drive pool containing four drives is accessed by a four-stream storage policy. If you wish to deconfigure one of the drives, you must first reduce the four-streamed storage policies to three-streams.
Note
Previous backups using multiple streams cannot be restored if the number of streams in a storage policy is reduced.
-
To re-use the storage policy associated with the deconfigured library, Change Data Path or Add a Data Path to a Storage Policy Copy.
-
When you deconfigure the library from one of the MediaAgents that share a library in the SAN environment, check and verify that the Auto Configure DDS DrivePool and Auto Configure Failover Library Controllers options are disabled in the Library Properties dialog box in the Expert Storage Configuration dialog box. If these options are not disabled, the system will automatically configure the library when the services in the MediaAgent are re-started.
-
If you have any discovered spare WORM media in a Blind Library, then deconfiguring the library will leave the discovered spare WORM Media unusable. The media cannot be used when the library is configured back again. So apply caution when adding WORM media to a Blind Library for spare use.
Deconfigure Library
Use the following steps to deconfigure library from the Expert Storage Configuration tool. You can also deconfigure a tape library from the CommCell Console. For more details, see Deconfiguring a Tape Library.
-
Be certain that the drive that you want to deconfigure is not in use. Use the Job Controller to find and kill any jobs that use the drive.
-
Make sure that a media is not mounted in the drive.
-
On the ribbon in the CommCell Console, click the Storage tab, and then click Expert Storage Configuration.
-
Under Available MediaAgents, select the MediaAgent (s) whose devices you want to detect or display and then click Add >>.
Click OK.
-
In the Information dialog box, click OK.
-
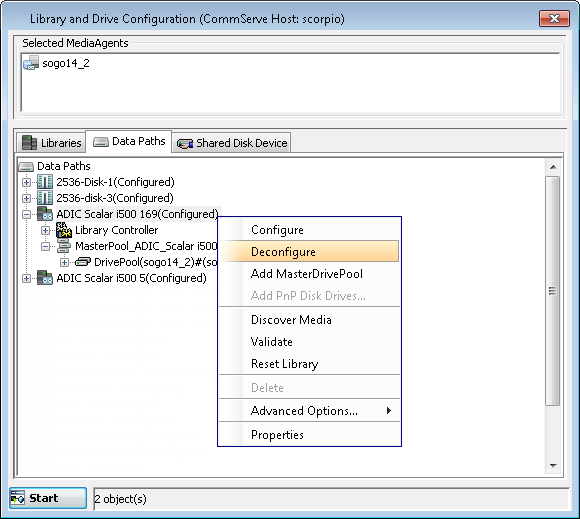
From the Expert Storage Configuration dialog box, right-click the library that you want to deconfigure, and then click Deconfigure.
-
A prompt appears, informing you that drives must be deconfigured before their library and asking if you want to deconfigure the library's drives. Click Yes to deconfigure.
-
A prompt appears, informing you that drive pools must be deconfigured before their library and asking if you want to deconfigure the library's drive pools. Click Yes to deconfigure.
The configuration status of the library, its drive pools, and its drives changes to not configured.
Delete Deconfigured Library
You can view the deconfigured libraries and the media (with contents) associated with the deconfigured libraries from the CommCell Console.
-
From the CommCell Console, right-click the deconfigured library that you want to delete, and then click Delete.
-
Click Yes in the Confirm prompt asking you whether you wish to delete the library.
The deconfigured library is deleted from the CommCell Console.
Deconfigure Master Drive Pools
Library will have multiple master drive pools configured with different MediaAgent. Follow the steps below to deconfigure a specific master drive pool.
-
On the ribbon in the CommCell Console, click the Storage tab, and then click Expert Storage Configuration.
-
Under Available MediaAgents, select the MediaAgent (s) whose devices you want to detect or display and then click Add >>.
Click OK.
-
In the Information dialog box, click OK.
-
From the Expert Storage Configuration dialog box, click the Data Paths tab, right-click the Master drive pool that you want to deconfigure and then click Deconfigure.
-
A prompt appears if you want to deconfigure the master drive pool. Click Yes to deconfigure.
-
A prompt appears, informing you that drives must be deconfigured before their drive pool and asking if you want to deconfigure the constituent drives. Click Yes to deconfigure.
The configuration status of the master drive pool, its drive pools and their drives changes to not configured.
Deconfigure Drive Pools
Use the following steps to deconfigure drive pools.
-
On the ribbon in the CommCell Console, click the Storage tab, and then click Expert Storage Configuration.
-
Under Available MediaAgents, select the MediaAgent (s) whose devices you want to detect or display and then click Add >>.
Click OK.
-
In the Information dialog box, click OK.
-
From the Expert Storage Configuration dialog box, click the Data Paths tab, right-click the drive pool that you want to deconfigure, and then click Deconfigure.
-
A prompt appears, informing you that drives must be deconfigured before their drive pool and asking if you want to deconfigure the constituent drives.
Click Yes to deconfigure.
The configuration status of the drive pool and its drives changes to not configured.
Deconfigure Drives
The number of configured drives in a drive pool cannot be smaller than the largest number of streams used by any storage policy that accesses that drive pool. For example, assume that a drive pool containing four drives is accessed only by a three-stream storage policy. In this case, you can deconfigure only one drive within the drive pool. The system prevents you from deconfiguring any additional drives. To deconfigure additional drives, you must first reduce the number of streams in the storage policy.
Note
Some Agents/database applications have the following requirement: The number of streams through which the database is restored must equal the number of streams through which the data was backed up. If you have used a storage policy for multi-stream database backups we advise you not to reduce the number of streams.
Use the following steps to deconfigure a drive.
-
Be certain that the drive that you want to deconfigure is not in use. Use the Job Controller to find and kill any jobs that use the drive.
-
Make sure that a media is not mounted in the drive.
-
On the ribbon in the CommCell Console, click the Storage tab, and then click Expert Storage Configuration.
-
Under Available MediaAgents, select the MediaAgent (s) whose devices you want to detect or display and then click Add >>.
Click OK.
-
In the Information dialog box, click OK.
-
From the Expert Storage Configuration dialog box, right-click the drive that you want to deconfigure, and then click Deconfigure.
-
Click Yes in the confirmation prompt that appears to deconfigure the drive.
The status of the drive changes to not configured.
Migrating a Tape Library to a New MediaAgent
Use the following steps to migrate a tape library to a new MediaAgent, when the library is moved and attached to a new MediaAgent..
-
On the ribbon in the CommCell Console, click the Storage tab, and then click Expert Storage Configuration.
-
From the Select MediaAgents dialog box, select the following:
-
From the Available MediaAgents list box, select the MediaAgent(s) that is attached to the tape library.
-
Click Add >> to move the MediaAgent(s) to the Selected MediaAgents list box.
-
Click OK.
-
-
Click OK.
-
Once you attach the library to the new MediaAgent, use the steps described in Device Detection to detect devices for new MediaAgent.
-
For existing MediaAgent the library will appear as configured.
Use the steps described in Deconfigure Libraries to deconfigure the library. Once deconfigured the status of the library appear as not configured.
Use the steps described in Delete Deconfigured Libraries to delete the library.
-
To use the new Tape library, change the data path on the Storage Policy Copy which was previously used by existing library.
See Change Data Path on Storage Policy Copy for step-by-step instructions.
Related Topics
Prerequisites - Direct-Attached Libraries
Prerequisites - Direct-Attached Shared Library
Hardware Configuration Guidelines - Libraries Attached to a SAN