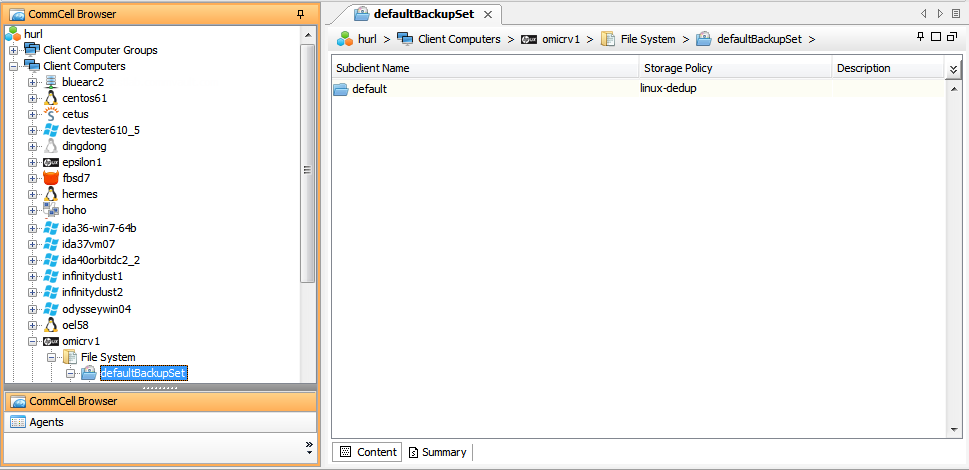
Understanding the CommCell Console
The File System iDataAgent uses the following entities to manage backup and restore operations from the CommCell Console.
Subclient
A logical entity that uniquely defines a unit of data on a client computer.
Backup Set
A group of subclients which includes all the data backed up by the iDataAgent.
Configuring User Defined Backup Sets
You can create user defined backup sets to group a set of selected data that you need to backup. A user-defined backup set will contain its own default subclient.
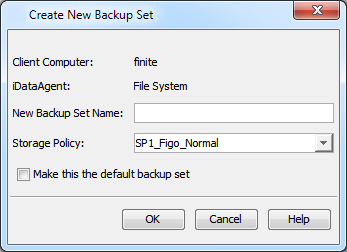
Creating a Backup Set for On-Demand Backups
On-Demand backups allow content to be specified as an external input when initiating a backup. Whereas traditional backups are performed using subclients, which contain fixed content configured prior to performing the operation, On- Demand backups allow you to specify content each time you perform a backup.
Content for On-Demand backups is defined through two entities:
-
a Content File, which is a text file that defines the location of the data that you want to protect. Each Content File contains the fully qualified paths from the root directory to files, links, and devices to be backed up.
-
a Directive File, which is a text file that defines where each Content File is located. The Directive File contains the fully qualified paths from the root directory to one or more Content Files. Only one Directive File is needed for a single On-Demand backup.
Once these entities are defined, an On-Demand Backup Set is then created. Backups performed from this Backup Set will allow you to select the Content and Directive Files to be included.
Formatting Content and Directive Files
Content File entries should be in the following format with no filters, wildcards, or regular expressions included:
/usr/datafile
/usr/textfile
/etc/docfile
Similarly, Directive File entries should be in the following format with no filters, wildcards, regular expressions, or blank lines:
/usr/ContentFile1
Configuring On-Demand Backup Sets
Create one or more Content Files defining the content to be backed up.
-
From the CommCell Browser, navigate to Client Computers | <Client>.
-
Right-click the File System, point to All Tasks and then click New On Demand Backup Set.
-
In the New Backup Set Name box, type a name (up to 32 characters).
-
Click OK.
Create a Directive File defining the locations of each Content File.
Note
Once an On-Demand Backup Set has been created, it cannot be changed into a traditional backup set.
Adding Files and Folders with Unicode Characters to Content Files
If the path or the filename contains Unicode characters, the Content File must be converted to a format that can be used by the data protection operation. The Unicode Conversion utility must be used to convert the Content File to a format that can be provided as input.
-
Using a text editor, create a file that contains a list of files or folders with Unicode characters and save the file as a Unicode text file.
-
From the command line, navigate to the <software install folder>/Base folder and type the following:
./CVconvertUnicode <source file> <destination file>
where:
-
<source file> is the full path and name of the file created in Step 1.
-
<destination file> is the full path and name of the destination file. This file is automatically created by the utility.
-
-
Use the destination file as the content file to perform an On-Demand backup.
Preventing Duplicate Backups of Files
On-Demand Backups explicitly back up the files listed in the Content File. If the Content file has two entries for the same file, the file will be backed up twice.
For example, consider a Content File that lists the following entries:
/usr/
/usr/textfile
In this scenario, the textfile folder will be backed up twice because the Content File also has an entry for the parent folder usr.
It is recommended that Content Files avoid such duplicate entries. If you are unable to avoid duplicate entries, use the following steps to prevent the duplication of data.
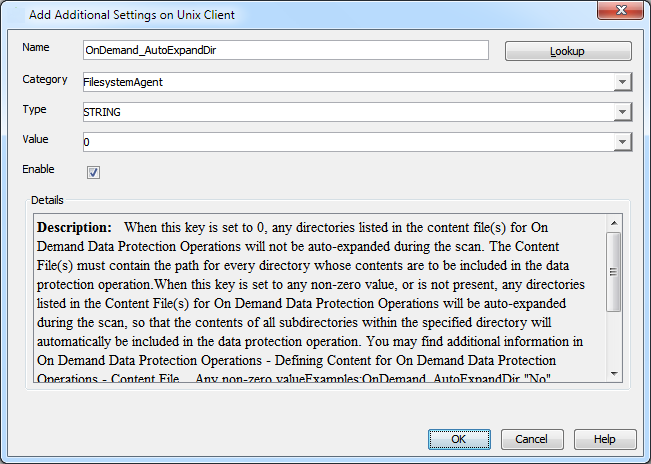
Configuring Content File to Exclude Duplicate Entries
-
From the CommCell Browser, navigate to Client Computers.
-
Right-click the <Client> in which you wish to perform the restore, and then click Properties.
-
Click Advanced and then click Additional Settings tab.
-
Click Add.
-
In the Name field, type OnDemand_AutoExpandDir.
The Category and Type fields are populated automatically.
-
In the Value field, type 0.
-
Click OK.
Configuring User Defined Subclients
You can create user-defined subclients to protect specific portions of the client data. For example, you may need to frequently backup a specific directory or a set of directories. You can create a subclient for such directories and schedule frequent backups for that subclient.
Tip
By default, the content of the Default Subclient contains the entire file system.
When you create a user-defined Subclient, the contents of the user-defined Subclient will be excluded from the Default Subclient.
Note: If your subclient has a large number of directories (over 1 million), split your content across multiple subclients and schedule backups apart to avoid high memory usage by the Commvault ifind process.
If you have defined overlapping content across multiple subclients within the backup set, the content is backed up by one subclient. Other subclients within the backup set skip the content.
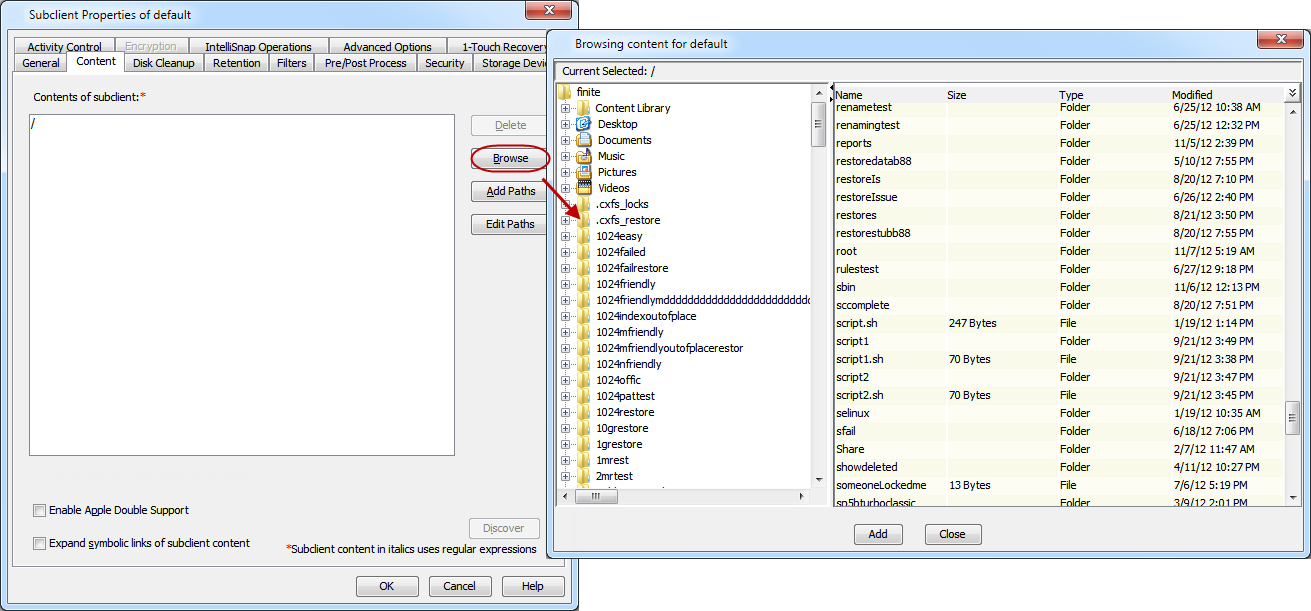
Creating a Subclient to Back Up Specific Files
-
You can create a user-defined subclient to manage and backup specific data files. From the CommCell Browser, navigate to Client Computers | <Client> | File System | Backup Set.
-
Right-click the Backup Set, point to All Tasks and then click New Subclient.
-
In the Subclient Name box, type a name.
-
Click the Storage Device tab.
-
In the Storage Policy list, click a storage policy name.
-
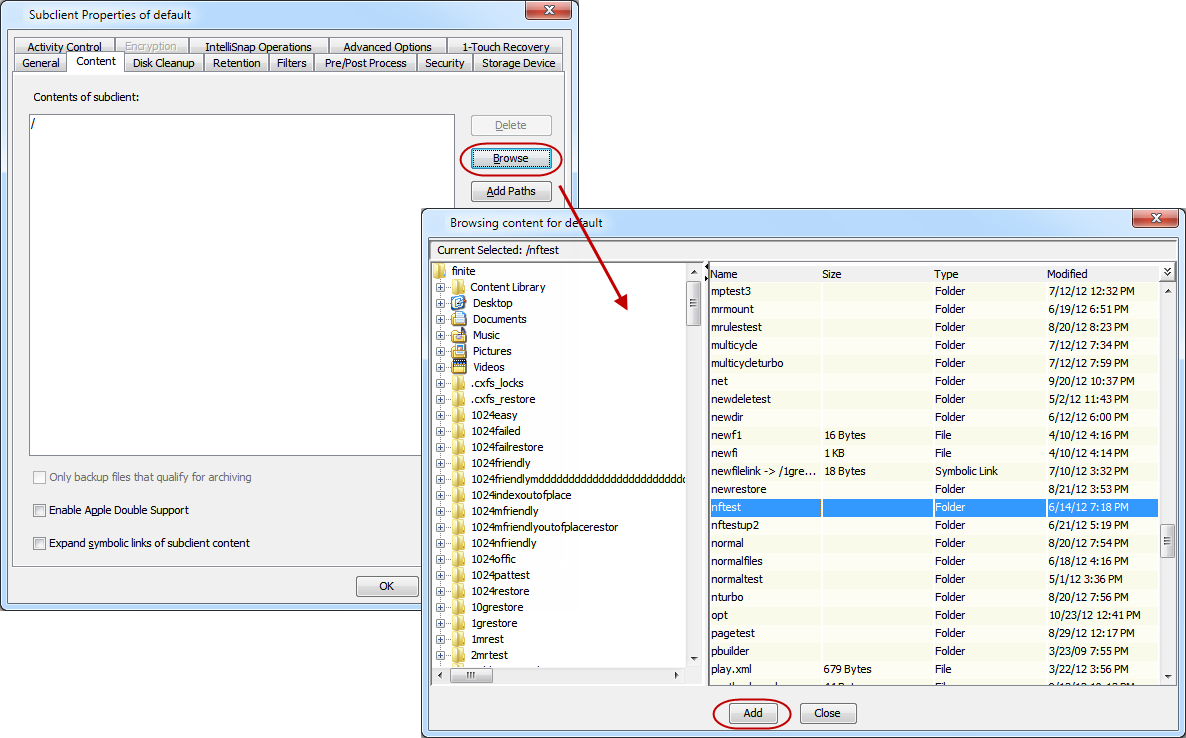
Click the Content tab.
-
Click Browse.
-
Select the directory or file to be backed up and click Add.
Repeat this step to include all the files and directories to be backed up.
-
Click Close.
-
Click OK.
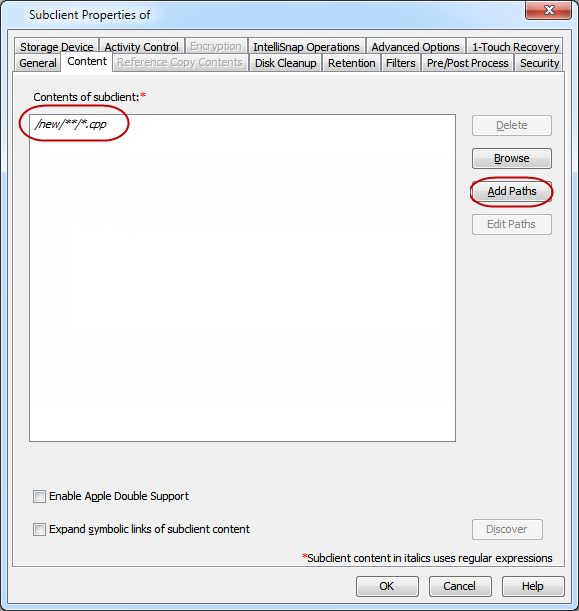
Creating a Subclient to Back Up Specific Files Using Wildcards
You can use the following wildcards to specify the files to be backed up.
|
Wildcards |
Description |
Examples |
|---|---|---|
|
* |
Matches any number of characters. Used to match all objects. This wildcard is used in the following scenarios:
|
*.doc backs up all files with the extension .doc (e.g., status.doc, mission.doc) on all partitions and paths on the client computer. /Test/*.doc backs up all .doc files only in the /Test directory a*.so backs up all files which start with "a" and with the extension .so (e.g., alsvc.so, advdcc.so) on the client computer. /Finance/Test/* backs up only the files under the /Finance/Test directory. Any sub-directory under the Test directory is not backed up. |
|
** |
Matches any directory level. |
/**/move.cpp - includes the file named move.cpp located at any directory level. (e.g., /root/newapp/move.cpp/opt/kde3/src/move.cpp) /etc/** - includes all directories and files under /etc directory. All the sub-directories and files under these directories are included in the backup. |
|
*** |
Matches any directory level. |
/etc/*** includes all directories, sub-directories, and files under the /etc directory. Note This wildcard is recommended for filters only. |
|
? |
Matches any one character. Used to match all files (or directories) for which any one character in the file name or the directory name is variable. |
/access? backs up any directory or file on the client computer for which the name begins with- access followed by any one character such as access1 or access5. However, access12 or access15 are not backed up because the last two characters in the name are variables. To back up access12 or access15, you must specify access?? in the subclient content. Class?report backs up any directory or file for which the wildcard character in the place of ? is a variable. For example: Class1report and Class2report are included in the backup. However, Class15report is excluded from backup. |
|
[] |
Matches a set or range of characters enclosed in square brackets. |
Numbers within square brackets are treated as single digits, and a dash between two digits indicates the complete range of numbers between those two digits. |
|
[!] |
Matches any single character that is not in the listed set or range of characters. You can use the wildcard in the following scenario: Back up all files in a directory except the files for which the name starts with any character from the specified set or range of characters. |
/root/[!AEIOU]*.doc backs up all .doc files in the /root directory that start with a letter other than A, E, I, O, or U. |
When you use wildcards to specify the subclient content, the content path appears in Italics.
If you want all the files with the file extension ".doc" to be backed up from any level, then specify the content as *.doc. If any subclient content doesn’t start with /, then /**/ will be prefixed to the content to match at any level. E.g., *.doc will be /**/*.doc
To treat *, ?, [ ] as literals in the subclient content and not as wildcards, you can escape the wildcard by adding ‘\’ before the wildcard. For example, /Report\[2011-2012\]/*.doc backups all the .doc files under /Report[2011-2012]
More than one type of wildcard can be used when specifying subclient content (e.g., /Dcvol?/oracle[1-47]/**/*.log).
On newly installed UNIX clients, a wildcard path with a single trailing "*" backs up only the files and not the subdirectories. For more information about the wildcard behavior, see Wildcard Behavior on Newly Installed UNIX Clients.
Use the following steps to backup specific files using wild cards:
-
From the CommCell Browser, navigate to Client Computers | <Client> | File System | Backup Set.
-
Right-click the Backup Set, point to All Tasks and then click New Subclient.
-
In the Subclient Name box, type a name.
-
Click the Storage Device tab.
-
In the Storage Policy list, click a storage policy name.
-
Click the Content tab.
-
Click Add Paths.
-
Type the specific file name or the path to the file(s), and then click OK.
-
Click OK.
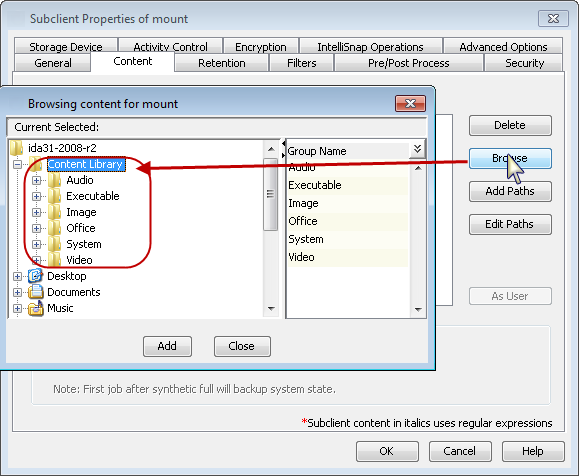
Creating a Subclient to Back Up Predefined Content
The Content Library folder on any client will automatically collect frequently accessed data such as images, audio and video. You can select the required content category under the Content Library and add to the subclient content. The following predefined content categories are available:
-
Audio
-
Executable
-
Image
-
Office
-
System
-
Video
Use the following steps create a subclient to backup predefined content:
-
From the CommCell Browser, navigate to Client Computers | <Client> | File System | Backup Set.
-
Right-click the Backup Set, point to All Tasks and then click New Subclient.
-
In the Subclient Name box, type a name.
-
Click the Storage Device tab.
-
In the Storage Policy list, click a storage policy name.
-
Click the Content tab.
-
Click Browse.
-
Navigate to <Client> | Content Library.
-
Click the desired file type.
For example, click Audio to select all the audio files on a client.
-
Click OK.
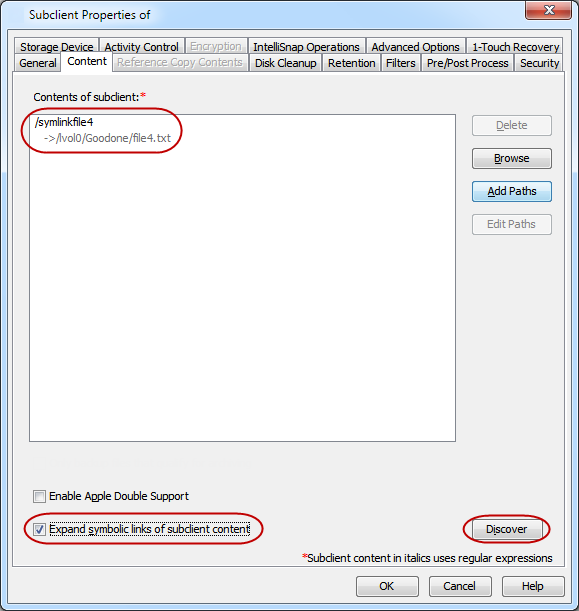
Creating a Subclient to Back Up Symbolic Links
A symbolic link is a file that points to another file. By default, the symbolic link file will be included in the subclient content. However, use the following procedure to expand and backup the path in the symbolic link.
-
From the CommCell Browser, navigate to Client Computers | <Client> | File System.
-
Right-click the Backup Set, point to All Tasks and then click New Subclient.
-
In the Subclient Name box, type a name.
-
Click the Storage Device tab.
-
In the Storage Policy list, click a storage policy name.
-
Click the Content tab.
-
Select the Expand symbolic links of subclient content check box and then click Discover.
The data paths to which the symbolic links in the data contents are pointing will be displayed in contents of subclient.
-
Click OK.
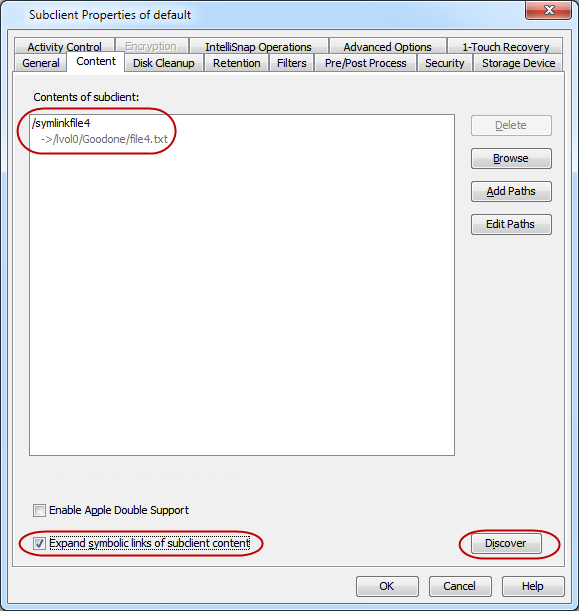
Enabling Backup of Symbolic Link Contents on a Subclient
Backup of content pointed by the symbolic links can be enabled at the subclient level.
Use the following steps to follow the symbolic links under a subclient and include the content pointed by these links for backup:
-
From the CommCell Browser, navigate to Client Computers | <Client> | File System | Backup Set.
-
Right-click the <Subclient> and then click Properties.
-
Click the Content tab.
-
Click Browse.
-
Select the directory or file to be backed up and click Add.
Repeat this step to include all the files and directories to be backed up.
-
Click Close.
-
Select the Expand symbolic links of subclient content check box and then click Discover.
The data paths to which the symbolic links in the data contents are pointing will be displayed in contents of subclient.
-
Click OK.
Enabling Backup of Symbolic Link Contents on a Client
Symbolic links are backed up by default when they are part of subclient content. In addition to symbolic links, you can enable back up of data pointed by symbolic links that are present under the subclient content path but reside outside the content path.
For example, consider a subclient with content as /home/user having symbolic links under this directory:
/home/user/lib->/usr/lib/
/home/user/commonProfile.rc->/etc/commonProfile.rc
When you enable the option, symbolic links as well as the data they are pointing to will be backed up, i.e., the data content of the directories, /user/lib and /etc/commonProfile.rc is backed up.
Note that data will be backed up unless there is another subclient with content covering the path the symbolic link is pointing to; if the other subclient is not scheduled for backup, loss of data due to user error will occur.
Use the following steps to enable backup of data pointed by symbolic links:
-
From the CommCell Browser, navigate to Client Computers.
-
Right-click the <Client> and click Properties.
-
Click Advanced and then click Additional Settings tab.
-
Click Add.
-
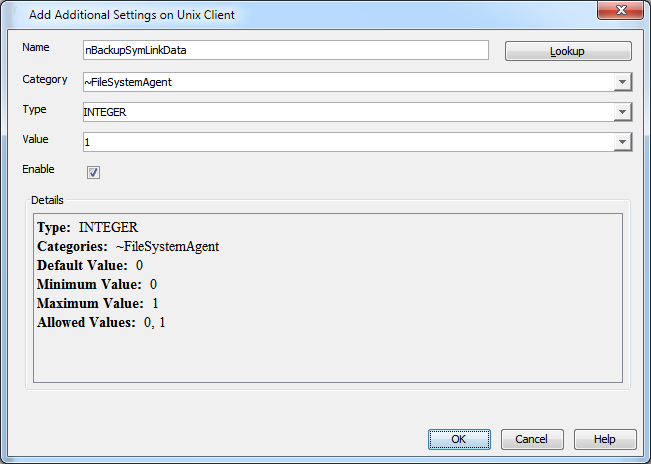
In the Name box, type nBackupSymLinkData.
The Category and Type fields are automatically populated.
Alternatively, you can click Lookup and search for the additional setting using the Find box.
-
In the Value field, type 1.
-
Click OK.
Tip
Duplicate links and certain kinds of circular links (e.g., /a/b/c/d -> /a/b) are excluded from the subclient content automatically.
Creating a Subclient to Back Up Raw Devices
You can create subclients to backup block and character raw devices. You can include raw device files referenced by one or more symbolic links in the subclient content. The following should be noted:
-
Use character device files instead of block device files for achieving better backup and restore performance.
-
Raw devices are backed up using full backups.
-
Raw device backups are not restartable. Hence, it is recommended to run these backups under high priority.
-
Number of bytes backed up is always displayed as 0 on the CommCell Console even for a successful backup. However, the correct number of backed-up bytes is displayed in the Job History.
-
For consistent backups, unmount the volumes before you perform a backup of the raw devices.
-
From the CommCell Browser, navigate to Client Computers | <Client> | File System.
-
Right-click the Backup Set, point to All Tasks and then click New Subclient.
-
In the Subclient Name box, type a name.
-
Click the Storage Device tab.
-
In the Storage Policy list, click a storage policy name.
-
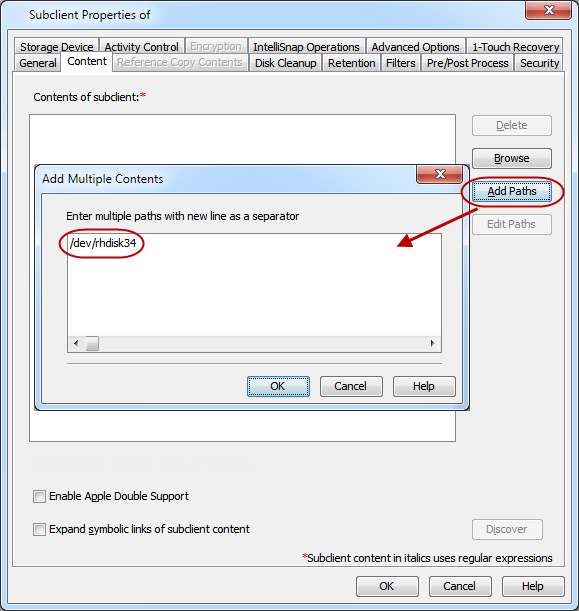
Click the Content tab.
-
Click Add Paths.
-
Type the raw device path (e.g., /dev/rhdisk34).
-
Click OK.
-
Click OK to close the Subclient Properties dialog box.
Synchronizing Data on the Disk and the Index
Starting Service Pack 10, the synchronization of data on the source disk and the index (reconcile backups) runs automatically. This topic describes how you enable this feature for upgraded clients or subclients.
After you enable this feature, the subsequent archive job compares and identifies the missing files from the subclient content on the disk and the index. The missing files are then included in the archive job.
A scenario that might result in the discrepancy is a cut and paste operation on a file that does not change the modified time of the file. As a result, when you use the recursive scan method, the file is not picked up during the archive operation.
Notes
- We recommend that you upgrade the client and the CommServe computer to the latest service pack version. You can also enable this feature using the subclient policy.
If the synchronization operation picks up any missing files, then the incremental job is linked to the synthetic full backup. As a result, when an auxiliary copy operation runs for the synthetic full backup, the incremental job is also copied.
Before You Begin
-
You must have Indexing Version 2 on your client computer.
-
This feature is not selected by default on upgraded clients and subclients created using the command line interface.
-
Until you run a new archive cycle, the previous cycles are not pruned. If you want to prune the previous archive cycles, then disable the Retain jobs in previous cycle until Source Files and backup index are synchronized in latest cycle parameter.
-
This feature is not supported on the following subclients:
-
Subclients that have only archiver retention enabled
-
Days-based retention subclients
-
Procedure
-
From the CommCell Browser, expand Client Computers > client > File System > backup_set.
-
Right-click the appropriate subclient and click Properties. The Subclient Properties dialog box appears.
-
In the Subclient Properties dialog box, specify the basic settings for the subclient:
-
In the Subclient name box, type the name of the subclient.
-
On the Content tab, add the content to be backed up.
-
Click Advanced.
The Advanced Properties dialog box appears.
-
On the Advanced Options tab, verify if the Reconcile Backup check box is selected.
Note: If you experience slowness in scan time after you enable this option, create the bIgnoreTrueUpChangeTimeCheck additional setting on the client computer. For instructions on adding the additional settings from the CommCell Console, see Add or Modify an Additional Setting.
-
In the Every n days from the previous backup job box, enter the number of days after which any archive job will automatically synchronize the missing files.
You must specify a minimum value of 7 days else the value is automatically set to a default value of 30 days.
Note: By default, the reconcile backup operation runs after every incremental job that runs after a synthetic full backup.
-
Click OK.
-
On the Storage Device tab, in the Storage Policy list, click a storage policy name to associate with the subclient.
Tip: To create a new storage policy, click Create Storage Policy and follow the instructions in the storage policy creation wizard.
-
Click OK.
-
Treating Wildcards as Characters
If a path or a file contains wildcards in its name, use the following steps to specify such content without treating them as wildcards.
Note
Filter strings are case-sensitive.
-
From the CommCell Browser, navigate to Client Computers | <Client> | File System | Backup Set.
-
Right-click the Backup Set, point to All Tasks and then click New Subclient.
-
In the Subclient Name box, type a name.
-
Click the Storage Device tab.
-
In the Storage Policy list, click a storage policy name.
-
Click the Content tab.
-
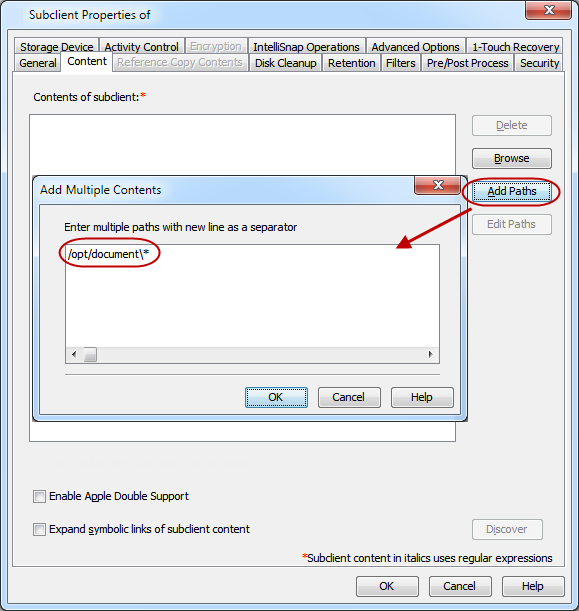
Click Add Paths, and type the path.
For Example, if the path is /opt/document*, then specify the path as
/opt/document\*
-
Click OK.
Configuring Backups for Recently Modified or Changed Data
You can configure backups only for the data that has been modified or changed after a specified date. This option is useful if you need to filter out data that was modified before a certain date.
Note the following before configuring backups for recently modified or changed data.
-
After enabling the date option for an existing subclient if you do not run a full backup, the data filtered out based on date rule will be marked as deleted.
-
After moving the date forward for a configured subclient if you do not run a full backup, the data backed up by the previous jobs will be marked as deleted.
-
A full backup is mandatory after disabling the date option or after moving the date backward.
-
This option is applicable to file system backups and laptop backups only.
-
From the CommCell Browser, navigate to the <CommServe>.
-
Right-click the <CommServe>, and then click Properties.
-
On the CommCell Properties dialog box, click the Additional Settings tab.
-
Click Add.
-
On the Add Additional Settings on Windows Client dialog box, perform the following:
-
In the Name box, type bAllowBackupFilesCreatedOrModifiedOnAfter. The Category and Type details will be automatically populated.
Alternatively, you can click Lookup and search for the additional setting using the Find box.
-
In the Value box, select TRUE.
-
Click OK.
-
-
Click OK to close the CommCell Properties dialog box.
-
Restart the CommCell Console.
-
From the CommCell Browser, navigate to Client Computers | <Client> |File System| <Backup Set>.
-
Right-click the <Subclient>, and then click Properties.
-
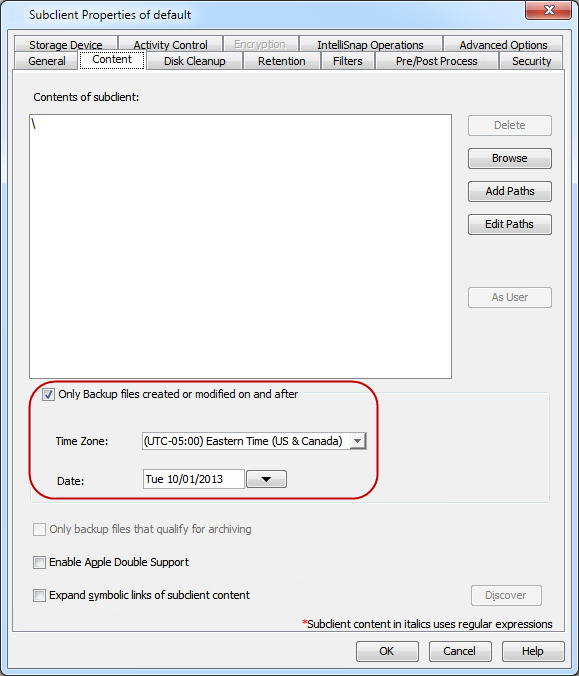
On the Subclient Properties of <Subclient> dialog box, click the Content tab.
-
Select the Only Backup files created or modified on and after check box.
-
In the Time Zone box, select the time zone.
-
In the Date box, type or select the date after which the data modified or changed has to be backed up.
-
Click OK.
Configuring Backups for Hard Links
By default, hard links are ignored during backups and the data is duplicated thus taking up additional storage space. You can prevent such data duplication when backing up hard-linked files and also preserve hard links during restores using the following steps.
-
From the CommCell Browser, navigate to Client Computers.
-
Right-click the <Client>, and then click Properties.
-
Click Advanced and then click Additional Settings tab.
-
Click Add.
-
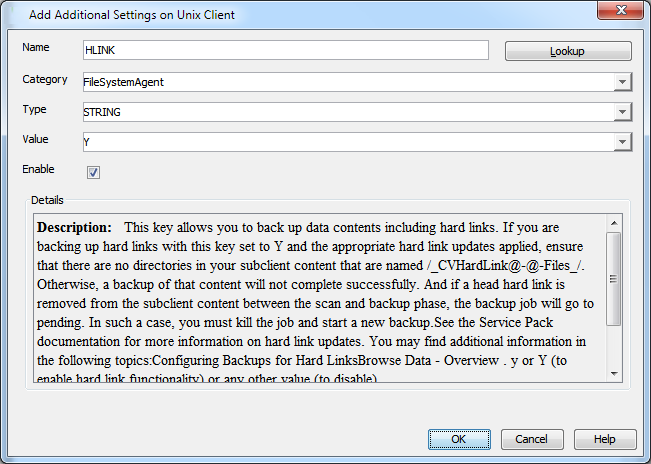
In the Name field, type HLINK.
The Category and Type fields are populated automatically.
-
In the Value field, type Y.
-
Click OK.
Configuring Backups for NFS-Mounted File Systems
By default, the NFS-mounted file systems are not included in the subclient unless they are explicitly included in the content or the ignoreFSType additional setting is used.
To configure the ignoreFStype additional setting, see Enabling Backups for Skipped File Systems for more information.
Use the following steps to add the NFS-mounted file system mount point to the subclient content:
-
From the CommCell Browser, navigate to Client Computers | <Client> | File System | Backup Set.
-
Right-click the <Subclient> in the right pane, and then click Properties.
-
Click the Content tab.
-
Click Browse.
-
Select the NFS mount point to be included in the backup.
-
Click Add.
-
Click Close.
-
Click OK.
Configuring Backups for Locked Files
Files with advisory locks are backed up by default. However, files with mandatory locks are skipped during backups. Use the following methods to configure the backups of files with mandatory locks.
Enabling Backups of Locked Files
-
You can ignore the file lock detection and back up the files with mandatory locks using the following steps: Log on to the CommCell Console.
-
On the CommCell Browser, right-click the <client computer> and click Properties.
-
Click Advanced.
The Advanced Properties dialog box appears.
-
Click the Additional Settings tab, and click Add.
The AddAdditional Settings dialog box appears.
-
In the Name box, type sSKIPLOCKF.
-
In the Category box, select FileSystemAgent.
-
In the Type box, select String.
-
In the Value box, type Y.
-
Click OK.
The additional setting appears in the list on the Additional Settings tab.
-
Click OK.
Configuring Backups for Mac Files
By default, the File System iDataAgent backs up Mac files on a shared mount point. During these backups, if the data on the Mac file system share are Apple Double formatted files, they are backed up as two separate files.
Use the following steps to backup the Apple Double formatted Mac files as a single file:
-
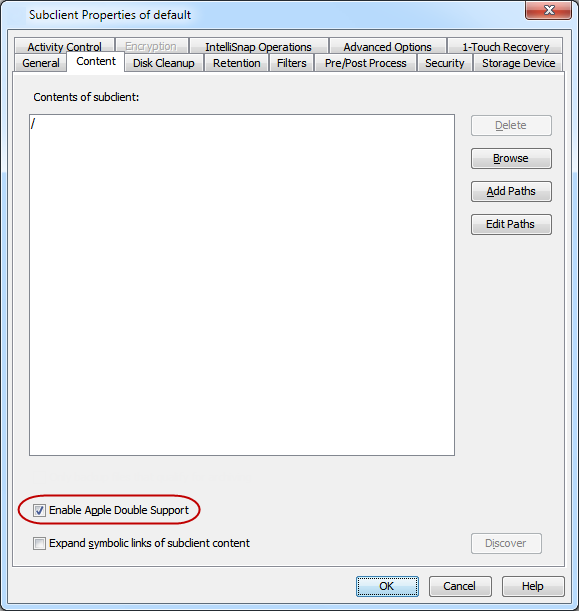
From the CommCell Browser, navigate to Client Computers |<Client> | File System | Backup Set.
-
Right-click the <Subclient> in the right pane and click Properties.
-
Click the Content tab.
-
Select the Enable Apple Double Support check box.
-
Click OK.
Configuring the Locale for Non-ASCII Characters
To backup and restore files containing non-ASCII (international) characters appropriate locale has to be configured in the server. Once configured, these settings enable you to do the following:
-
Back up files with names containing non-ASCII characters.
-
Restore file names containing non-ASCII characters without distortion.
-
Properly display files with non-ASCII characters when browsing subclient content or backup data
The following steps use the example of KOI-8R character encoding scheme to store the files with Russian names.
-
Logon to the client as root and stop the Services.
commvault stop -
Run the locale command (with no options) to determine which locale is currently set on the server. A sample output is shown in the example.
Example:
LANG=en_US.iso885915
 LC_CTYPE="en_US.iso885915"
 LC_NUMERIC="en_US.iso885915"
 LC_TIME="en_US.iso885915"
 LC_COLLATE="en_US.iso885915"
 LC_MONETARY="en_US.iso885915"
 LC_MESSAGES="en_US.iso885915"
 LC_ALL=
This output shows that the en_US.iso885915 locale for the LANG environment variable is currently set.
-
Use the LC_CTYPE environment variable to set the desired locale.
Example:
LC_CTYPE=ru.koi8-r; export LC_CTYPE -
Run the locale command. A sample output is shown in the example.
Example:
LANG= en_US.iso885915 LC_CTYPE="ru.koi8-r" LC_NUMERIC="ru.koi8-r" LC_TIME="ru.koi8-r" LC_COLLATE="ru.koi8-r" LC_MONETARY="ru.koi8-r" LC_MESSAGES="ru.koi8-r" LC_ALL= -
Start the Services.
commvault start
A properly configured system will have the correct locale set in one of the operating system startup scripts (e.g., /etc/profile). In case you do not want to change the locale for the entire system, you may make the changes to the Commvault startup scripts by editing the /opt/commvault/galaxy_vm file
Example:
LC_CTYPE=ru.koi8-r
 export LC_CTYPE
Restart the server to allow the agent to start with the correct locale settings.
Configuring Backups for Automatically Skipped File Systems
By default, the following file systems are automatically skipped during backups:
-
nfs
-
nfs3
-
nfs4
-
floppy
-
cdfs
-
proc
-
autofs
-
lofs
-
ctfs
-
tmpfs
However, you can include them in the backups using one of the following methods:
Enabling Backups for Skipped File Systems
By default, the default subclient includes all the data in the client. However, the above mentioned file systems are not included in the backups. Use the following steps to include the skipped file systems in the default subclient.
-
From the CommCell Browser, navigate to Client Computers.
-
Right-click the <Client>, and then click Properties.
-
Click Advanced and then click Additional Settings tab.
-
Click Add.
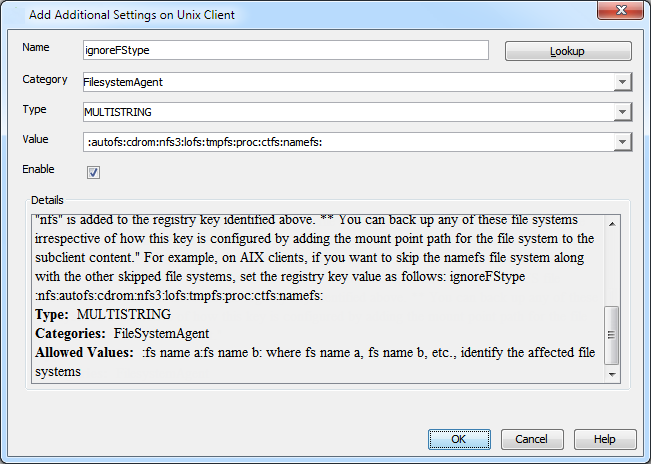
-
In the Name box, type ignoreFStype.
The Category and Type fields are populated automatically.
-
In the Value box, type :autofs:cdrom:nfs3:lofs:tmpfs:proc:ctfs:namefs:.
-
Click OK.
Adding the Skipped File System to Subclient Content
-
From the CommCell Browser, navigate to Client Computers | <Client> | File System.
-
Right-click the Backup Set, point to All Tasks, and then click New Subclient.
-
In the Subclient Name box, type a name.
-
Click the Storage Device tab.
-
In the Storage Policy list, select a Storage Policy name.
-
Click the Content tab.
-
Click Browse.
-
Select the skipped file system data to be backed up and click Add.
-
Click Close.
-
Click OK.
Configuring Filters for Backups
You can set filters to prevent specific data from being backed up. Typically, you can use filters to exclude certain system-related files and database application files which consistently fail during a backup operation.
The .snapshot directories under the root of all the volumes are automatically filtered to avoid duplicate backups.
To exclude application files from backups, see Excluding Application Files from a UNIX File System Backup.
Filtering Files from a Backup
Subclient-level backup filters are available for the File System iDataAgent to exclude specified directories and files from being backed up. Follow the steps given below to configure filters on a subclient:
-
From the CommCell Browser, navigate to Client Computers | <Client> | File System | Backup Set.
-
Right-click the Subclient in the right pane and then click Properties.
-
Click the Filters tab.
-
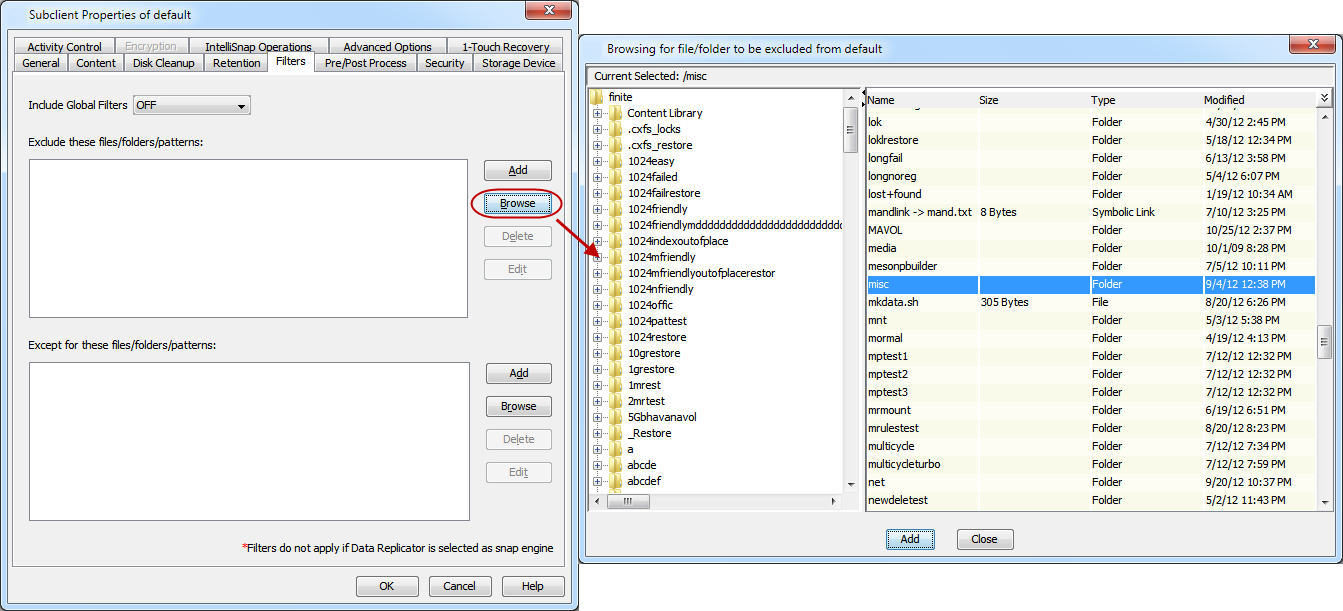
Under Exclude these files/folders/patterns, click Browse.
-
Click the file, folder, or directory that you want to exclude from backup operations and click Add.
-
Optionally, click Add under Exclude these files/folders/patterns and type the path to files and folders that you want to exclude. You can also enter patterns of files or folders using wild cards.
You cannot enter Escape sequence to specify the path or file name.
-
Click Close.
-
Click OK.
Important: If you exclude files that were backed up or archived already, then the subsequent incremental backup operation will mark the file as deleted in the index. The file might be dropped from the synthetic full backup based on your subclient retention settings and storage policy retention settings.
Files and Folders Filtered Automatically from Backups
The following snapshot directories are excluded from the archive operation automatically.
-
\\*\*\**\~snapshot\***
-
\\*\*\**\.snapshot\***
-
\\*\*\**\~SNAPSHT\***
Add the <BIF,-Snapshots> to subclient filter to include the snapshot directories in the archive operation.
Supported Wildcards
You can use the following wildcards to specify the files to be filtered.
|
Wildcards |
Description |
Examples |
|---|---|---|
|
* |
Any number of characters. This wildcard is used in the following scenarios:
|
|
|
? |
Any one character.
|
|
|
[] |
Set or range of characters. |
|
|
[!] |
The negation of a set or range of characters. You can use the wildcard in the following scenario: filter all files in a directory except the files for which the name starts with any character from the specified set or range of characters. |
/root/[!AEIOU]*.doc filters all .doc files in the /root directory that start with a letter other than A, E, I, O, or U. |
|
** |
Matches any directory level. |
|
|
*** |
Matches any directory level, including the parent directory |
|
Notes:
-
When you use wildcards to specify the subclient content, the content path appears in Italics.
-
If you want all the files with the file extension ".doc" to be filtered from any level, then specify the content as "*.doc". If any subclient content does not start with a forward slash (/), then "/**/" will be prefixed to the content to match at any level. For example: "*.doc" will become "/**/*.doc".
-
If you wants to treat the asterisk (*), question mark (?), and square brackets ([ ]) as literal, and not as wildcards, then add a forward slash (\) before the wildcard. For example: /Report\[2011-2012\]/*.doc will filter all the .doc files under /Report[2011-2012]
-
More than one type of wildcard can be used when specifying subclient content. For example: /Dcvol?/oracle[1-47]/**/*.log).
On newly installed UNIX clients, a wildcard path with a single trailing "*" filters only the files and not the subdirectories. For more information about the wildcard behavior, see Example of UNIX Filters.
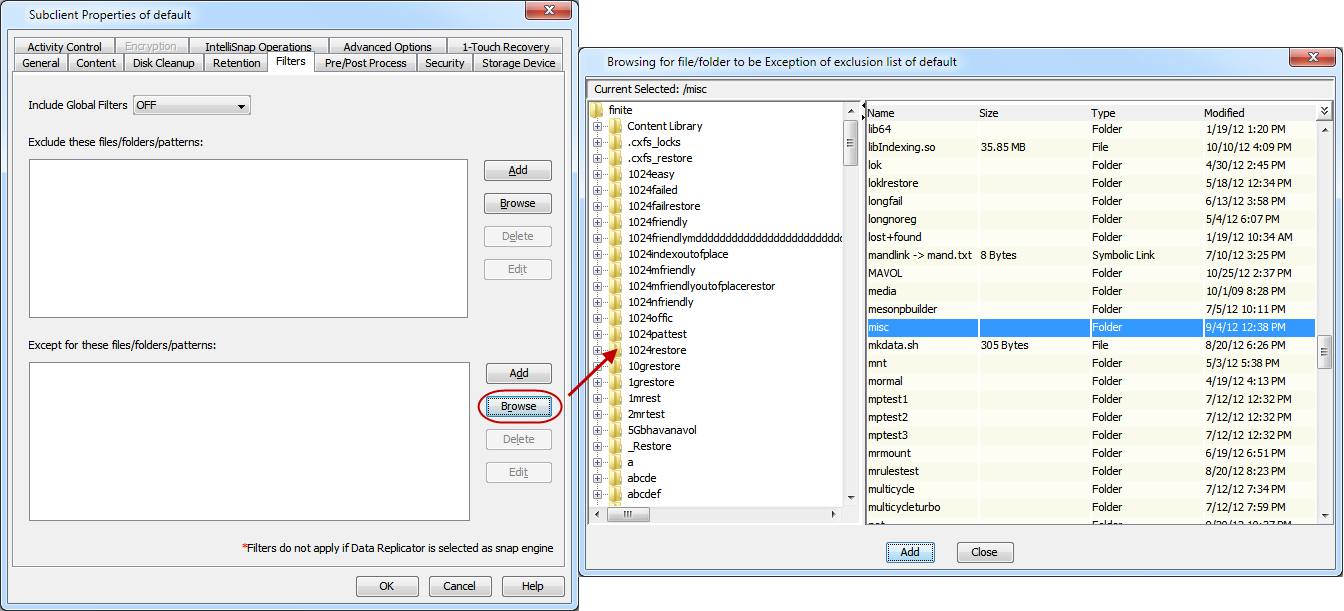
Configuring Exclusions to Filters
Once you set the filters, you can also provide exceptions for the filters. The files or folders added to the exception list will be included in the backup operations. For example, if you want to exclude from your back up operation all the files in the /Ops directory except the Maintenance file. You can add a subclient filter to exclude the /Ops directory from being backed up and also provide an exception to allow the Maintenance file to be backed up.
On newly installed UNIX clients, a wildcard path with a single trailing “*” allows exception to exclusion of only the files and not the subdirectories.
-
From the CommCell Browser, navigate to Client Computers | <Client> | File System | Backup set.
-
Right-click the <Subclient> in the right pane and click Properties.
-
Click the Filters tab.
-
Under Except for these files/folders/patterns, click Browse.
-
Click the file, folder, or directory that you want to include in the backups and then click Add.
-
Click Close.
-
Click OK.
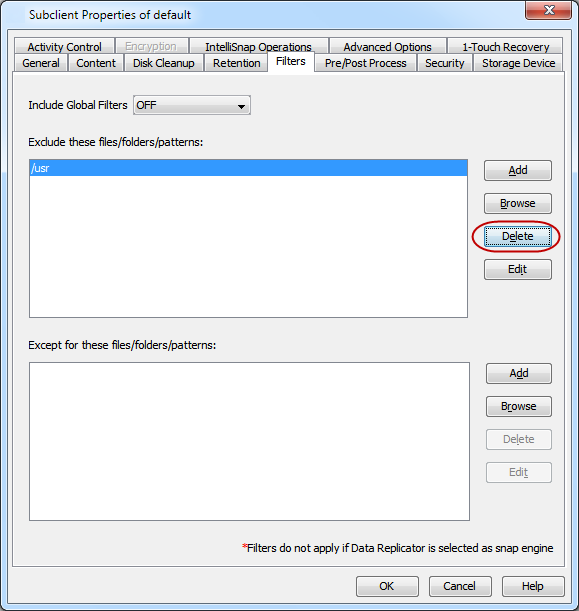
Deleting a Filter
-
You can remove a filter by deleting it from the exclusion list. From the CommCell Browser, navigate to Client Computers | <Client> | File System | Backup set.
-
Right-click the <Subclient> in the right pane, and then click Properties.
-
Click the Filters tab.
-
Under Exclude these files/folders/patterns, select the filter that you want to delete.
-
Click Delete.
-
Click OK.
Configuring User Impersonation for Restricting Backups for End-Users
The File System agent can be installed as a root user or a non-root user.
If the File System agent is installed as a non-root user, then the Commvault end-users can back up only those files or folders for which they have permissions. End-users will not be able to back up data for all users. Non-root user installation is suitable for backing up databases.
If the File System agent is installed as a root user, then the Commvault end-users can back up and restore data for any UNIX user (any path).
To enhance security, you can use backup impersonation to restrict the end-users to back up only those files or folders for which they have permissions.
With impersonation for backups, each end-user must configure the login credentials in the subclient which will be used to back up the content on the client. If the login credentials do not match, the job fails. Since the backup job runs with the credentials provided by the end-user, backup is restricted to the permissions of the impersonated user.
Support
With Service Pack 9 or later, impersonation for backups is supported also on client computers with Indexing Version 2. For more information on Indexing, see Indexing: Overview.
Before You Begin
-
The Commvault admin user must configure a global parameter on the CommServe to enforce impersonation for backups, see Enabling User Impersonation for Backups.
Note: Configuring the global parameter enforces impersonation for all File System clients. The existing backups fail if the login credentials are not set.
-
The Commvault end-user is a user with no In Place Recovery permission. Each end-user has access to only the associated backup sets. The end-user cannot access data for other users. However, Commvault admin user will have access to all backup sets. The defaultBackupSet must be restricted only to the Commvault admin user because the Commvault admin user can run jobs without impersonation and back up the entire file system data. Also, the end-user can run only file system backups, and cannot use OnePass for UNIX File Systems, IntelliSnap for UNIX, and Scan Optimization features. For information on end-user permissions required for backup impersonation, see End-User Permissions Requirement for Backup Impersonation.
-
For end-users, client browse is disabled.
-
The end-user can also run the backup job from the client without having to provide the credentials. The logged-in user ID will be stored and used for impersonation during backups. End-users can use the command line to perform backups only on the source client. If the backups are run from other clients, backups will fail if the credentials are not passed in the input XML file.
Procedure
You can run backups with user impersonation using one of the following methods:
From the CommCell Console
-
From the CommCell Browser, expand Client Computers > client > File System > backup set.
-
Right-click the appropriate subclient and click Properties.
The Subclient Properties dialog box appears.
-
Specify the basic settings for the subclient:
-
On the Content tab, add the content to be backed up.
-
Click As User and enter the user name and password, and then click OK.
Note: The As User option for an On-Demand subclient is present in the Backup Options dialog box.
-
On the Storage Device tab, in the Storage Policy list, click a storage policy name. To create a new storage policy, click Create Storage Policy and follow the instructions in the storage policy creation wizard.
-
Select additional options as appropriate and click OK.
-
From the Command Line
When you run the backup from the command line, the logged-in user ID is used for impersonation. If the user account is also defined in the subclient, then the subclient user credential will take precedence and it will be used for the backup job.
-
For more information on running command line backup on a regular subclient, see Command Line Backup - UNIX and Linux File Systems.
-
For more information on running command line backup on an on-demand backup set, see On-Demand Data Protection Operations.
Configuring Retention for Deleted Items
You can specify the time period for which you want to retain the deleted files in the backup cycle. The deleted file is available for browse and restore from the latest backup cycle.
About This Task
Consider the following guidelines or limitations:
-
Files that are moved from one subclient to another are also considered as deleted files, and the subclient retention settings apply to those files as well.
-
By default, deleted files are retained until the retention criteria for the associated storage policy is applied against the deleted files.
-
Files retained by the subclient retention policy are carried forward in backup storage by synthetic full jobs. When you run the synthetic full backup at the end of specified retention period, the deleted files are no longer carried forward for retention.
-
If a full backup is run during the retention period, the deleted files may get removed earlier from the backup cycle.
Before You Begin
Review Data Aging-Overview and Data Aging - Getting Started before you set the retention for your subclient.
Procedure
-
From the CommCell Browser, expand Client Computers > client > File System > backup_set.
-
Right-click the subclientfor which you want to modify retention options,and then click Properties.
The Subclient Properties dialog box appears.
-
Click Advanced.
The Advanced Subclient Properties dialog box appears.
-
On the Retention tab, specify the retention criteria, select the Extend storage policy retention check box. For more information about the retention options see Retention Options for Deleted Files
Note: If you are upgrading from the previous version to the current version, see Transitioning from a Previous Version to the Current Version.
-
Click OK.
Result
When a synthetic full backup is run, the subclient retention policy applies to the deleted or moved files.
Retaining Additional Versions of a File during Synthetic Full Jobs
You can retain additional versions of your file, including the latest version, when you perform a synthetic full backup.
By default, the latest version of files are included in the synthetic full backup. You can also choose to keep the older version of the files for a specific number of days.
Procedure
-
From the CommCell Browser, expand Client Computers > client > agent > backup_set.
-
Right-click the subclient, and then click Properties.
The Subclient Properties dialog box appears.
-
Click Advanced.
-
The Advanced Subclient Properties dialog box appears.
-
On the Retention tab, Older file versions area, select one of the following options:
-
Keep older versions for n years n months, and n days
Type a value for the time period for which you want to retain the older versions of the file. All data-stub pairs and specified versions of the data are retained for the specified time period.
-
Keep n versions
Type a value for the number of versions you want to retain, starting from the latest back up. If you clear the Keep n versions check box, all data-stub pairs and the latest version of the data is backed up.
-
-
Click OK.
Configuring File Level Information for a Subclient
File Level Analytics provides granular file level details of files in the backup. The granular details include information like file size, file access time, file modified time, etc. For detailed Information on File Level Analytics see, File Level Analytics documentation.
Use the following procedure to configure the collection of file level details for a subclient during backups:
-
From the CommCell Browser, expand Client Computers > client> File System >backup_set.
-
Right-click the appropriate subclient and click Properties.
-
In the Subclient Properties dialog box, click Advanced.
-
In the Advanced Subclient Properties dialog box, click the Advanced Options tab.
-
On the Advanced Options tab, enable collection of file level details:
-
Select the Catalog additional file and system attributes check box
-
Click OK.
-
-
Click OK.
Enabling Optimized Scan for HP-UX File System iDataAgent
Optimized Scan is performed when you run a backup for any subclient. The .DATACLASS_nn directory contains the optimized scan meta data. By default, the .DATACLASS_nn directory is excluded from backups.
If a subclient contains a volume that is not added to the monitored volumes list, a recursive scan is performed for that volume.
Use the following procedure to enable Optimized Scan:
-
From the CommCell Browser, expand Client Computers > client > File System > backup_set.
-
Right-click the appropriate subclient and click Properties.
-
In the Subclient Properties dialog box, click Advanced.
-
In the Advanced Properties dialog box, click the Advanced Options tab.
-
Click Optimized Scan and then click OK.
-
Click OK.
For more information, see Optimized Scan for Unix.
Configuring the Kernel Parameters
The File System iDataAgent uses the operating system's kernel resources, such as shared memory, semaphores, etc., to perform data protection and recovery operations. If you are using an earlier version of the operating system, you can optimize the usage of these resources by setting the kernel parameter values.The following table displays the possible range of values for each parameter:
|
Parameters |
Description |
Possible Range of Values |
|---|---|---|
|
SEMMNI |
Defines the maximum number of semaphore sets in the entire system. |
1 - 65535 |
|
SEMMAP |
Defines the maximum number of semaphore map entries. |
1 - 65535 (SEMMNI + 2) |
|
SEMMNS* |
Defines the maximum semaphores in the system |
1 - 2147483647 [MAXINT] (Default value 128 is too low.) |
|
SEMVMX |
Defines the maximum value of a semaphore |
32768 |
|
SHMMNI* |
Defines the maximum number of shared memory segments in the entire system |
1 - 2147483647 [MAXINT] |
|
SHMMAX |
Defines the maximum allowable size of one shared memory segment |
0 - 4294967295 (Available physical memory); recommended value is 2147483648 |
|
SHMSEG* |
Defines the maximum number of shared memory segments that one process can attach |
0 - 32767 |
|
SEMMNU |
Defines the maximum number of System V IPC system-wide processes that can have "undo" operations pending at any given time. |
1 - (nproc-4) [256]; preferred value: 1024 |
Use the following steps to modify the kernel parameters with System Administrator Menu (SAM) for HP-UX File System:
-
From the UNIX prompt, enter the command to open the System Administrator Menu (SAM).
#sam
-
In the SAM utility window, double-click the Kernel Configuration icon.
-
Double-click the Configurable Parameters icon. SAM will display a screen containing a list of configurable parameters, including current and pending values.
-
Double-click on the parameter you wish to change.
-
Click New Formula/Value option and type the recommended value.
-
Click OK.
-
Restart the computer to allow the changes to take effect.
System Management Homepage (SMH) is the new tool introduced to manage HP-UX. Use the following steps to modify the kernel parameters using System Management Homepage (SMH) since the System Administration Manager (SAM) is deprecated in the current releases of HP-UX:
-
From the UNIX prompt, enter the command to open the System Management Homepage (SMH) window.
#smh -
In the SMH Text User Interface, select k -Kernel Configuration and press Enter.
DISPLAY variable is not set. Starting the Text User Interface. Please wait...HP-UX System Management Homepage (Text User Interface) SMH ---------------------------------------------------------- a - Auditing and Security c - Auditing and Security Attributes Configuration(new) d - Peripheral Devices e - Resource Management f - Disks and File Systems g - Display k - Kernel Configuration l - Printers and Plotters(new) m - Event Monitoring Service n - Networking and Communications p - Printers and Plotters s - Software Management u - Accounts for Users and Groups ---------------------------------------------------------- x-Exit smh w-WebLaunch 1-Help ENTER-Launch Functional Area v-SAM Log Viewer -
Select the t - Tunables toview a list of configurable parameters, including current and pending values and press Enter.
SMH->Kernel Configuration ---------------------------------------------------------- t - Tunables View or modify kernel tunables m - Modules View or modify kernel modules and drivers a - Alarms View or modify alarms for kernel tunables l - Log Viewer View the changes made to kernel tunables or modules u - Usage View usage of kernel tunables c - Manage Configuration View the options available to manage configuration b - Restore Previous Boot Values Restores Previous Boot Values for Tunable <-----------------------------------------------------------------------> x-Exit smh ENTER-Select ESC-Back 1-Help -
Select the parameter you wish to change and press Enter. For Example, select semmni parameter.
SMH->Kernel Configuration->Tunables (All) ---------------------------------------------------------------------------- Tunable Tuning Current Next Boot Default Usage Module Capability Value Value Value ===================================================================== semaem Static 16384 16384 16384 - pm_usync semmni Static 2048 2048 2048 1.4% pm_usync semmns Static 4096 4096 4096 3.7% pm_usync semmnu Static 256 256 256 - pm_usync semmsl Dynamic 2048 2048 2048 - pm_usync semume Static 100 100 100 - pm_usync semvmx Static 32767 32767 32767 - pm_usync shmmax Dynamic 1073741824 1073741824 1073741824 3.1% vm_asi shmmni Dynamic 400 400 400 2.2% vm_asi shmseg Dynamic 300 300 300 - vm_asi --------------------------------------------------------------------- x-Exit smh ESC-Back p-Pending b-Restore Previous Boot Values 2-kctune Manpage /-Search ENTER-Details m-Modify d-Dynamic 1-Help 3-Tunable Manpage -
Press m to modify the selected parameter.
-
Use the following formula to calculate the value for the SEMMSL parameter:
-
Non-MediaAgent:
SEMMSL = 1 * maximum_number_of_parallel_data_transfer_operations
-
MediaAgent:
SEMMSL = 12 * maximum_number_of_parallel_data_transfer_operations
-
-
Use the following formula to calculate the value for the SEMMNS parameter:
SEMMNS = SEMMSL * SEMMNI
SMH->Kernel Configuration->Tunables (All)->Details
 Details : semmni
 ---------------------------------------------------------------------------------
 Tunable semmni
 ==============================================================================
 Description Maximum number of semaphore sets on the system
 Dynamic no
 Subsystem pm_usync
 Default Value 2048
 Current Value 2048
 Planned Value 2048
 Last Boot Value 2048
 Constraints semmni >= 2
 Constraints semmni <= 32767
 Constraints semmni <= semmns
 Auto Tuning Not Supported
 Current Usage 28
 ----------------------------------------------------------------------------------
 x-Exit smh m-Modify ESC-Back 1-Tunable Help
-
-
Specify the following:
-
Type the new parameter value in New setting [Expression/value]
-
Type the new evaluated value for expression if needed in New setting [evaluated] or select Recalculate and press Enter.
-
Select Yes to backup the current configuration before applying the change.
-
Type the reason for modification in Reason for Change.
-
Select Modify and press Enter.
SMH->Kernel Configuration->Tunables (All)->Details->Modify
 ------------------------------------------------------------------------
 Tunable semmni
 Description Maximum number of semaphore sets on the system
 Module pm_usync
 Current Value 2048 [Default]
 Value at Next Boot 2048 [Default]
 Value at Last Boot 2048
 Default Value 2048
 Constraints semmni >= 2
 semmni <= 32767
 semmni <= semmns
 Can Change At Next Boot Only
 NOTE: If the new Value is specified as Default, the next boot value
 will be default value for the tunable as recommended by HP.
 However, if the tunable is being autotuned then the value assigned
 will be determined dynamically by kernel during run-time.
 New setting[Expression/Value]: ___________________
 New setting (evaluated): ___________________
 [ Recalculate ]
 Back up the current configuration before applying change: (X) Yes ( ) No
 Reason for change : _______________________________________
 [ Modify ] [ Preview ] [ Cancel ]
 ------------------------------------------------------------------------
-
-
A Confirmation window will be displayed warning you that the requested changes have been saved and will take effect at next boot. Press Enter to continue.
SMH->Kernel Configuration->Tunables (All)->Details->Modify ---------------------------------------------------------------------------------- mount: ignoring incomplete/incorrect entry for /dev/dsk/c0t0d0 in /etc/fstab NOTE: The requested changes could not be applied to the currently running system, for the following reasons: - The tunable 'semmni' cannot be changed without a reboot. * The requested changes have been saved, and will take effect at next boot. Tunable Value Expression semmni (now) 2048 Default (next boot) 2048 2048 mount: ignoring incomplete/incorrect entry for /dev/dsk/c0t0d0 in /etc/fstab Command Successful press Enter Key to continue -
Restart the computer.
Configuring Multiple Streams for Backups
File System Multi-Streaming employs multiple data streams per subclient for data protection operations. This enables the subclient's contents to be distributed to all the streams, transmitting them in parallel to the storage media. Hence a subclient whose data is secured using three data streams, utilizes more of the available network resources, and can complete in as little as one third the time that the same data would require using a single stream.
Note that, you do not have to enable multi-streaming if you have multiple mount points pointing to the same physical drive.
Before enabling multi streaming, ensure that you can use multi-streaming when you restore the data and create an auxiliary copy. Restores by jobs use the same number of streams that you configure for the subclient. For more information on restoring by jobs, see Restore by Jobs.
Follow the steps given below to configure multi-streaming.
-
From the CommCell Browser, expand Client Computers > client> File System >backup_set.
-
Right-click the appropriate subclient and click Properties.
-
In the Subclient Properties dialog box, specify the basic settings for the subclient:
-
In the Subclient name box, type the name of the subclient.
-
On the Content tab, add the content to be backed up.
-
Click Advanced.
-
-
In the Advanced Subclient Properties dialog box, click the Performance tab.
-
On the Performance tab, specify the number of data streams:
-
Select the Allow multiple data readers within a drive or mount point check box
-
Enter the number of data streamsin the Number of Data Readers box.
Important: The number of streams configured in the storage policy must be equal to or greater than the value entered in the Number of Data Readers box.
-
Click OK.
-
-
On the Storage Device tab, in the Storage Policy list, click a storage policy name to associate with the subclient.
Tip: To create a new storage policy, click Create Storage Policy and follow the instructions in the storage policy creation wizard.
-
Click OK.
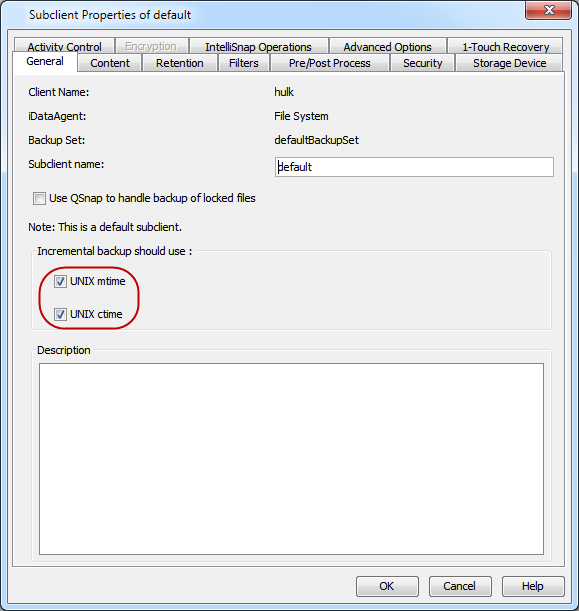
Configuring Incremental and Differential Backups Using Ctime and Mtime
Incremental and differential backups can be configured depending on the changed time. The changed time can include ctime (changes in the file properties) or mtime (changes to the data in the file). You can use ctime to include the files with their properties changed since last backup/last full backup. Similarly, you can use mtime to include the files with their data changed since last backup/last full backup.
The ctime and mtime will be applicable only for the volumes which are scanned by the Recursive Scan. When Optimized Scan is used for scanning the volumes, ctime and mtime will not be taken into account.Follow the steps given below to configure an incremental backup using ctime and mtime options.
-
From the CommCell Browser, navigate to Client Computers | <Client> | File System | Backup Set.
-
Right-click the <Subclient> in the right pane, and then click Properties.
-
Under Incremental backups should use, select the change time (ctime or mtime).
-
Click OK.
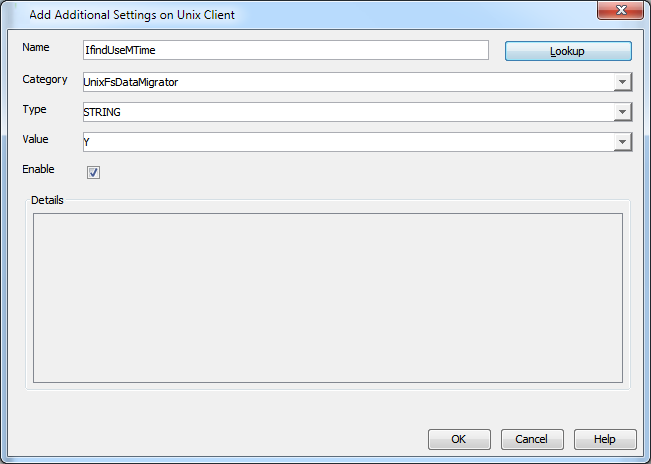
Configuring Ctime or Mtime for All Subclients
When File Archiver agent is also installed on the client, you can globally set the ctime/mtime for backups on all the subclients using the following steps:
-
From the CommCell Browser, navigate to Client Computers.
-
Right-click the <Client> and then click Properties.
-
Click Advanced and then click AdditionalSettings tab.
-
Click Add.
-
In the Name field, type ifindUseMTime.
The Category and Type fields are populated automatically.
-
In the Value box, type one of the following:
-
Y - to include mtime
-
N - to include ctime
-
-
Click OK.
Configuring Pre-processing and Post-processing for Backups
Setting Up Pre-processes and Post-processes
You can add and modify Pre-processes and Post-processes for a subclient. These are batch files or shell scripts that you can run before or after certain job phases. For example, you can use an echo command to check the level of a backup. Similarly, you can include a case statement within a script to run specific operations based on the level of the backup job.
A Save As Script file can also be run as a pre-process and post-process, if you include the absolute path of the associated input file in the script file.
See Pre-processes and Post-processes - Commands and Arguments for information on additional arguments that the CommServe sends to the Pre-processes and Post-processes.
The first line of the script must execute a command that is designed to call in the pre/post program. Ensure that you have included the appropriate command in the first line of the script.
The following is an example of a typical pre/post script:
#!/bin/bash base='basename $0' echo $0, 'date' > /extra/aah/RESULTS/$base.out exit 0
You cannot run pre-processes and post-processes for backup jobs that are complete after the scan phase. For example, if subclient content was not added or did not change since the last incremental or differential backup, the backup and archive index phases are not performed, so the backup job is complete after the scan phase.
-
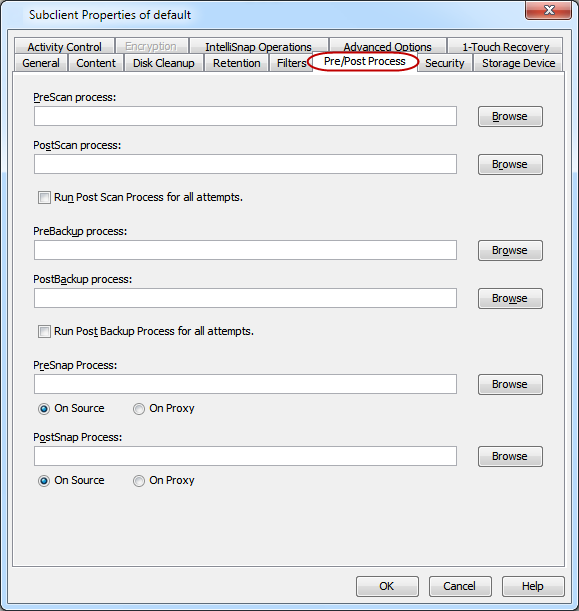
From the CommCell Browser, navigate to Client Computers | <Client> | File System | Backup Set.
-
Right-click the <Subclient> in the right pane, and then click Properties.
-
Click the Pre/Post Process tab.
-
Depending on the process you want to set up, click the corresponding Browse button.
-
Select the process and then click OK.
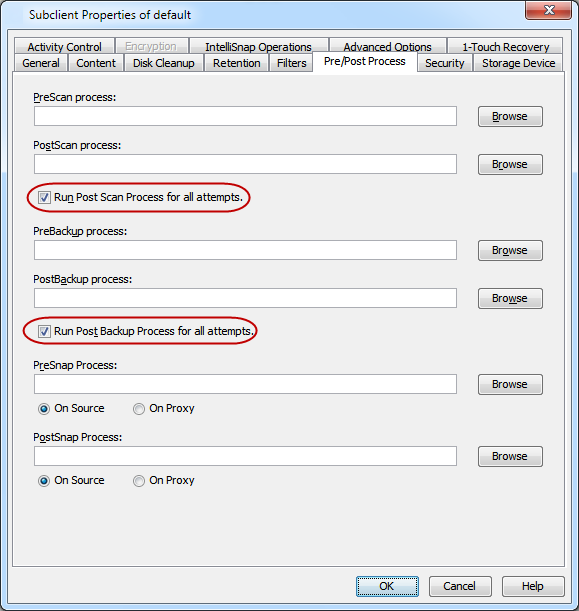
Setting Up Post-processes to Run during Failures
By default, a specified post-process command is executed only on successful completion of the scan or backup operation or if the job is killed.
Use the following steps to run a post-process even if the scan or backup operation did not complete successfully. For example, this may be useful to bring a database online or release a snapshot.
-
From the CommCell Browser, navigate to Client Computers | <Client> | File System | Backup Set.
-
Right-click the <Subclient> in the right pane, and then click Properties.
-
Click the Pre/Post Process tab.
-
Select the Run Post Scan Process for all attempts check box.
-
Select the Run Post Backup Process for all attempts check box.
-
Click OK.
Blocking Backup of Specific Files or Directories
UNIX administrators can block backup of sensitive data present on client computers irrespective of the configured subclient content, filters, exceptions, and global filters. Even Commvault administrators cannot back up or restore the blacklisted files or directories.
The UNIX administrator creates a blacklist file on the client computer with content that must be skipped from the backup jobs. The client computer uses the blacklist file as a filter.
To prevent the Commvault administrators from overwriting the blacklist file, an in-place restore operation of the blacklist file is also not supported.
Before You Begin
This feature is supported on UNIX client computers with Indexing Version 2. For more information on Indexing, see Indexing: Overview.
Procedure
-
Log on to the client computer as an Administrator.
-
Create a blacklist file /etc/cv_backup_blacklist with a list of files or directories that must be skipped from the backup jobs.
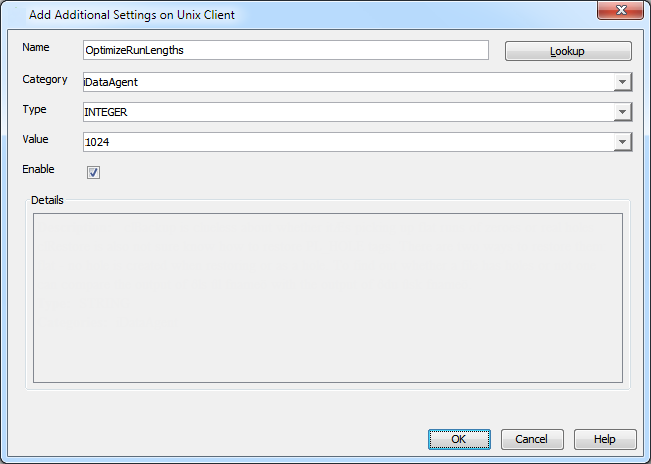
Configuring Sparse Files for Restores
The sparse files are restored by default as flat files, wherein the holes are restored as data. This will increase the disk usage. Use the following steps to restore the holes as genuine holes which will considerably reduce the disk usage.
To add or edit an additional setting, follow the steps in Add or Modify an Additional Setting.
Use these arguments:
-
In the Name box, type OptimizeRunLengths. The Category and Type details are automatically populated.
-
In the Value box, type a positive integer value that is a multiple of 1024. Any other value will be rounded off to the next multiple of 1024.
Configuring Backups for ACFS Data
ACFS Mount Point as File System Subclient Content
-
From the CommCell Browser, navigate to Client Computers | <Client> | File System.
-
Right-click the <defaultBackupset>, point to All Tasks and click New Subclient.
-
In the Subclient Properties dialog box, specify the basic settings for the subclient:
-
In the Subclient Name box, type a name.
-
On the Content tab, click Add Paths and type the path to the ACFS mount point, and then click OK..
Note: To exclude the ACFS mount point from being backed up on subclients of other nodes in the cluster, you must set filters. For more information about configuring filters, see the "Filtering Files from a Backup" section on this page.
-
-
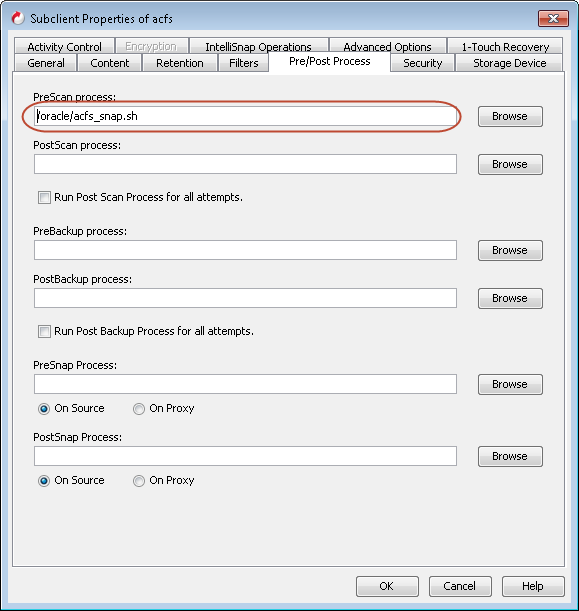
Conditional: If you want to configure a pre process, on the Pre/Post Process tab of the Advanced Subclient Properties dialog box, type or select the path to the pre-processing script.
-
On the Storage Device tab, in the Storage Policy list, click a storage policy name to associate with the subclient.
-
Click OK.
ACFS Snapshot as File System Subclient Content
Use the following steps to configure backups for Oracle ACFS data:
-
Create a pre-process script to delete any existing ACFS snapshot and create a new snapshot. In cluster environments, make sure the script is in the same location of all clustered nodes. For example:
#!/bin/sh SNAP_NAME=cv_acfs_snap ACFS_PATH=/oracle/acfs LOG_FILE="/var/log/commvault/Log_Files/cv_acfs_bkp.log" date >> $LOG_FILE acfsutil snap delete $SNAP_NAME $ACFS_PATH >> $LOG_FILE 2>&1 acfsutil snap create $SNAP_NAME $ACFS_PATH >> $LOG_FILE 2>&1 exit $? -
From the CommCell Browser, navigate to Client Computers | <Client> | File System.
-
Right-click the <defaultBackupset>, point to All Tasks and select New Subclient.
-
In the Subclient Name box, type the name for the subclient.
-
Click the Content tab.
-
Click Add Paths.
-
Type the path to the new snapshot, and then click OK.
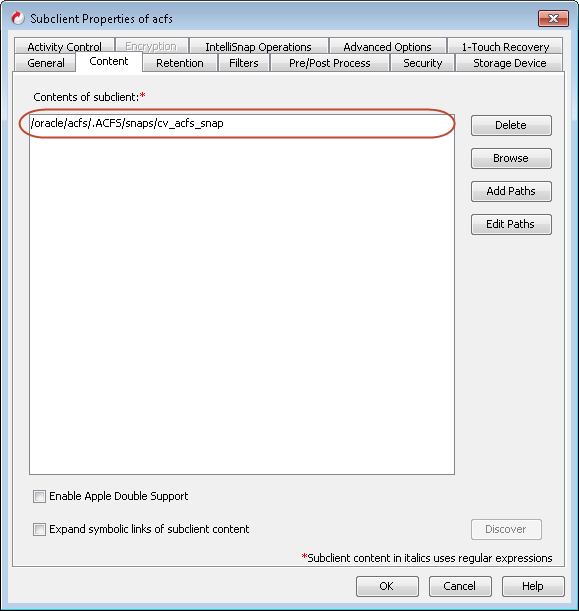
-
Click the Pre/Post-Processing tab to specify the path to the script.
-
Type or select the path to the pre-processing script, and then click OK.
-
Click the Storage Device tab.
-
In the Storage Policy box, select the storage policy name.
-
Click OK.
Configuring the HP-UX File System Agent to Ignore System Errors for Backup Jobs
You can configure the HP-UX File System Agent to ignore system errors for backup jobs. For example, the File not found error.
This configuration also applies for the older clients up to two releases old.
Procedure
-
To the client computer, add the backupDoNotReportFileError additional setting with the valueerror_code1. For example, 65521.
For instructions on adding the additional setting from the CommCell Console, see Add or Modify an Additional Setting.
Property
Value
Name
backupDoNotReportFileError
Category
FileSystemAgent
Type
String
Value
error_code1, error_code2...
Modifying an Agent, Backup Set or Subclient
The following table describes the properties that can be configured from the agent, backup set and subclient levels.
|
Option |
Description |
Related Topics |
|
Preserving the File Access Time |
This option allows you to prevent the file access time from being changed as a result of running data protection operations on the client. When this option is selected, the file access time will be preserved. Note that the ctime (changes in the file properties) is modified when you select this option though incremental backups do not honor it.
|
|
|
Change Storage Policies |
You can modify the storage policies in any of the following situations.
You can change the storage policies from the subclient level.
|
Refer to Storage Policies. |
|
Rename a Backup Set or Subclient |
You can rename backup sets and subclients. Renaming BackupSet:
Renaming subclient:
|
|
|
Data Transfer Options |
You can efficiently configure the available resources for transferring data secured by data protection operations from the subclient level. This includes the following:
You can configure the data transfer options.
|
Refer to Data Compression and Network Bandwidth Throttling. |
|
View Data Paths |
|
|
|
Configure Activity Control |
You can enable backup and restore operations from the agent and subclient level. However, you can enable restore operations only from the agent level.
|
Refer to Activity Control. |
|
Configure User Security |
You can create a security association from the agent or subclient level. For instructions on creating a security association at the agent or subclient level, see Administering the Security Associations of an Entity. |
Refer to User Administration and Security. |
|
Enable and Disable Data Encryption |
You can enable data encryption from the subclient level. Encryption must be enabled at the client level prior to configuring any instances residing on that client.
|
Refer to Data Encryption. |
|
View Software Version and Installed Updates |
The Version tab, at the Agent level displays the software version and post-release service packs and updates installed for the component.
|
|
|
CommCell Configuration Report |
The CommCell Configuration Report provides the properties of the CommServe, MediaAgents, clients, agents, subclients, and storage policies within the CommCell based on the selected filter criteria.
|
Refer to CommCell Configuration. |
Deleting an Agent, Backup Set or Subclient
Caution
When you delete an instance or backupset, the associated data is logically deleted and you can no longer access the corresponding data from CommCell Console for recovery purposes.
Refer to Recovering Data Associated with Deleted Clients and Storage Policies for information on how to recover data if you accidentally delete an entity.
Deleting an Agent
You must uninstall or deconfigure the agent software from the client computer before deleting it from CommCell Browser. After you delete the client software, you can either leave the corresponding data intact for an appropriate action or you can remove the data immediately. If you choose to remove the data immediately, you must delete the agent from the CommCell Browser. If you delete the agent, all of the agent's data is irretrievably lost.
-
You cannot delete an agent while operations for that agent are running.
-
From the CommCell Browser, navigate to Client Computers > client**.
-
Right-click the agent**, and then click Delete.
-
A confirmation message appears with the following message:
This operation will permanently delete the data backed up from this level and it cannot be restored. -
Click OK to continue with the deletion operation or click No to cancel the deletion.
Deleting a Backup Set
Consider the following before deleting a Backup Set:
-
You cannot delete a default Backup Set.
-
Schedules associated with the Backup Set are also automatically deleted.
-
From the CommCell Browser, expand Client Computers > client > agent.
-
Right-click the backup_set, and then click Delete.
-
A confirmation message is displayed, asking if you want to delete the Backup Set.
Click No to cancel the deletion and retain the Backupset, or click Yes to continue the deletion.
Deleting a Subclient
Consider the following before deleting a subclient:
-
You cannot delete a default subclient.
-
Schedules associated with the subclient are also automatically deleted.
-
From the CommCell Browser, expand to Client Computers > client > agent > backup_set
-
Right-click the subclient that you want to delete, and then click Delete.
-
A confirmation message appears that asks if you want to delete the subclient.
Click No to cancel the deletion and retain the subclient, or click Yes to continue the deletion.