Overview
There will be situations when you might want to restore either the entire database that was lost due to a system failure or hardware malfunction or recover specific portions of the data that was corrupted. Depending on your requirement, you can perform a Component-level Browse and Restore to get back the lost data. In addition, you can also use several alternate restore methods to restore the required data.
Documentum iDataAgent, enables you to restore and recover the following:
-
Storage Areas
-
Entire database
-
Individual data files or table spaces
-
Database files, such as log files, history files.
-
Full-text Indexes
Note
It is recommended to shutdown the Documentum Repository services before initiating the database restore.
You can also recover the database independently when needed.
Generally, you will want to restore/recover data immediately. However, if you need to restore some large amount of data that is not required immediately, you can schedule it to be restored at some later point of time when either the client computer is not in use or when the network utilization is low. Scheduling the restore operation relieves you of having to manually initiate the operation.
Restore Destinations
By default, the iDataAgent restores data to the client computer from which it originated; this is referred to as an in-place restore. You can also restore the data to another client computer in the CommCell. Keep in mind the following considerations when performing such restores:
-
The destination client must reside in the same CommCell as the client whose data was backed up.
-
Note that when you perform restores other than in-place restores, the restored data assumes the rights (i.e., permissions) of the parent directory.
The following section enumerates the types of restore destinations that are supported by this iDataAgent.
In-Place Restore
When restoring data, the iDataAgent provides the facility to restore the data to the same path/destination on the client computer from which the data originated; this is referred to as an in-place restore.
Out-of-Place Restore
All restore levels provide the facility to restore data to a different directory on the client computer from which the data originated; this is referred to as an out-of-place restore to a different path/destination. You can also restore data to a different client computer in the CommCell using the same path/destination. This can include restoring either individual data files or tablespaces, or the entire database to another computer.
Keep in mind the following considerations when performing out-of-place restores:
-
The destination client must reside in the same CommCell as the client whose data was backed up.
-
Note that when you perform an out-of-place restore, the restored data assumes the rights (i.e., permissions) of the parent directory.
Component-Level Browse and Restore Operations
Documentum iDataAgent supports the following types of component-level browse and restore operations.
Restoring Storage Areas
The Documentum iDataAgent enables you to restore storage areas using the Component-level Browse and Restore method.
Restoring Full-Text Indexes
The Documentum iDataAgent enables you to restore full-text indexes using the Component-level Browse and Restore method.
Restoring the Entire Database
At times, if the database gets corrupted, you might need to restore the entire database and recover it back to the current state. However, in order to recover a database, you will also need to restore the logs. Both the data and the logs can be restored. You can restore the database in-place or out-of-place.
You can perform a Component-level Browse and Restore to restore the entire database. Minimally, you will need to specify a destination client, the name of the DB2 instance in the Destination Instance, the target database name, and target database path.
In the advanced Restore tab, you will need to specify options for the archive logs as described in Restoring Logs.
Redirect or Rename Data during Restore
One of the advanced restore options available during a restore operation is the ability to redirect datafiles and tablespaces to be restored to a new location. Additionally, datafiles can be renamed during restore. Both of these operations can be performed from the Redirect tab in the Documentum Advanced Restore Options dialog box. Redirecting and/or renaming datafiles and tablespaces as they are restored allows them to be restored without overwriting existing datafiles and tablespaces. This is also useful when restoring and recovering an database to a new host with a different directory structure. While redirecting the tablespaces/datafiles, it is always recommended that you redirect all of the restored tablespaces/datafiles. In other words, restore only the tablespaces/datafiles that need to be redirected.
Note
Select Switch Database mode for Restore for putting the database in the appropriate mode before restoring it.
Restoring the Database While Online and Offline
The Documentum iDataAgent allows you to restore the database in online or offline mode. When the database is online, other applications can access the database while the restore is in progress When the database is offline, the restore job has an exclusive connection to the database; any other access to the database is not allowed while the restore is in progress. See Component-level Browse and Restore for details.
Restoring History Files
In addition to restoring the entire database, the Documentum iDataAgent also enables you to restore history files.
The database history file is invaluable in a recovery scenario. The history file is individually restorable from any backup image. If the current database is unusable or not available, and the associated recovery history file is damaged or deleted, you can restore the history file. The recovery history file can then be reviewed to provide information on which backup to use to restore the database. The recovery history file provides enough information to recover a database or table space using a backup image. See Component-level Browse and Restore for details.
Restoring Logs
In addition to restoring data files/ table spaces, the Documentum iDataAgent also enables you to restore the logs. You can also restore the logs based on log time or log serial number.
You can restore the entire logs using the browse and restore method.
To restore the logs:
-
From the CommCell Browser, to browse and restore documents, select one of the following methods:
-
From the CommCell Browser, navigate to Client Computers | <Client> | Documentum.
Right-click the <Instance>, point to All Tasks, and then click Browse and Restore.
-
From the CommCell Browser, navigate to Client Computers | <Client> | Documentum | <Instance>.
Right-click the default subclient and click Browse and Restore.
-
-
Click View Content.
-
Expand the Documentum and select the components such as Storage Area, Full-Text Index and Database to be restored.
Click Recover All Selected.
-
By default, Overwrite Files and Overwrite if file on media is newer is selected to overwrite all backed up storage areas.
By default, Restore to same folder is selected to restore the storage area to the same folder.
-
Click the Database tab.
-
Click Advanced.
-
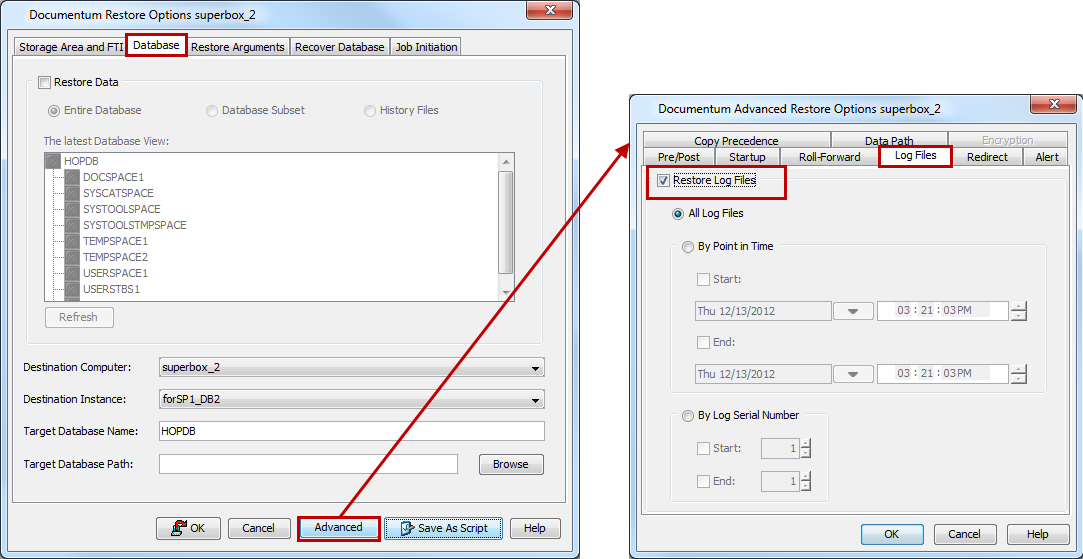
In the Documentum Advanced Restore Options dialog box, select the Log Files tab.
-
Select the Restore Log Files check box.
-
Click By Point in Time to specify the point in time in which to restore the Log File.
-
Click By Log Serial Number to specify the restore between two serial numbers.
-
-
Click OK.
-
Click OK to start the restore.
Reapplying Log Files with Roll Forward
The Documentum iDataAgent allows you to recover the database by reapplying the log files containing transactions that are not part of any database backup image. Whenever log files are restored with the roll-forward option activated, DB2 searches for the following target restore paths per the following order: DB2's own directory path for log file restores; the DB2 Retrieve Path that was specified during the installation of the DB2 iDataAgent; the DB2 Archive Path that was specified during the installation of the DB2 iDataAgent.
To reapply the logs files:
-
From the CommCell Browser, to browse and restore documents, select one of the following methods:
-
From the CommCell Browser, navigate to Client Computers | <Client> | Documentum.
Right-click the <Instance>, point to All Tasks, and then click Browse and Restore.
-
From the CommCell Browser, navigate to Client Computers | <Client> | Documentum | <Instance>.
Right-click the default subclient and click Browse and Restore.
-
-
Click View Content.
-
Expand the Documentum and select the components such as Storage Area, Full-Text Index and Database to be restored.
Click Recover All Selected.
-
By default, Overwrite Files and Overwrite if file on media is newer is selected to overwrite all backed up storage areas.
By default, Restore to same folder is selected to restore the storage area to the same folder.
-
Click the Database tab.
-
Click Advanced.
-
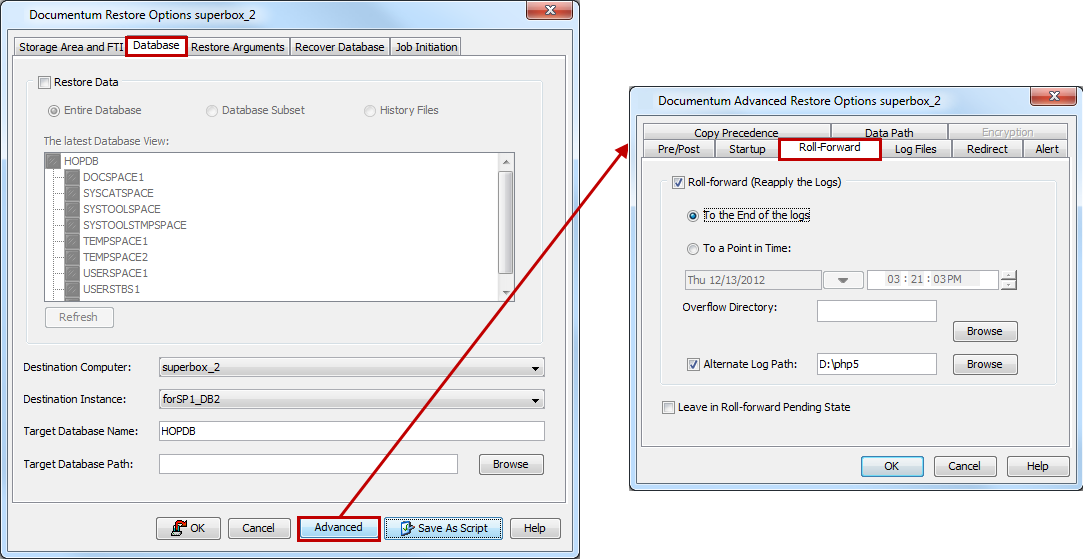
In the Documentum Advanced Restore Options dialog box, select the Roll-forward tab.
-
Select the Roll-forward (Reapply the Logs) check box.
-
Select either To the End of the logs or To a Point in Time option.
-
Click To the End of the logs to reapply all log files.
-
Click To a Point in Time to specify the point in time in which to reapply the Log File.
-
-
Select the Alternate Log Path check box to provide another location within the DB2 directory for the log files.
-
Select the Leave in Roll-forward Pending State check box to specify whether to leave the database in a roll-forward pending state after the restore.
If this check box is selected, the database will not come up until you roll-forward the database.
-
Click OK.
-
Click OK to start the restore.
Database Configuration Parameters for Command Line Log Restore
To configure the DB2 database so that log files required during roll-forward when log restore is not selected and the logs are not available on the DB2 database client then the following DB2 database configuration parameters need to be configured using the following commands:
db2 update db cfg for <database name> using LOGARCHOPT1"'
CvDctmClientName=<CvDctmClientName>,CvDctmInstanceName=<CvDctmInstanceName>,CvSrcClientName=<CvSrcClientName>,CvClientName=<CvClientName>,CvInstanceName=<CvInstanceName>'"
db2 update db cfg for <database name> using VENDOROPT"' CvDctmClientName=<CvDctmClientName>,CvDctmInstanceName=<CvDctmInstanceName>,CvSrcClientName=<CvSrcClientName>,CvClientName=<CvClientName>,CvInstanceName=<CvInstanceName>'"
where:
<CvDctmClientName> identifies the name of the computer where the Documentum iDataAgent is installed
<CvDctmInstanceName> identifies the name of the Documentum instance configured on client corresponding to <CvDctmClientName>
<CvSrcClientName> identifies the name of the computer where the Documentum iDataAgent is installed
<CvClientName> identifies the name of the computer where the DB2 iDataAgent is installed
<CvInstanceName> identifies the name of the Commvault instance (e.g., Instance001). This should be the name of the DB2 iDataAgent instance associated with the appropriate CommServe.
Rename One or More Tablespaces with Redirect
The Documentum iDataAgent allows you to rename one or more table spaces or table space containers upon restore. Renaming these items as they are restored allows them to be restored without overwriting existing table spaces or table space containers.
To rename table spaces with Redirect:
-
From the CommCell Browser, to browse and restore documents, select one of the following methods:
-
From the CommCell Browser, navigate to Client Computers | <Client> | Documentum.
Right-click the <Instance>, point to All Tasks, and then click Browse and Restore.
-
From the CommCell Browser, navigate to Client Computers | <Client> | Documentum | <Instance>.
Right-click the default subclient and click Browse and Restore.
-
-
Click View Content.
-
Expand the Documentum and select the components such as Storage Area, Full-Text Index and Database to be restored.
Click Recover All Selected.
-
By default, Overwrite Files and Overwrite if file on media is newer is selected to overwrite all backed up storage areas.
By default, Restore to same folder is selected to restore the storage area to the same folder.
-
Click the Database tab.
-
Click Advanced.
-
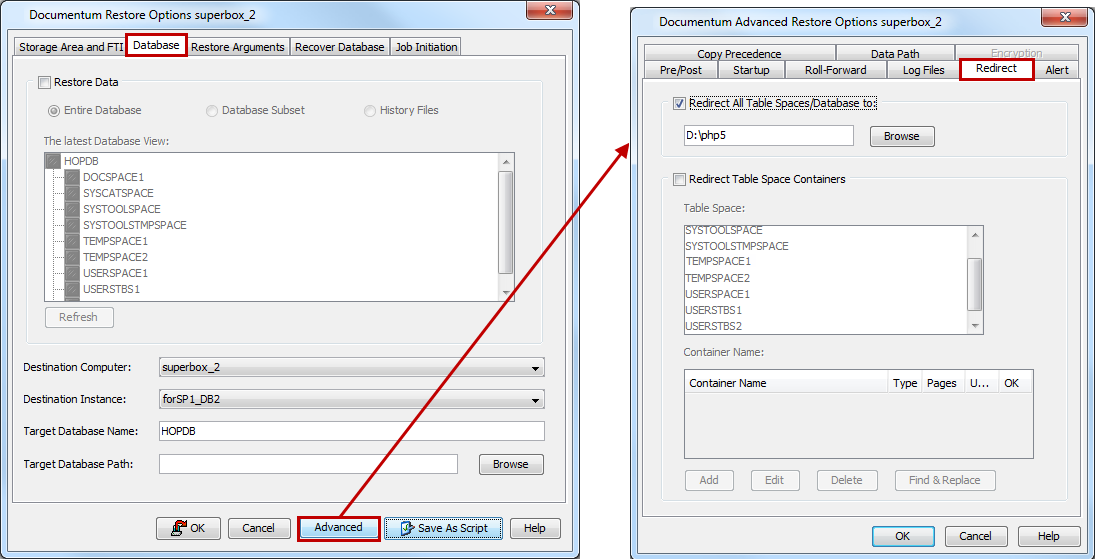
In the Documentum Advanced Restore Options dialog box, select the Redirect tab.
-
Select the Redirect All Table Spaces/Database to check box and type the path or click Browse to specify the location.
-
Select the Redirect Table Space Containers check box to administer one or more table space containers.
Select the names of the Table Spaces whose container name can be administered from the Table Space list.
In Container Name, the container name (path) for the table space selected in the Table Space field. To take action on this container name, click the name. Once you do this, the Add, Edit, Delete, and Find and Replace buttons are activated.
-
-
Click OK.
-
Click OK to start the restore.
Recovering a Database
In certain cases, you might wish to restore the database without selecting backup images.
To recover a database::
-
From the CommCell Browser, to browse and restore documents, select one of the following methods:
-
From the CommCell Browser, navigate to Client Computers | <Client> | Documentum.
Right-click the <Instance>, point to All Tasks, and then click Browse and Restore.
-
From the CommCell Browser, navigate to Client Computers | <Client> | Documentum | <Instance>.
Right-click the default subclient and click Browse and Restore.
-
-
Click View Content.
-
Expand the Documentum and select the components such as Storage Area, Full-Text Index and Database to be restored.
Click Recover All Selected.
-
By default, Overwrite Files and Overwrite if file on media is newer is selected to overwrite all backed up storage areas.
By default, Restore to same folder is selected to restore the storage area to the same folder.
-
Click the Database tab.
-
Select the Restore Data check box and click Entire Database.
-
Select the name of the client computer in the Destination Client from the list.
-
Select the name of the DB2 instance in the Destination Instance from the list.
-
In the Target Database Name, enter the name of the Database.
-
In the Target Database Path, enter the path of the database or click Browse.
-
Ensure to include in this field just the letter of the appropriate drive followed by a colon (e.g., L:). Otherwise, the target database will not be accessed.
-
-
Click the Restore Arguments tab to restore the backup images available for restore.
-
By default Offline Restore is selected to run a restore when the database is offline.
If a restore is run with the database online, other applications can access the database while the restore is in progress. Online restores are available only for partial database restores (and not for full database restores).
-
In Select Backup Images, click the appropriate full backup image and (if present) any associated incremental and delta incremental backup images.
Click > to move these images to the Selection list box and then click OK.
Note
Report files contain the names of the files that have become unlinked during a restore operation as a result of a fast reconcile. File names, if specified, must be fully qualified. These files are restored only if the table being restored has a DATALINK column type and linked files. To generate this file, you must either enter or browse for and then select the appropriate DB2 Report File path.
-
-
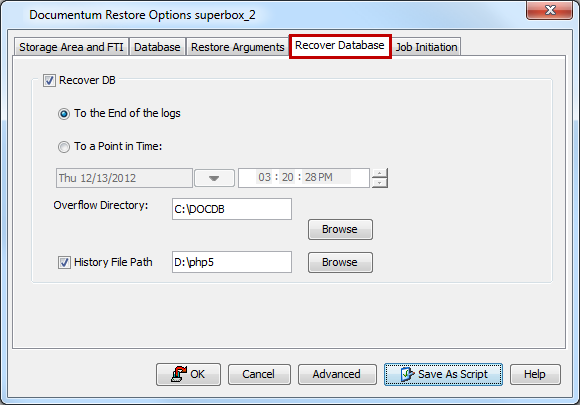
Click the Recover Database tab.
-
Select the Recover DB check box to recover a DB2 database without selecting backup images from the CommCell Console. Whenever this option is selected, the Restore Arguments tab is disabled.
Click To a Point in Time to recover the DB2 database based on the state and contents of the database to a specific point in time. To change this time, click in the list as appropriate.
-
In the Overflow Directory box type the path or click Browse to specify the location to be search for all of the archived logs during the database recovery.
-
Select the History File Path check box and type the path or click Browse to specify the history file that the system will check in order to select the backup image to restore.
-
Click OK to start the restore.
Documentum File Browse Operations
Before restoring documents, you need to manually make these Documentum jobs inactive using Documentum software:
-
dm_DMClean
-
dm_DMFileScan
Once the files are restored, re-activate the jobs again.
The Documentum iDataAgent supports the following types of Documentum File Browse restore operations.
Restoring a Single Document
The Documentum iDataAgent allows you to restore a single document. For step-by-step instructions, see Documentum File Browse for more information.
Restoring Multi-Versioned Documents
Use the following steps to browse and restore the selected versions of a multi-versioned document to an out-of-place destination and check them into the Documentum Repository:
-
From the CommCell Browser, click a Documentum instance.
-
Right-click a subclient that has been used to back up documents and select Documentum File Browse.
-
From the Browse Options dialog box, click OK.
-
Under the Name column, right-click a folder that contains one or more multi-versioned documents and select Explore.
-
Expand the folder, right-click a multi-versioned document and select View All Versions.
-
Select one or more versions of the document and click Restore.
-
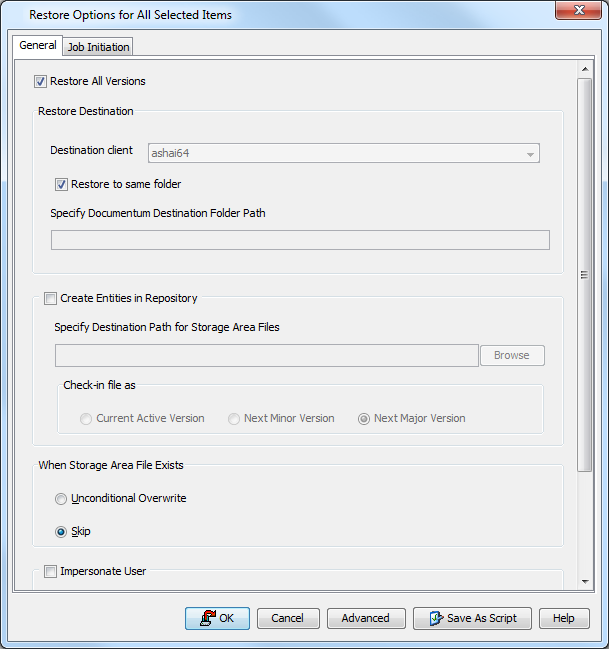
The Restore Options dialog box appears. Do the following:
-
Select the name of the source client computer in the Destination Client from the list.
-
Specify a path in Specify Documentum Destination Folder Path to perform an out-of-place restore.
-
Click Unconditional Overwrite.
-
Click Create Entities in Repository o specify a destination storage area and check-in either a current or next major/minor versions of documentum files. The Documentum files from the MediaAgent will be dumped on to a local staging path and then restored on the destination computer.
-
In Specify Destination Path for Storage Area Files, enter the file system path on the destination computer to which the files will be restored. Typically, this would be a system path on the Primary Content Server. Click one of the following:
-
Current Active Version to check the file in with the same version number that is currently active in Documentum.
-
Next Minor Version to check the restored file to the next Minor Version. For example, if the restored document was a Minor version (e.g., 1.2), it will be check it into the next Minor version (e.g., 1.3). If the restored document is a Major version (e.g., 2.0), it will be checked into the next Minor version (e.g., 2.1).
-
Next Major Version to check-in the file to the next major version.
-
For example, if the restored document was a Major version (e.g., 2.0), it will check it into the next Major version (e.g., 3.0). If the restored document was a Minor version (e.g., 1.2), it will check it into the next Major version (e.g., 2.0).
-
-
-
Click OK from the Restore Options dialog box to begin the restore operation.
Note
When restoring a Minor versioned document (e.g., 1.2), it will restore to a Major version (e.g., 2.0). Additionally, if the file exists in Documentum, then the physical file will be restored, but the document check-in will be skipped even when unconditional overwrite is selected.
Restoring a Document to a Different Cabinet
Use the following steps to browse and restore selected versions of a document to a different cabinet:
-
From the CommCell Browser, click a Documentum instance.
-
Right-click a subclient that has been used to back up documents and select Documentum File Browse.
-
From the Browse Options dialog box, click OK.
-
Under the Name column, right-click a folder that contains one or more multi-versioned documents, and select Explore.
-
Expand the folder in the left pane, right-click a document, and select View All Versions.
-
Select one or more versions of the document and click Restore.
-
The Restore Options dialog box appears. Do the following:
-
Click Unconditional Overwrite.
-
Unselect Restore to same folder.
-
In Specify Documentum Destination Folder Path, enter a different <cabinet_name>/folder to which the files will be restored.
-
-
Click OK from the Restore Options dialog box to begin the restore operation.
Browse Latest Data
The option to browse the backup data provides the facility to view and restore the data that was backed up. The following sections explain how to browse the backup data.
Follow the steps given below to view the latest data backed up by a backup set:
-
From the CommCell Browser, navigate to Client Computers | <Client> | Documentum | <Instance>.
-
Right-click the default subclient and click Browse and Restore.
-
By default Latest Backup is selected.
-
Click View Content.
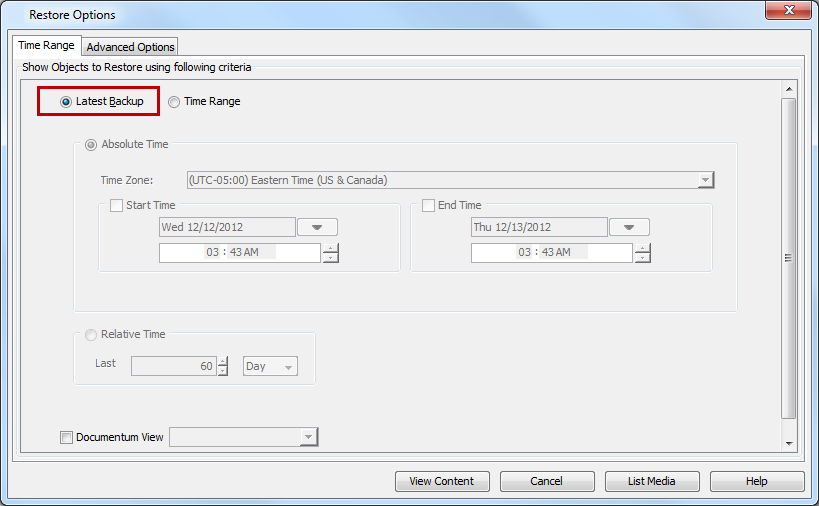
The latest data backed up by all the subclients is displayed in the Client Browse tab.
Browse Data before a Specified Time
Follow the steps given below to browse the data backed up before specified time:
-
From the CommCell Browser, navigate to Client Computers | <Client> | Documentum | <Instance>.
-
Right-click the default subclient and click Browse and Restore.
-
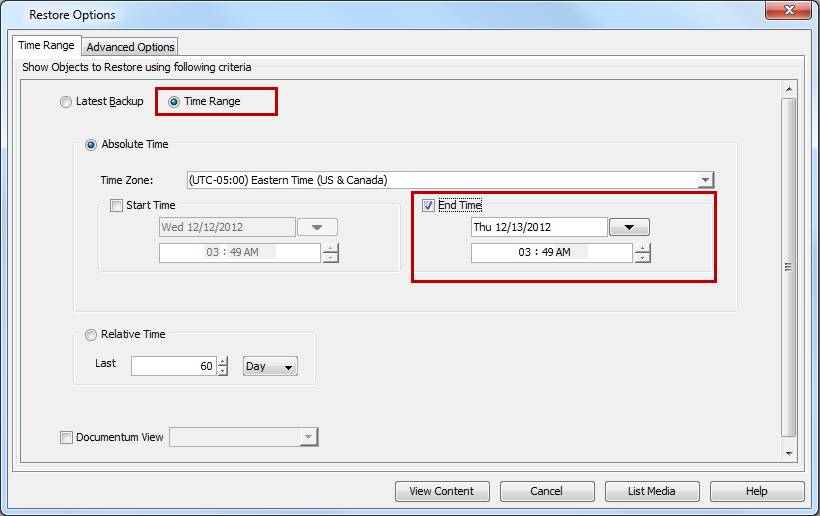
Click Time Range.
By default Latest Backup is selected.
-
Under Absolute Time select End Time and enter a date and time to browse and restore data before it.
-
Click View Content.
Browse Data between a Specified Time
Follow the steps given below to browse data between specified time:
-
From the CommCell Browser, navigate to Client Computers | <Client> | Documentum | <Instance>.
-
Right-click the default subclient and click Browse and Restore.
-
Click Time Range.
By default Latest Backup is selected.
-
Under Absolute Time do the following:
-
Select Start Time and enter a date and time.
-
Select End Time and enter a date and time.
-
-
Click View Content.
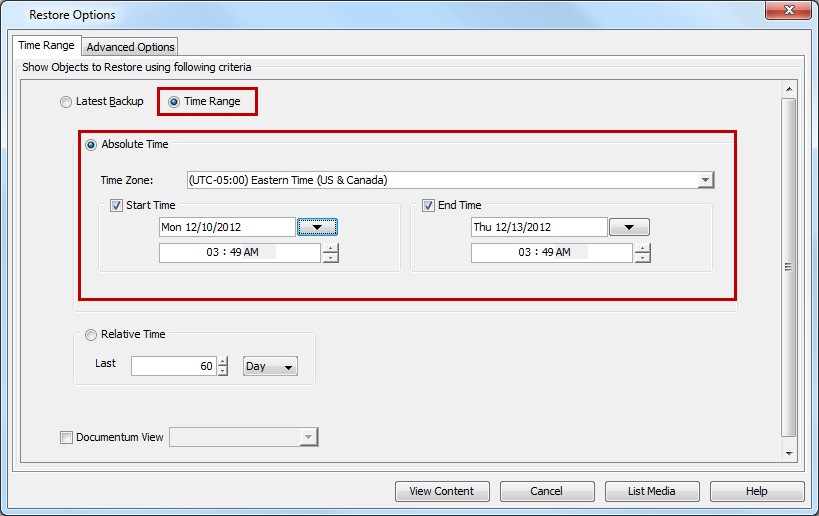
Data in between the time specified will be browsed and displayed.
Browsing Data Associated with Specific Jobs
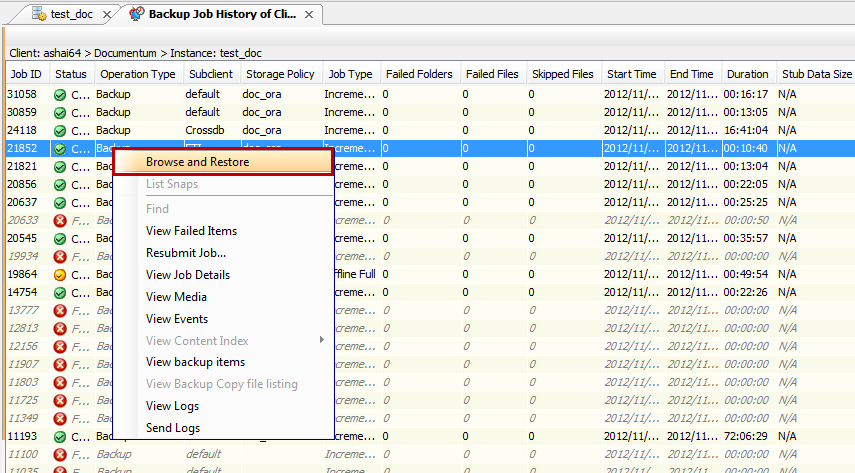
You can browse and restore data associated with specific backup jobs. You can do this from the backup history window as follows:
-
In the CommCell Browser, right-click the appropriate entity and click View | Backup History.
-
Click OK.
-
From the Backup History filter window select the filter options, if any, that you want to apply, and then click lick lick OK.
-
From the Backup Job History window, right-click on a job (of a supported agent type) and click Browse and Restore.
-
Click OK.
Global Browse and Restore Options
Certain browse options can be set globally, to enable it as the default option. Such options include the following:
-
Displaying Aged Data during Browse
Aged data which are available on media can be included in the browse operation and subsequent recovery if needed.
Refer to Accessing Aged Data documentation for detailed information on this feature.
-
Disabling Confirmation Message for Restore Jobs
Confirmation messages for restore jobs can be turned off using this option.
-
Automatically Switching the Copy to Read Data from any Copy
Use this option to automatically change the copy precedence if the primary copy is unreachable during browse and restore operations.
Follow the steps below to enable these options:
-
From the CommCell Console ribbon, on the Home tab, click Control Panel.
-
Under User, click Browse/Search/Recovery.
-
In the Browse/Search/Recovery Options dialog box, select the Show aged data during browse and recovery check box.
-
Click OK.
Browse Error Reporting
During a Browse operation, if one of the following error conditions occurs, an accurate problem description will be reported in the Browse window. This is extremely useful for troubleshooting.
-
MediaAgent Offline
-
Index Cache Inaccessible
-
Offline Requested Data Not Found
Browse Using MediaAgent
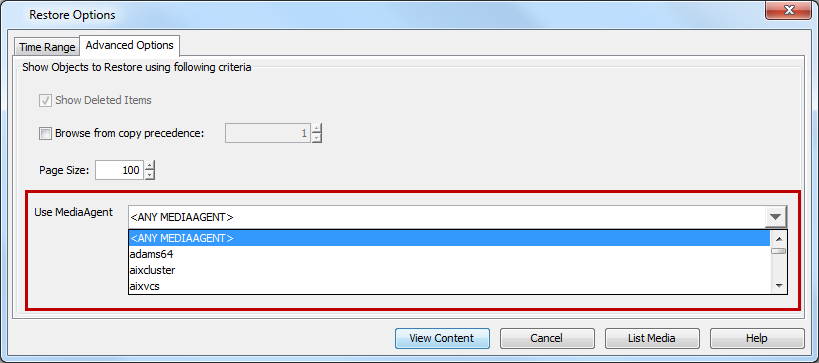
Data can be restored from any compatible library and drive type in the CommCell. By default, the system automatically identifies and restores data from any configured library in the CommCell, even if the media is not available in the original library in which the data protection operation was performed. Use this procedure to Browse using a specific MediaAgent.
Note
If a MediaAgent is selected for browse, the library and media that are required for restore operation must be accessible to this MediaAgent for restore. The Restore may fail if it is not accessible.
-
From the CommCell Browser, navigate to Client Computers | <Client> | Documentum.
Right-click the <Instance>, point to All Tasks, and then click Browse and Restore.
-
Click the Advanced Options tab.
-
Select the <MediaAgent> that must be used from the Use MediaAgent list.
-
Click View Content.
Browse from Copies
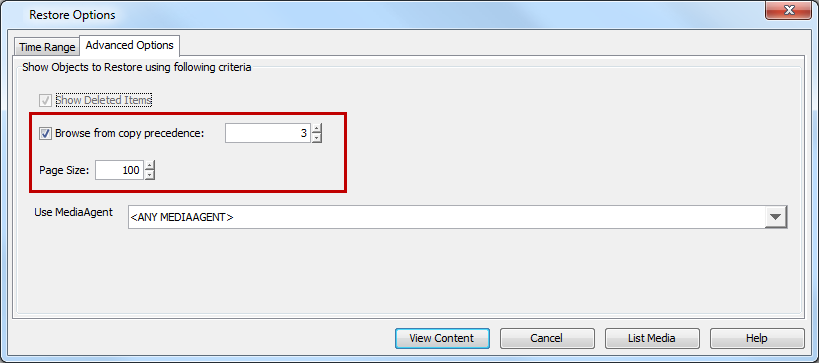
By default, when a browse operation is requested, the software attempts to browse from the storage policy copy with the lowest copy precedence. If the data that you want to browse was already pruned from the primary copy, the software searches the other copies of the storage policy, starting from the copy with the lowest copy precedence to a copy with the highest copy precedence.
This feature is useful in the following conditions:
-
The media containing protected data for a particular copy has been removed from the storage library, you can choose to browse from a copy whose media are inside the library.
-
Allows browsing from a copy that accesses faster disk media rather than slower tape media.
-
When media drives used by a particular copy are busy with another operation, this helps in browsing from a different copy to avoid resource conflicts.
-
From the CommCell Browser, navigate to Client Computers | <Client> | Documentum.
Right-click the <Instance>, point to All Tasks, and then click Browse and Restore.
-
Click the Advanced Options tab.
-
Select the Browse from copy precedence check box and specify the preference number.
Note
If you specify a copy precedence number for a browse operation, the software searches only the storage policy copy with that precedence number in all storage policies used for securing the data. If data does not exist in the specified copy, the browse operation fails even if the data exists in another copy of the same storage policy.
-
Click View Content.
List Media
List media option is useful to predict media required for the following operations:
-
To restore data associated with a specific backup set, subclient or instance
-
To restore the index required to browse data associated with a specific backup set or subclient
-
To restore a specific file (or specific files and folders)
-
To restore data associated with a specific job
The list media operation can be performed for instances, backup sets, and subclients. The following sections describe each of these methods.
The List Media feature can also be used in a number of other capacities. Refer to the List Media documentation for a complete overview of this feature.
Listing Media for a Subclient
-
From the CommCell Browser, right-click the subclient for which you wish to list media and then click List Media.
-
From the List Media dialog box choose one of the following options:
-
Click Media For the Latest Data to list media associated with the most recent data protection cycle.
-
Click Specify Time Range to list media associated with data protection operations up to the specified date and time range.
Use the Data Before box to specify the end date and time.
-
Click Advanced and then click Exclude Data Before to list media associated with data protection operations after the specified date and time.
Note that you can use the Specify Browse Time and Exclude Data Before options to list media between a specified date and time range.
-
-
Click OK.
The appropriate media is listed in the Media dialog box.
Listing Media for a Backup Set or Instance
-
From the CommCell Browser, right-click the backup set or instance for which you wish to list media, click All Tasks and then click Browse.
-
From the Browse Options dialog box, if required, select the following options:
-
Click Browse the Latest Data to list media associated with the most recent data protection cycle.
-
Click Specify Browse Time to list media associated with data protection operations up to the specified date and time range.
Use the Browse Data Before box to specify the end date and time.
-
Click Advanced and then click Exclude Data Before and then select the date and time from which you wish to list media associated with data protection operations.
Note that you can use the Specify Browse Time and Exclude Data Before options to list media between a specified date and time range.
-
-
Click List Media.
-
From the List Media dialog box, click List Media for restore within specified time range and click OK.
The appropriate media is listed in the Media dialog box.
Restore by Jobs
The Restore By Jobs feature provides the facility to select a specific backup job to be restored. This method of restoring data is considerably faster as it reads continuously on the tape and retrieves the data and does not depend on the indexing subsystem to get the seek offsets on the media.
This feature can be used in different scenarios such as the following:
-
To restore point-in-time data associated with a specific backup job, such as full, incremental, differential, etc.
-
To restore CommServe DR data for the disaster recovery or for creating a hot-site purposes.
-
To restore multiplexed data from the same client.
Consider the following when restoring by jobs:
-
Run a restore by jobs whenever you want to restore the entire contents of the job.
-
Avoid running restores by jobs for jobs associated with the default subclient. If you do this, the entire contents of the machine will be restored. As such, this may cause problems (e.g., the machine might run out of space) or produce undesirable results (e.g., you might end up restoring operating system files or directories that you really do not want to restore).
-
Avoid modifying the contents of any associated subclients since this may result in the retrieval of older data.
Use the following steps to restore data by jobs.
-
From the CommCell Browser, right-click the level whose data you want to browse, click View History, and then click the Backup History.
-
From the Backup History Filter window, select the filter options, if any, that you want to apply and click OK.
-
From the Backup Job History window, right-click the backup job that need to be restored and select Browse.
-
From the Browse Options dialog box, click OK to execute the browse using the Browse the Latest Data option.
-
From the Browse window, select the instance node in the left pane and then select the required data and logs in the right pane, and click the Recover All Selected button at the bottom of the window.
-
Select the desired restore options and click OK.
Managing Jobs
Once you initiate the restore operation, a restore job is generated in the Job Controller. Jobs can be managed in a number of ways. The following sections provide information on the different job management options available:
Restart Jobs
Jobs that fail to complete successfully are automatically restarted based on the job restartability configuration set in the Control Panel. This configuration can be changed at any time; however, changes to this configuration will affect all jobs run in the entire CommCell.
It is also possible to override the default CommServe configuration for individual jobs by configuring retry settings when initiating the job. This configuration, however, will apply only to the specific job.
Note
Restored jobs for this Agent are started from the beginning.
Configure Job Restartability at the CommServe Level
-
In the CommCell Console, click the Control Panel icon, then double-click Job Management.
-
In the Job Restarts tab of the Job Management dialog box, select a job type from the Job Type list, and then select the Restartable check box.
-
To change the maximum number of times the Job Manager will try to restart a job, select a number in the Max Restarts box.
-
To change the time interval between attempts by the Job Manager to restart the job, select a number of minutes in the Restart Interval (Mins) box.
-
Click OK to save your changes.
Configure Job Restartability for an Individual Job
-
From the Restore Options dialog box, click Advanced, then select the Job Retry tab and specify the following as desired:
-
Total Running Time - The maximum elapsed time, in hours and minutes, from the time that the job is created.
-
Number of Retries - The number of times that Job Manager will attempt to restart the job.
-
Kill Running Jobs When Total Running Time Expires - Option to kill the job when the specified Total Running Time has elapsed, even if its state is "Running".
-
-
Click OK.
Resubmit Jobs
If a restore job fails to complete successfully, you can resubmit the job without the need to reconfigure the original job's restore options using the Resubmit Job feature. When a job is resubmitted, all the original options, restore destinations, and other settings configured for the job remain in tact.
Resubmit a Restore Job
-
From the CommCell Browser, right-click a client computer whose data recovery history you want to view, click View, then click to view a job history.
-
From the Job History Filter dialog box, select Restore.
-
If you want to view more advanced options for restores, from the Job History Filter, select Restore, then click Advanced.
-
From the Data Recovery History Advanced Filter select the destination client computer of the restores you would like to view, then click OK.
-
-
The system displays the results of the options you selected in the Data Recovery Job History window.
-
Right-click on any job, and select Resubmit.
-
Select the job options.
-
Click OK.
Control Jobs
The following controls are available for running jobs in the Job Controller window:
|
Suspend |
Temporarily stops a job. A suspended job is not terminated; it can be restarted at a later time. Only preemptible jobs can be suspended. |
|
Resume |
Resumes a job and returns the status to Waiting, Pending, Queued, or Running depending on the availability of resources or the state of the operation windows and activity control settings. Restore jobs for this Agent are resumed from the beginning. |
|
Kill |
Terminates a job. |
These controls can be applied to:
-
All jobs in the Job Controller.
-
All selected jobs in the Job Controller providing you have the correct security associations at the proper level for each job selected.
-
All data protection operations running for a particular client or client/agent.
-
All data protection operations running for a particular MediaAgent.
Control a Job
From the Job Controller of the CommCell Console, right-click the job and select Kill, Suspend, or Resume as desired.
-
When killing a job:
Click Yes when the confirmation prompt appears if you are sure you want to kill the job. The job status may change to Kill Pending for a few moments while the operation completes. Once completed, the job status will change to Killed and it will be removed from the Job Controller window after five minutes.
-
When suspending a job:
The job status may change to Suspend Pending for a few moments while the operation completes. The job status then changes to Suspended.
-
When resuming a job:
As the Job Manager attempts to restart the job, the job status changes to Waiting, Pending, or Running
Additional Options
Several additional options are available to further refine your restore operations. These options are available from the Advanced Restore Options window.
To access the Advanced Restore Options window:
-
From the CommCell Browser, expand Client Computers by double-clicking Client Computers | Documentum | <instance name>. The default and other subclients (if available) are displayed on the right-hand windowpane.
-
To access the Advanced Restore Options for documents, follow the steps in Documentum File Browse and Restore.
-
To access the Advanced Restore Options for Documentum Repository components, follow the steps in Component-level Browse and Restore.
-
-
From the Restore Options dialog box, click Advanced.
The following table describes the additional options:
|
Option |
Description |
|
Data Path Options |
The data path options can be accessed from the Data Path tab in the Advanced Restore Options window. Data can be restored to any compatible library and drive type in the CommCell. By default the system automatically identifies the data path for the restore operations as configured in the CommCell. You can change this data path at the restore level by selecting a specific MediaAgent, library or drive pool in the Advanced Restore Options dialog. The data path change can be specified at the restore, schedule and the schedule policy levels. Note that the data path changes specified are only applicable only for the specific restore job/restore schedule. Ensure that the specified MediaAgent and the library or drive pool are available and accessible, failing which the job will go into Pending state; failover protection does not apply here. Also, note that this setting overrides all other settings, including the data path settings at the Storage Policy, Subclient and the alternate data path (Gridstor). In some situations you may want to use another data path to perform a data recovery operation. In such a situation, you can specify the MediaAgent, Library and/or the Drive Pool. Refer to the Change Data Path documentation for a comprehensive overview prior to using this feature. |
|
Startup Options |
The start options are accessible from the Startup tab in the Advanced Restore Options window. These options facilitate the startup behavior of the restore job. The Default Priority option dictates the type of job that will be used in determining how the Job Manager will allocate resources for this job. The Change Priority option specifies the priority for the job, between 0 (highest priority) and 999 (lowest priority). The Job Manager will use the priority setting when allocating the required resources. This is useful if you have jobs that are very important and must complete, or jobs that can be moved to a lower priority. The Start up in Suspended State specifies that this job will start in the Job Controller in a suspended state and cannot run until the job is manually resumed using the Resume option. This option can be used to add a level of manual control when a job is started. For example, you could schedule jobs to start in the suspended state and then choose which scheduled jobs complete by resuming the operation started in the suspended state. Refer to the Job Priority and Priority Precedence documentation for a comprehensive overview prior to using these options. |
|
Run Pre/Post Restore Processes |
This option is available from the Pre/Post tab in the Advanced Restore Options window. When you select this option, it allows you to use the restore phases as triggers to start processes. For more information on which agents support Pre-processes and Post-processes for Restore, see Restore Options - Support. |
|
Assign Copy Precedence |
This option is available from the Copy Precedence tab in the Advanced Restore Options window. Use this dialog box to assign a particular copy precedence to the copy that you want checked for that particular storage policy. For a more detailed discussion, see Recovering Data From Copies. |
|
Redirect one or more datafiles |
These options are available from the Redirect tab in Advanced Restore Options window. You can rename and/or redirect one or more datafiles when the data is restored as well as to redirect table spaces to another location for restore. |
|
Alert |
You can configure alerts for the specific restore job from the Alert tab in the Advanced Restore Options window. Refer to the Alerts documentation for comprehensive overview prior to using this feature. |