You can customize the SAP Archive Link for SAP Archiving Interface to use the SAP Archive Link with Commvault ObjectStore to store and manage SAP data.
The ArchiveLink is the generic interface for archiving; almost all SAP application areas use this interface by customizing the generic business object service for archiving in the given SAP application.
Before You Begin
Configure the SAP Archive Link client. For more information, see Configuring the SAP Archive Link Client for SAP Archiving Interface.
Procedure
-
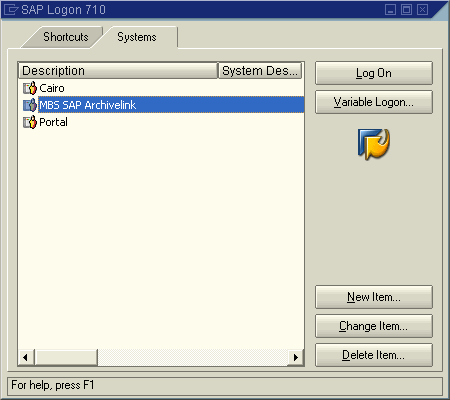
Double click the SAP Logon icon.
From the SAP Logon select the Systems tab. Double-click on the MBS SAP Archivelink option.
-
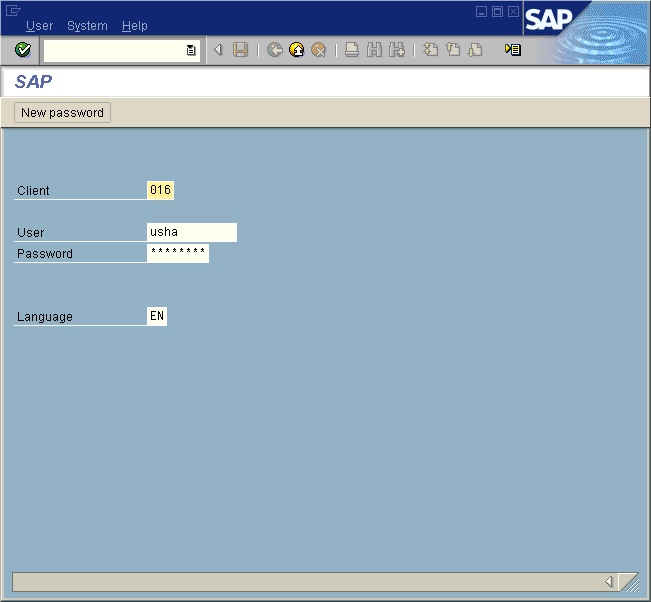
From the SAP Login windowenter valid credentials for Client, User, Password and Language.
To change your password click the New password icon.
Click the ENTER icon located at the top right corner of the screen.
-
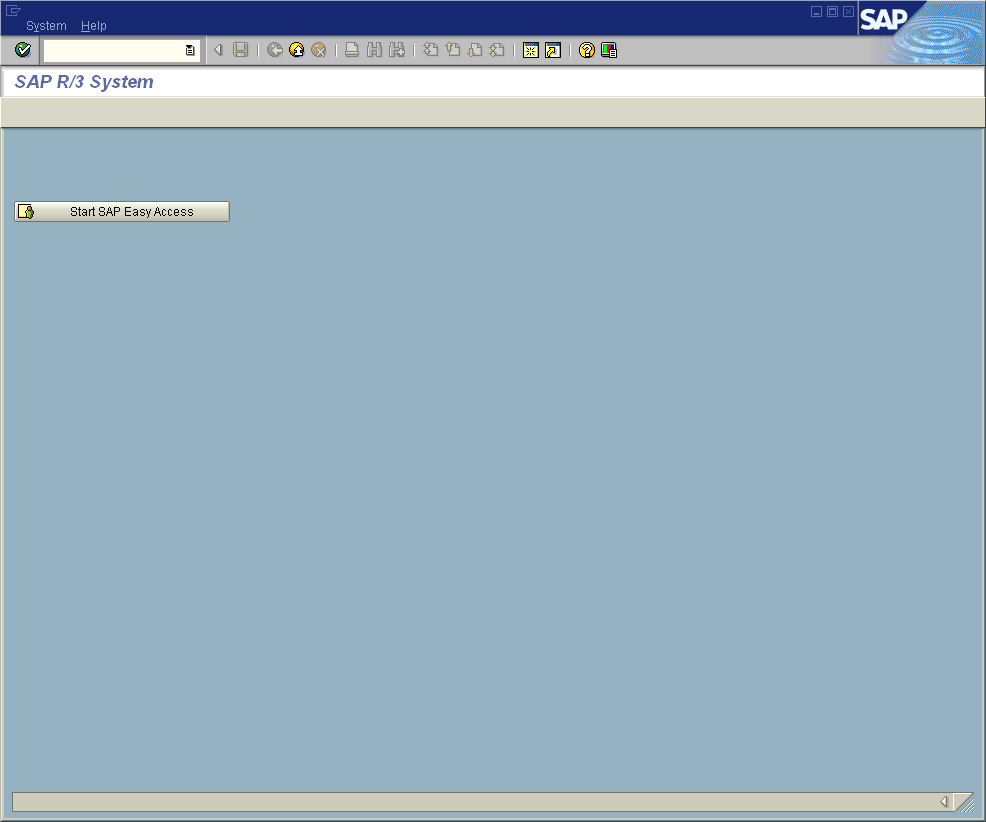
From the SAP R/3 System window,click on Start SAP Easy Access.
This initiates the SAP Easy Access program.
-
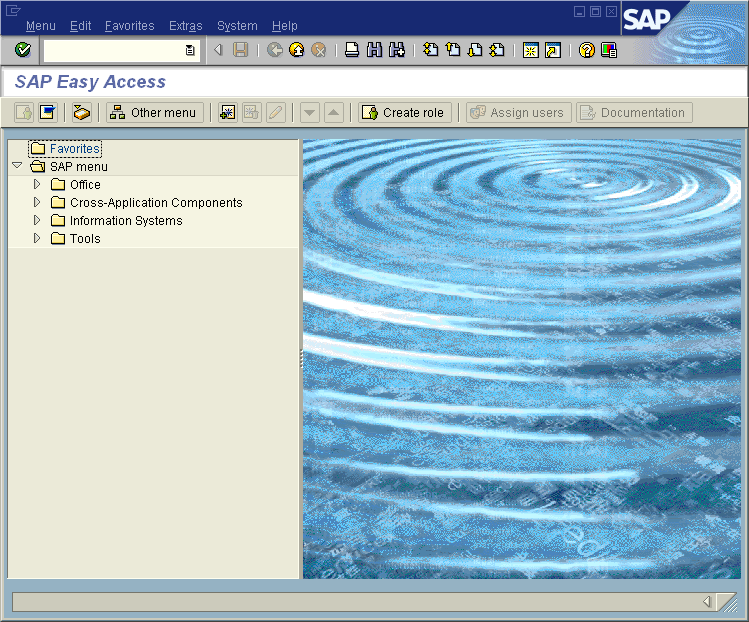
From the SAP Easy Access window, click on the Favorites folder, to select the existing transactions.
If no transactions have been created, click on Insert icon and select the Transaction option to manually invoke the required transaction.
-
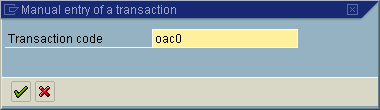
Clicking on Insert --> Transaction opens the Manual entry of a transaction pop-up window.
Enter the value oac0 forthe Transaction Code.
Click the OK icon.
-
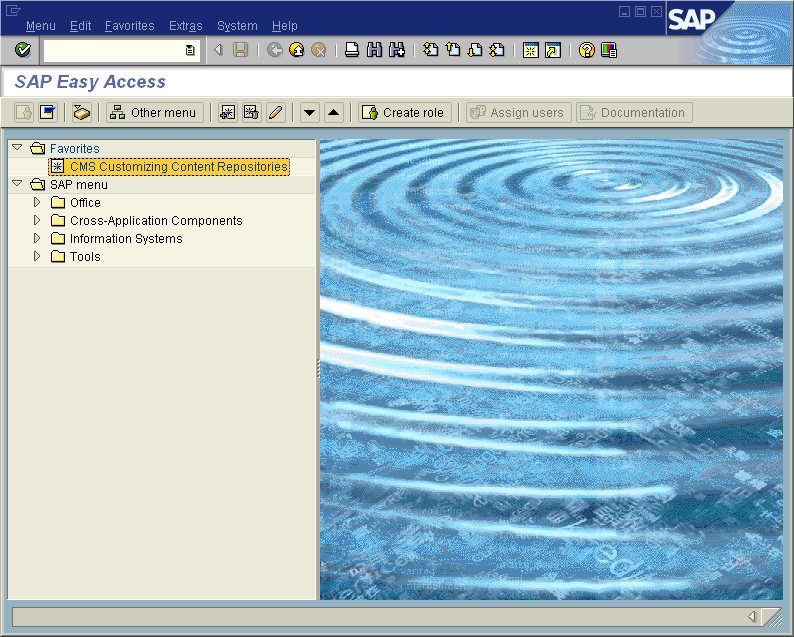
The SAP Easy Access window now has the CMS Customizing Content Repositories as part of the favorites folder.
Double click the CMS Customizing Content Repositories to create, view or edit the content repositories.
-
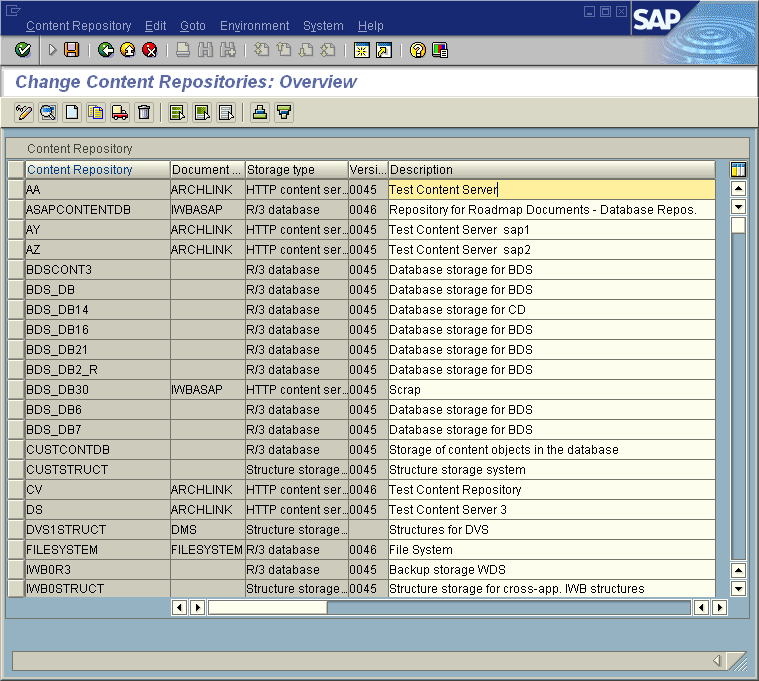
From the Change Content Repositories: Overview window, you can create a new content repository, edit or delete an existing repository.
To Update an existing repository: Click on the Display/Change icon (shortcut key: CTRL+F4). Double click the repository you want to update. The Change Content Repositories: Detail window opens allowing you to edit the content.
To Delete a repository: Click on the Display/Change icon (shortcut key: CTRL+F4). Select the content repository you want to delete and hit the Delete icon (shortcut key: Shift+F2).
To Create a new repository: Click on the Display/Change icon (shortcut key: CTRL+F4)Now click on Create icon (shortcut key: F5). The Change Content Repositories: Detail windowallows you to create a new content repository.
-
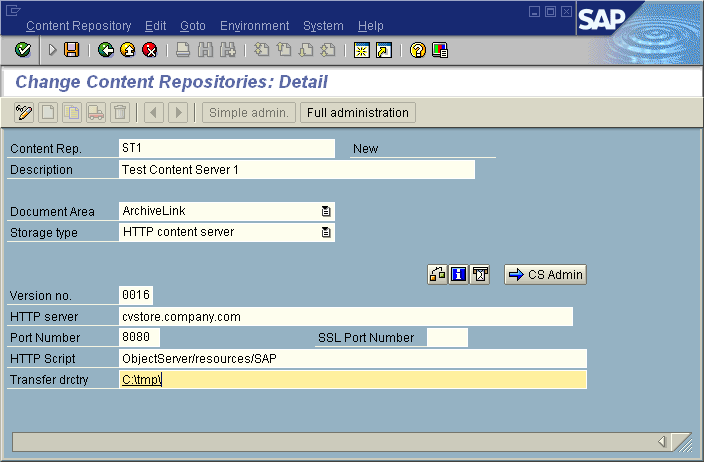
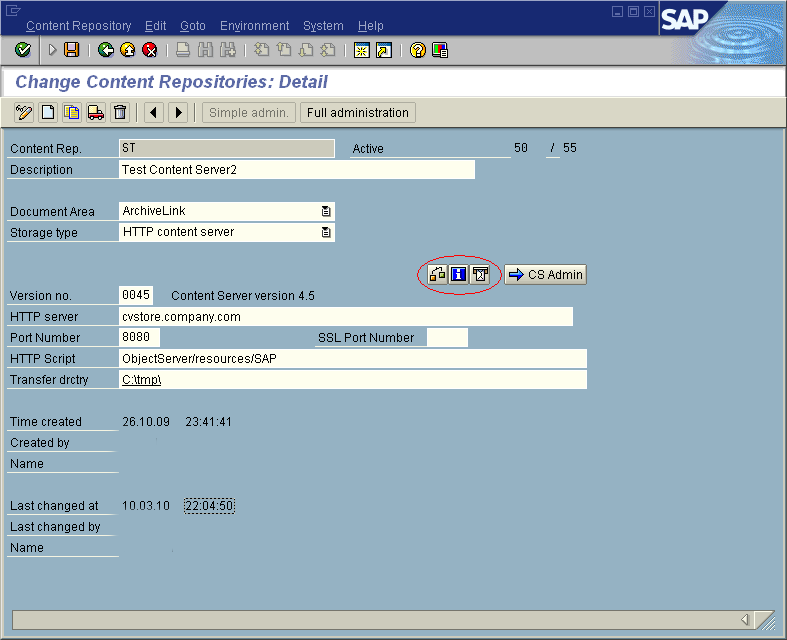
From the Change Content Repositories: Detail windowcreate a new content repository.
-
Enter the Content Repository name in the Content Rep. field. Note that the Content Repository name should be same as the "Site Path", created in the Creating a Site section.
-
Provide a short description to the Content Repository added, in the Description field.
-
Select ArchiveLink from the Document Area drop down.
-
Select HTTP content server from the Storage type drop down.
-
Enter the version number in the Version no. field.
-
HTTP Server: Provide the URL to the webservice.
-
Enter the Port Number of the webservice.
-
The HTTP Script will be ObjectServer/resources/SAP.
-
In the Transfer drctry field, enter the path to a valid directory in the machine running the SAP GUI.
Save the newly created Content Repository via the Save button (floppy icon).
A Content Repository for SAP data will be created in the defined HTTP server URL provided.
-
-
After entering all the values as detailed in Step 8, you can validate the connection by clicking on the Test Connection icon.
Click on the Status Information icon to view the server status information of all the content repositories hosted on the HTTP Server.
Every new SAP R/3 client using the SAP Archive Link, has to send a certificate of acceptance by clicking the Send Certificate icon.
Note
Test Connection, Status Information and Send Certificate icons are highlighted with a red circle in the image.
Click on the -->CS Admin to navigate to the Content Server Administration-Change window and approve the certificate just created.
-
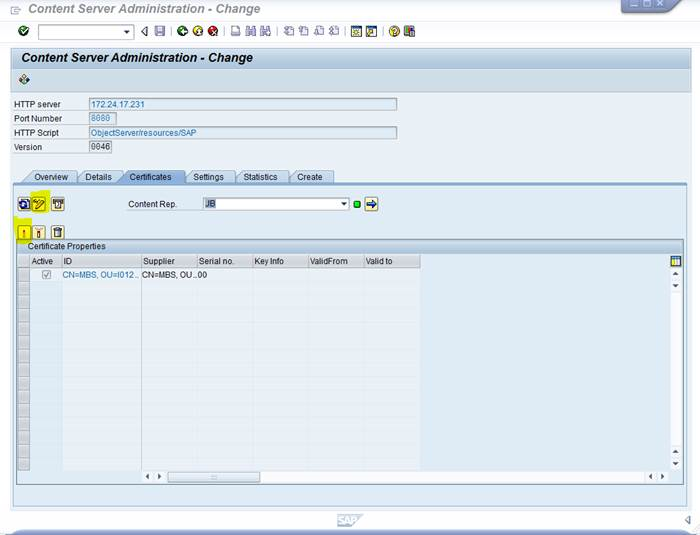
From the Content Server Administration window, select the Certificates tab.
Click on the Display<-->Change icon to enable changes.
Select the certificate you created from the Certificate Properties list by checking the box.
Now activate the certificate by clicking on the Activate icon. Make sure all credentials are checked before activating/approving the certificate. User is not given the option to deactivate a certificate.
The Deactivate icon is currently disabled.
Any changes made in this page should be saved using the Save button (floppy icon).
Note
The statistics tab in the Content Server Administration - Change window is currently under development.
Procedure
-
Double click the SAP Logon icon.
From the SAP Logon select the Systems tab. Double-click on the MBS SAP Archivelink option.
-
From the SAP Login windowenter valid credentials for Client, User, Password and Language.
To change your password click the New password icon.
Click the ENTER icon located at the top right corner of the screen.
-
From the SAP R/3 System window,click on Start SAP Easy Access.
This initiates the SAP Easy Access program.
-
From the SAP Easy Access window, click on the Favorites folder, to select the existing transactions.
If no transactions have been created, click on Insert icon and select the Transaction option to manually invoke the required transaction.
-
Clicking on Insert --> Transaction opens the Manual entry of a transaction pop-up window.
Enter the value oac0 forthe Transaction Code.
Click the OK icon.
-
The SAP Easy Access window now has the CMS Customizing Content Repositories as part of the favorites folder.
Double click the CMS Customizing Content Repositories to create, view or edit the content repositories.
-
From the Change Content Repositories: Overview window, you can create a new content repository, edit or delete an existing repository.
To Update an existing repository: Click on the Display/Change icon (shortcut key: CTRL+F4). Double click the repository you want to update. The Change Content Repositories: Detail window opens allowing you to edit the content.
To Delete a repository: Click on the Display/Change icon (shortcut key: CTRL+F4). Select the content repository you want to delete and hit the Delete icon (shortcut key: Shift+F2).
To Create a new repository: Click on the Display/Change icon (shortcut key: CTRL+F4)Now click on Create icon (shortcut key: F5). The Change Content Repositories: Detail windowallows you to create a new content repository.
-
From the Change Content Repositories: Detail windowcreate a new content repository.
-
Enter the Content Repository name in the Content Rep. field. Note that the Content Repository name should be same as the "Site Path", created in the Creating a Site section.
-
Provide a short description to the Content Repository added, in the Description field.
-
Select ArchiveLink from the Document Area drop down.
-
Select HTTP content server from the Storage type drop down.
-
Enter the version number in the Version no. field.
-
HTTP Server: Provide the URL to the webservice.
-
Enter the Port Number of the webservice.
-
The HTTP Script will be ObjectServer/resources/SAP.
-
In the Transfer drctry field, enter the path to a valid directory in the machine running the SAP GUI.
Save the newly created Content Repository via the Save button (floppy icon).
A Content Repository for SAP data will be created in the defined HTTP server URL provided.
-
-
After entering all the values as detailed in Step 8, you can validate the connection by clicking on the Test Connection icon.
Click on the Status Information icon to view the server status information of all the content repositories hosted on the HTTP Server.
Every new SAP R/3 client using the SAP Archive Link, has to send a certificate of acceptance by clicking the Send Certificate icon.
Note
Test Connection, Status Information and Send Certificate icons are highlighted with a red circle in the image.
Click on the -->CS Admin to navigate to the Content Server Administration-Change window and approve the certificate just created.
-
From the Content Server Administration window, select the Certificates tab.
Click on the Display<-->Change icon to enable changes.
Select the certificate you created from the Certificate Properties list by checking the box.
Now activate the certificate by clicking on the Activate icon. Make sure all credentials are checked before activating/approving the certificate. User is not given the option to deactivate a certificate.
The Deactivate icon is currently disabled.
Any changes made in this page should be saved using the Save button (floppy icon).
Note
The statistics tab in the Content Server Administration - Change window is currently under development.