Terminology
OnePass for Exchange Mailbox (Classic) uses the following logical entities to manage archive and recovery operations from the CommCell Console.
Agent:Defines the Exchange server to be archived. In this case, it is Exchange Mailbox (Classic).
Backupset:Facilitates automatic discovery of mailboxes.
Subclient:Defines the mailboxes to be archived.
Grouping Mailboxes into User-Defined Subclients
You can create user-defined subclients to divide mailbox backups into groups based on specific criteria. For example, you might want to backup mailboxes in the Administrators Active Directory User group on a nightly basis, whereas mailboxes in the Accounting Active Directory User group might only need to be backed up once a week. Creating a user-defined subclient for each user group allows you to archive them at different intervals based on your resources and backup needs.
Tip
By default, the content of the default subclient contains all the mailboxes whose home server is the configured Exchange server. When you create a user-defined subclient, the contents of the user-defined subclient will be excluded from the default subclient.
By Active Directory User Groups
Before You Begin
In cases where the CommServe and the Active Directory Server are across a firewall, ensure that port 389 is opened.
Procedure
-
From the CommCell Browser, expand Client Computers> client > agent.
-
Right-click the appropriate backup_set, and then click Properties.
-
Click the Auto Discover tab.
-
Select the Enable Auto Discover check box, and then select AD User Group Affinity.
-
Click OK.
-
From the CommCell Browser, expand Client Computers> client > agent.
-
Right-click the backup_set, and then click All Tasks > New Subclient.
-
In the Subclient Name box, type a name.
-
Click the Storage Device tab, in the Storage Policy box, select a storage policy.
-
Click the Auto-discovery tab, and then click Configuration.
-
Click Discover.
-
In the Domain Name box, type the Active Directory domain name for the mailbox.
-
In the User Name box, type the user account name.
-
In the Password box, type the password for the user account, and then click OK.
-
On the Configure AD User Group for Auto-discovery dialog box, click the Subclient column to assign the Active Directory User Group to a subclient.
Alternatively, you can select the appropriate Active Directory User group, and then select the subclient from the Move all selected Items to drop-down box.
-
Click OK.
By Databases
You can configure a user-defined subclient to automatically discover mailboxes created within a particular database. This is especially useful in cases where a number of databases exist.
Procedure
-
From the CommCell Browser, expand Client Computers> client > agent.
-
Right-click the appropriate backup_set, and then click Properties.
The Backup Set Properties dialog box appears.
-
Click the Auto Discover tab.
-
Select the Enable Auto Discover check box, and then click Database Affinity.
-
Click OK.
-
From the CommCell Browser, expand Client Computers> client > agent.
-
Right-click the backup_set, and then click All Tasks > New Subclient.
-
In the Subclient Name box, type a name.
-
Click the Storage Device tab, in the Storage Policy box, select a storage policy.
-
Click the Auto-discovery tab, and then click Configuration.
-
Click Discover.
The mailbox stores appear.
-
To assign the mailbox store to a subclient, click the Subclient column and select one from the list.
Alternatively, you can assign all databases to one subclient in the Move all selected items to field.
-
Click OK.
Using Regular Expressions
Regular expressions can be used to discover mailboxes based on unique patterns of display names. For example, regular expressions can be used to discover all mailboxes that contain a particular department name within its display name.
When mailboxes are discovered using regular expressions, any mailbox that matches the wildcard expressions are automatically assigned to the associated user-defined subclient. If a mailbox does not match the expressions, it is automatically assigned to the default subclient.
The following table provides some examples of useful regular expressions:
|
Example |
Description |
|---|---|
|
Accounting* |
Auto-discovers any mailbox display name that begins with Accounting followed by any number of any characters (for example, Accounting Mailbox, Accounting Manager, and so on). |
|
user_group? |
Auto-discovers any mailbox display name that begins with user_group followed by any one character (for example, user_groupA, user_group1, and so on). |
|
[JT]im |
Auto-discovers any mailbox display name that begins with J or T and ends with im (for example, Jim, Tim). |
|
[a-k]Lee |
Auto-discovers any mailbox display name that begins with any character in the range of a through k inclusive and that ends with Lee (for example, aLee, bLee, and so on) |
|
[!ei]nsure |
Auto-discovers any mailbox display name that ends with nsure but does not begin with e or i (for example, unsure). |
|
[!a-k]Lee |
Auto-discovers any mailbox display name that does not begin with a through k and that ends with Lee (for example, xLee, yLee, and so on). |
|
[A-K]* |
You can also use a combination of wildcards in a single expression, if the wildcards are supported for the type of operation you are performing. For example, if you wanted to auto-discover all mailbox display names beginning with any characters in the range of A through K inclusive followed by any number of any characters, you would enter the following wildcard combination. |
|
[A-Z]*[ ][A-E][A-Z]* |
To skip the entire first name, find the first space and then discover users with last name beginning with the letters A through E. |
Procedure
-
From the CommCell Browser, expand Client Computers > client > agent.
-
Right-click the appropriate backup_set, and then click Properties.
The Backup Set Properties dialog box appears.
-
Click the Auto Discover tab.
-
Select the Enable Auto Discover check box, and then click Match mailbox by regular expressions.
-
Click OK.
-
From the CommCell Browser, expand Client Computers> client > agent.
-
Right-click the backup_set, and then click All Tasks > New Subclient.
-
In the Subclient Name box, type a name.
-
Click the Storage Device tab, in the Storage Policy box, select a storage policy.
-
Click the Auto-discovery tab.
-
In the Mail Box Display Names box, type a regular expression or wildcard pattern to specify that newly discovered mailbox display names matching that pattern during auto-discovery will be assigned to this subclient.
For a comprehensive wildcard list, see Wildcards.
-
Click Add. Repeat this step to enter additional wildcard patterns.
-
Click OK.
Disabling Automatic Discovery
Automatic discovery of mailboxes can be disabled in cases where it is no longer appropriate for mailboxes to be included in routine backups automatically. After automatic discovery is disabled, you must assign all mailboxes to a subclient manually.
Procedure
-
From the CommCell Browser, expand Client Computers > client > agent.
-
Right-click the appropriate backup_set, and then click Properties.
The Backup Set Properties dialog box appears.
-
Click Auto Discover tab.
-
Clear the Enable Auto Discover option.
-
Click OK.
Rearranging Subclient Content Automatically Based on Auto Discovery Rules
By default, if a change is made to an automatically discovered mailbox that alters the association criteria it was discovered with, the next Archive will automatically reassign the mailbox to the appropriate subclient that satisfies the new criteria. For example, if a mailbox was assigned to a subclient based on its parent database and the mailbox is later moved to a different database, the next Archive will automatically move the mailbox to the subclient associated with the new database.
In some cases, it might not be appropriate for the Archives to manage mailboxes in this manner. You can disable this functionality or enable it again later if it has already been disabled.
Procedure
-
From the CommCell Browser, expand Client Computers > client.
-
Right-click the agent, and then click Properties.
The Exchange Mailbox (Classic) Properties dialog box appears.
-
Clear or select the Manage Content Automatically check box.
-
Click OK.
Configuring Archiving Rules
Message rules specify the criteria for the type of data to be stubbed. Messages that satisfy all the criteria are stubbed when the backup is run.
Messages are stubbed based on the following criteria:
-
Message Properties
-
Attachments
-
Disk Space and Mailbox Quotas
Based on Message Properties
You can set rules to archive messages based on the messages properties. All the messages matching with this criteria will be archived.
Procedure
-
From the CommCell Browser, expand Client Computers > client > agent > backup_set.
-
Right-click the subclient, and then click Properties.
The Subclient Properties dialog box appears.
-
Select the Message Rules tab.
-
Select Create Stubs.
-
In the Collect message after box, type or select the number of days old that a message must be in order for the message to be archived.
-
In the Collect message larger than box, type or select the size a message must be of in order for the message to be archived
-
You can select one or more from the following options:
-
Select Collect only messages containing attachment check box to archive the messages that have attachments.
-
Select the Skip unread messages check box.
-
Select Leave message body in the stub check box.
-
Select Add recall link to stub body check box.
-
-
In the Exclude these message types area, select one or more options to be excluded from being archived:
-
Appointments
-
Contacts
-
Schedules
-
Tasks
-
Custom: Select this option to define any specific message class to be excluded.
-
-
Click OK.
Based on Disk Space and Mailbox Quotas
You can set rules to archive based on a specified amount of used disk space on the volume where the database exists that hosts the mailbox. You can also establish a mailbox quota rule, which will archive messages when the mailbox has exceeded the specified threshold.
Procedure
-
From the CommCell Browser, expand Client Computers > client > agent > backup_set.
-
Right-click the subclient, and then click Properties.
The Subclient Properties dialog box appears.
-
Click the Message Rules tab, and the click the Quota subtab.
-
Select the Used disk space check box.
-
In the Archive if used disk space reaches box, type or select the size of the disk volume.
-
Select the Mailbox Quotas check box.
-
In the Archive if size of mailbox reaches box, type or select the mailbox size high watermark value.
-
In the Stop archive when mailbox reaches box, type or select the mailbox size low watermark value.
-
Click OK.
Based on Attachments
You can include or exclude messages from an archive operation based on the attachment type. When attachment filters are specified, the age/size rules are ignored when archiving criteria for attachments of the specified type. When attachment filters are not specified, age/size rules determine whether the attachments are archived. If there is a conflict between Attachment type Inclusions and Exclusions for a particular message, Attachment type Exclusions take precedence over Inclusions.
Note
The ability to include or exclude messages based on their attachment type is only supported for Exchange 2010 or earlier.
Procedure
-
From the CommCell Browser, expand Client Computers > client > agent > backup_set.
-
Right-click the subclient, and then click Properties.
The Subclient Properties dialog box appears.
-
Click the Message Rules tab.
-
Select the Enable these message rules check box.
-
Click the Attachment subtab.
-
Click Add, and then double-click the file extension.
-
Click Include to include all the attachments with the selected extension in the Archive migration operation.
-
Click Exclude to exclude all the attachments with the selected extension in the Archive migration operation.
-
-
Click Close.
-
Click OK.
Message Retention
Retention criteria defines the length of time that backed up data is retained in secondary storage. Message retention can be configured in three ways: at the storage policy copy level, at the subclient level, and using retention tags.
Storage Policy Copy Level
If you configure retention at the storage policy copy level, messages are retained based on the job in which they are archived. Messages are retained for the specified number of days and cycles. After the retention criteria are met, the older cycles are aged.
We recommend that you set the storage policy retention to 2 cycles, 15 days.
For more information, see Data Aging.
Subclient Level
When the retention criteria are specified at the subclient level, the messages are retained on the secondary storage for the specified number of days. This data is carried over to subsequent cycles through synthetic full backups.
You have the option to prune data on the Exchange server based on your data retention requirements. After the data is removed from the Exchange server, the data is not added to the indexing image of the next incremental backup. When the next synthetic full backup occurs, any data that is not in the most recent image is not carried forward to the next cycle.
Example
In this example:
-
The storage policy level retention is set to one day and one cycle.
-
The subclient level retention is set to prune messages from storage after 1095 days (that is, three years) from the message received time.
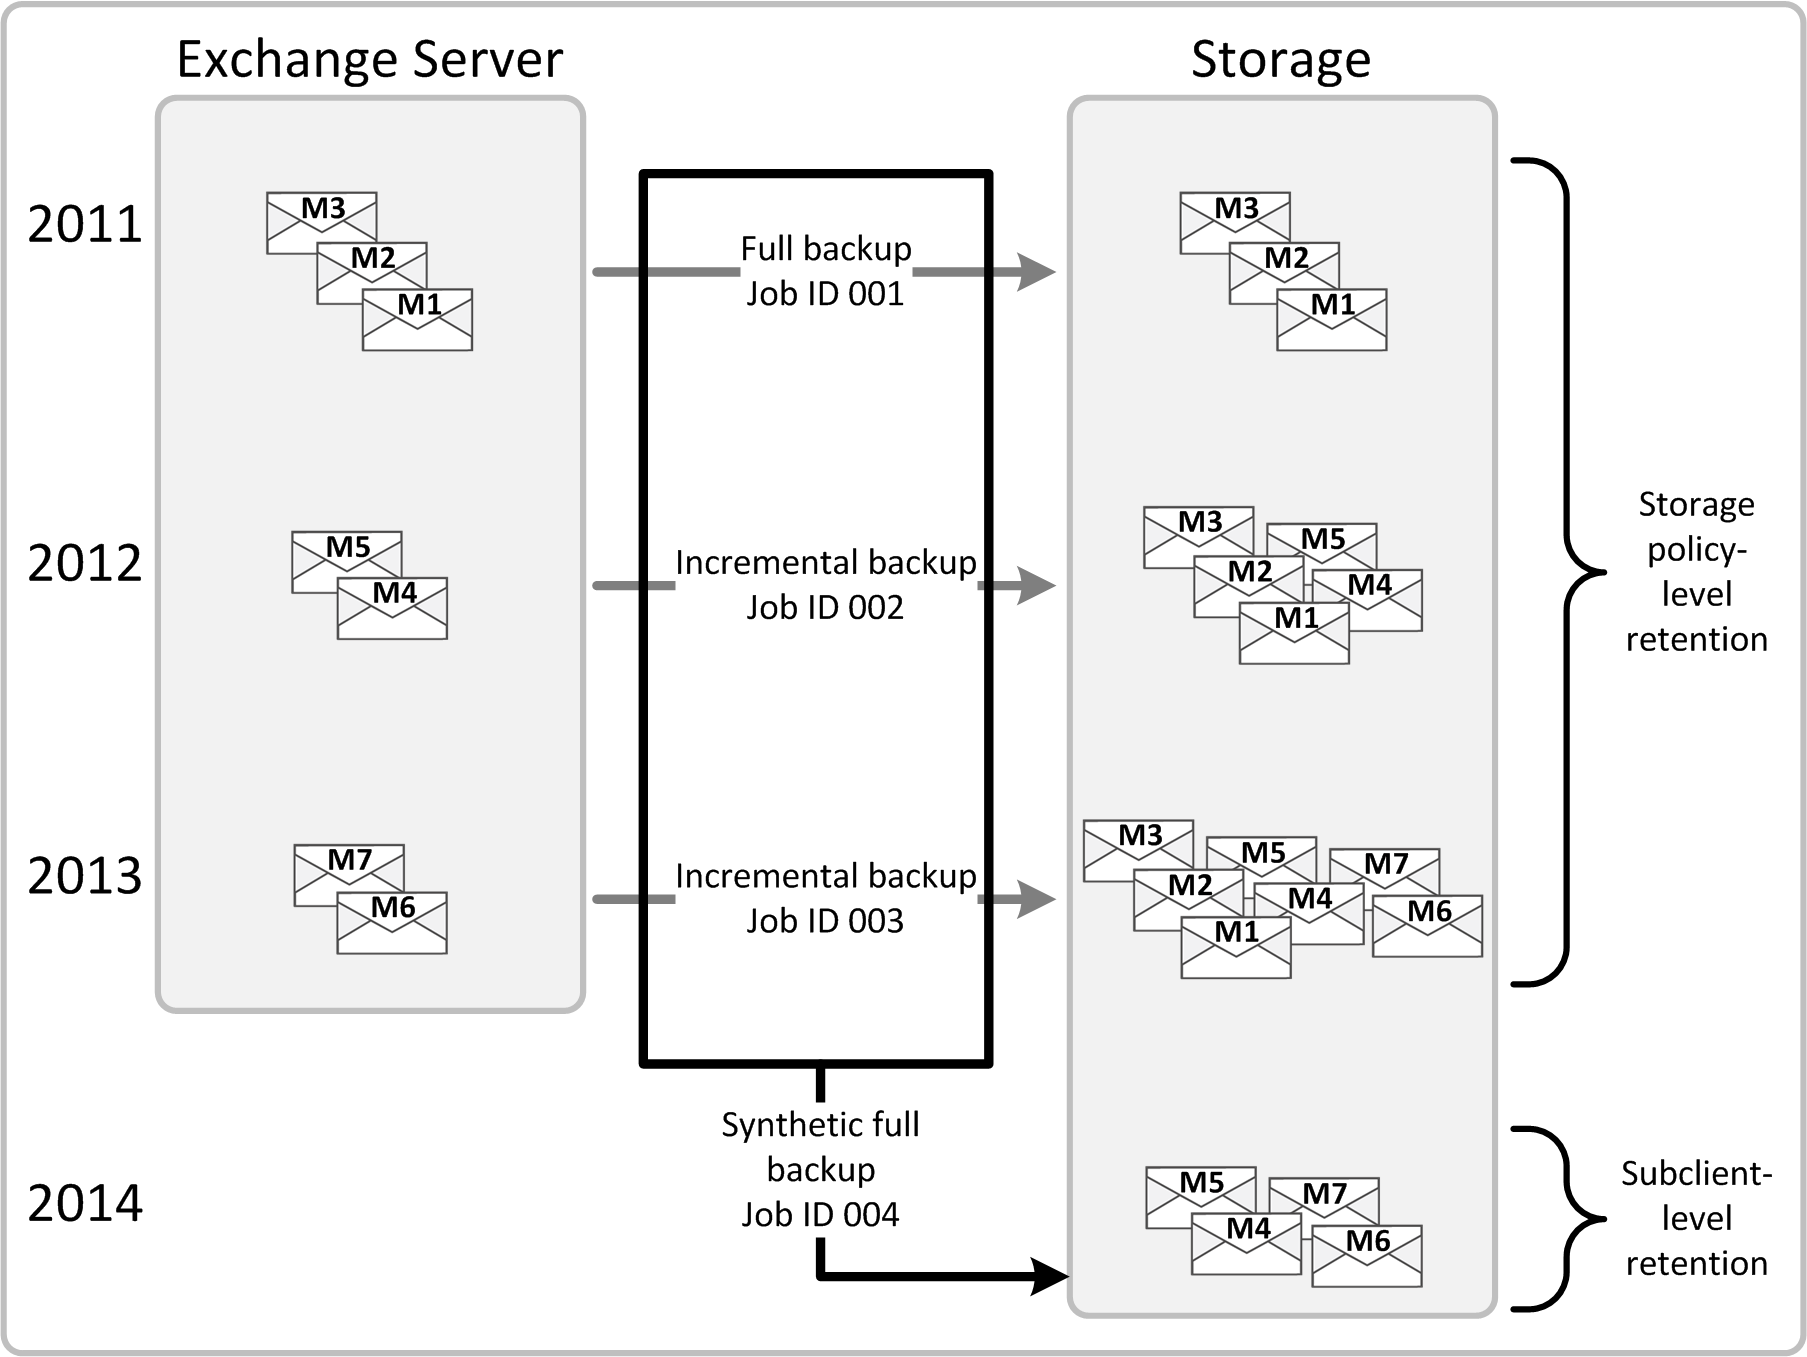
During the first full backup, emails M1, M2 and M3 are backed up to storage.
After the first full backup, emails M4, M5, M6 and M7 are received in the mailbox, and the messages are then backed up to storage during incremental backups.
Based on the storage policy-level retention, Jobs 001, 002, and 003, the two incremental and the one full are aged one day after the synthetic full backup runs.
Based on the subclient-level retention, when a synthetic full backup runs after the 1095 day retention criterion is met, emails M1, M2 and M3 are pruned from storage. However, emails M4, M5, M6 and M7 are carried forward to the next backup.
Configuring Retention Options for Messages and Stubs in the Mailbox
The messages that meet the message rule criteria are archived. The stubs of these archived messages are available in the mailbox together with the messages that did not meet the message rule criteria. You can configure the retention time for these stubs and messages.
Procedure
-
From the CommCell Browser, expand Client Computers > client > agent > backup_set.
-
Right-click the subclient, and then click Properties.
The Subclient Properties dialog box appears.
-
Select the Retention tab.
-
On the Source Pruning subtab, select the Prune messages check box and enter the number of days you want to retain data in the Older than n days based on received time field.
Optionally, you can select Never to retain the messages and the stubs forever on the secondary storage.
-
If you selected the Enable these message rules check box with the Create Stubs option on the Message Rules tab, then select the Prune stubs check box.
-
Click OK.
Result
Based on the message receive time, the messages will be deleted from the mailbox after the specified number of days.
Based on the message receive time, the stubs will be deleted from the mailbox after the specified number of days.
Configuring Source Pruning for Data and Stubs
By default, stubs and messages are pruned every 30 days. However, you can modify the pruning time by using the StubPruneFrequency additional setting.
Procedure
-
From the CommCell Browser, expand Client Computers.
-
Right-click the appropriate Exchange Mailbox client, and then click Properties.
The Client Computer Properties dialog box appears.
-
Click Advanced.
-
Click the Additional Settings tab.
-
Click Add.
-
In the Name box, type StubPruneFrequency.
-
From the Category list, select MSExchangeMBAgent.
-
In the Value field, enter the number of days after which the stubs and the messages will be pruned.
-
Click OK.
-
Restart the services on the client computer.
Configure Retention Options for Messages on the Secondary Storage
You can configure the retention time for the protected messages on the secondary storage. By default, messages and stubs are available for 1825 days on the secondary storage. However, you can configure to modify the backup retention on the secondary storage.
Procedure
-
From the CommCell Browser, expand Client Computers > client > agent > backup_set.
-
Right-click the subclient, and then click Properties.
The Subclient Properties dialog box appears.
-
Select the Retention tab.
-
Do either of the following:
-
Select If deleted on source to delete the messages immediately during synthetic full backups.
-
Select Older than n days based on received time and enter the number of days that you want to retain the messages on the secondary storage based on their received time.
-
-
Click OK.
Deleting Items Selectively Before Their Received Time Retention Criteria Is Met
You might want to delete certain messages or folders from secondary storage before they have met the configured Received Time retention criteria. This defensive pruning can be accomplished by using a combination of Delete Data by Browsing and running Synthetic Full backups on a subclient with OnePass enabled to remove these items selectively from secondary storage.
Your data will be deleted completely and you will not be able to recover your data after you perform this task.
Before You Begin
Delete the messages from the primary storage to ensure that they are not protected again in future backups.
Procedure
-
From the CommCell Browser, expand Client Computers > client > agent.
-
Right-click the backup_set that contains the data that you want to delete, click All Tasks > Delete Data By Browsing.
-
You are warned that the data will be permanently removed. Click Yes to continue.
-
From the Delete Data by Browsing dialog box, click Browse.
Note
When a path is selected and a browse time is specified, all data that matches the path will be deleted even if the data was not backed up in the specified time range.
-
In the Browse Options dialog box, select a browse time range and any advanced browse options, and click View Content.
-
From the browse selection window, select the data objects that you want to delete, and click OK.
Note
If you need to delete data from a specific folder that is not visible in the current browse selection, you need to browse to a point in time to a backup that included the folder. Then, you can select the data under that folder to be deleted.
-
Click Job Initiation if you would like to run this job immediately, click Immediate and then OK to run the job now.
-
From the CommCell Browser, expand Client Computers > client > agent > backup_set.
-
Right-click the subclient, and then click Backup.
-
From the Backup Options dialog box, select Synthetic Full for Backup Type.
-
Select Immediate for Job Initiation.
-
Click OK.
The data will be removed from the secondary storage during the Data Aging process as soon as the cycle retention criteria is met. The previous cycles containing this data will be removed from secondary storage, the data will be unrecoverable and the space will be reclaimed. For more details on deleting data, see Delete Backup and Archive Data.
Configuring the Recall Service Manually
The Recall Service URL is saved into each mailbox during the backup operation. The URL is defined in the client properties. However, the URL is not saved into mailboxes that were backed up previously, but are not backed up any longer.
Defining a Recall URL for Mailboxes That Are Not Backed Up
Stubs might exist for mailboxes that were backed up previously, but are not backed up any longer. You can set the recall URL for these mailboxes manually. In this case, the URL for mailboxes that are not backed up is the same as the URL for mailboxes that are backed up.
Procedure
-
From the CommCell Browser, expand Client Computers.
-
Right-click the Exchange Mailbox client, and then click Properties.
The Client Computer Properties dialog box appears.
-
Click Advanced.
The Advanced Client Properties dialog box appears.
-
Click the Additional Settings tab.
-
Click Add.
The Add Additional Settings dialog box appears.
-
In the Name box, type nUseRecallService.
-
In the Value field, type 1 to set the recall service on all the mailboxes.
-
Click OK.
-
Restart the services on the client computer.
Notes
In a cluster setup, make sure that:
-
The additional setting is configured on all of the physical nodes.
-
The Exchange server details are specified in the Agent properties on all of the physical nodes.
Defining a Different Recall URL
By default, the recall service is configured at the client properties level. You can set the recall URL of mailboxes to a different URL than the one defined in the client properties.
For example, you can define the recall URL when:
-
You do not back up any mailboxes anymore and you have not set any recall services in the client properties.
-
You need to define a different URL than the URL that was set during the backup.
However, defining a different recall URL temporarily overwrites the recall URL for all of the mailboxes, including the ones that use the URL that is defined in the client properties. After the recall URL is set temporarily, you can remove the additional setting. During the next back up, the recall URL for the mailboxes that are included in the backup are reset to the value that is defined in the client properties. Any mailboxes that are not backed up retain the recall URL that you defined.
Procedure
-
From the CommCell Browser, expand Client Computers.
-
Right-click the Exchange Mailbox client, and then click Properties.
The Client Computer Properties dialog box appears.
-
Click Advanced.
The Advanced Client Properties dialog box appears.
-
Click the Additional Settings tab.
-
Click Add.
The Add Additional Settings dialog box appears.
-
In the Name box, type nRecallURL.
-
In the Value field, type the URL to set the recall service on all the mailboxes.
For example, http://webconsole.web.com
-
Click OK.
-
Restart the services on the client computer.
Notes
In a cluster setup, make sure that:
-
The additional setting is configured on all of the physical nodes.
-
The Exchange server details are specified in the client properties on all of the physical nodes.
Managing the Default Subclient
By default, all mailboxes are automatically assigned to the default subclient. This default behavior is designed to ensure all mailboxes are backed up.
If you do not want all mailboxes to automatically be included in the default subclient, you can do so as described in the following sections.
We recommend that you do not modify these settings. Doing so would disable the default subclient's capability to serve as a catch-all entity for mailbox data. As a result, some data may not get backed up.
Adding Unassociated Mailboxes to the Default Subclient
By default, all mailboxes that are not associated with a user-defined subclient are included in the default subclient. If you do not want the default subclient to include such mailboxes, you can disable this behavior.
Procedure
-
From the CommCell Browser, expand Client Computers > client > agent > backup_set.
-
Right-click the default subclient, and then click Properties.
The Subclient Properties dialog box appears.
-
Click the Auto-discovery tab.
-
Clear the Automatically add new mailboxes that do not qualify for membership in any of the subclients check box.
-
Click OK.
Configuring Backups for Archive Mailbox
Applies to: Exchange 2010 or later
By default, the Archive Mailboxes are not included in archiving. When you select this option for a subclient, all of the Archive Mailboxes that are associated with the user mailbox that is configured on the subclient are archived.
Procedure
-
From the CommCell Browser, expand Client Computers > client > agent > backup_set.
-
Right-click the appropriate subclient, and then click Properties.
The Subclient Properties dialog box appears.
-
Select the Archive Mailbox check box.
-
Click OK.
Configuring Access to Archived Emails from Outside the Firewall
You can permit users to access archived messages from outside the organization while using Web gateways. In this procedure, Forefront Threat Management Gateway 2010 is used as an example to illustrate the complete process.
Procedure
-
Navigate to the Microsoft Forefront Threat Management Gateway.
-
Right-click Firewall Policy, and then click New > Web Site Publishing Rule.
-
Enter a name that will help you identify the rule correctly in the space, and then click Next.
-
Click Allow, and then click Next.
-
Click Publish a single Web site or load balancer, and then click Next.
-
Click User SSL to connect to the published Web server, and then click Next.
-
Enter the site name in the Internal site name box, enter the IP address of the Web Console Server in the Computer name or IP address box, and then click Next.
The site name should be the same as the one specified in the Web Server URLs tab of the Advanced Client Properties.
-
Enter the path /webconsole/* in the Path (optional) box, and then click Next.
-
Enter the public name to be used for the Web Console in the Public Name box, and then click Next.
The site name should be the same as the one specified in the Web Server URLs tab of the Advanced Client Properties.
-
Select New to create new Web Listener, and then click Next.
-
Enter a name that will help you identify the Web Listener correctly in the space, and then click Next.
-
Click Require SSL secured connections with clients, and then click Next.
-
Select the External check box to listen for the incoming Web request , and then click Next.
-
Click Specified IP addresses on the Forefront TMG computer in the selected network.
-
Select the IP address from the list of Available IP Addresses, click Add IP, and then click OK.
-
Verify that the External check box is selected, and then click Next.
-
Click Use a single certificate for this Web Listener, and then click Select Certificate.
-
Select the certificate that you imported into the TMG server that you plan to use, click Select, and then click Next.
For more information, see the Microsoft Technet article "Importing a certificate to a Forefront TMG computer", http://technet.microsoft.com/en-us/library/cc995102.aspx
-
From the Select how clients will provide credentials to Forefront TMG list, select No Authentication, and then click Next.
-
Click Finish.
-
Make sure that the new listener is selected, and then click Next.
-
From the Select the method used by Forefront TMG to authenticate to the published Web server list, select No delegation, but client may authenticate directly, and then click Next.
-
Click Next.
-
Click Finish.
-
Click Apply.
Disabling Backups of Disabled Mailboxes That Are in Active Directory
By default, mailboxes whose user accounts are disabled from the Active Directory are backed up. You can exclude these mailboxes from the backup operation.
Procedure
-
From the CommCell Browser, expand Client Computers > client > agent > backup_set.
-
Right-click the subclient, and then click Properties.
The Subclient Properties dialog box appears.
-
On the General tab, clear the Disabled Mailbox check box.
-
Click OK.
Configuring Backups for Deleted Item Retention Folders
By default, Deleted Item Retention folders are not included in backups. You can include them for record keeping purposes.
Procedure
-
From the CommCell Browser, expand Client Computers > client.
-
Right-click the agent, and then click Properties.
The Exchange Mailbox (Classic) Properties dialog box appears.
-
On the General tab, select the Backup Deleted Item Retention check box.
-
Click OK.
Configuring Backups of Recoverable Items Subfolders
Applies to: Exchange 2010 or later
There are subfolders within the Recoverable Items folder that you might need to back up if a Litigation Hold or In-Place Hold is placed on a mailbox. These subfolders are named Purges and Versions (Exchange 2010 or later), and DiscoveryHolds (Exchange 2013 or later). To configure the backup of these subfolders, you must enable the corresponding additional setting, and then configure the backup of the Deleted Item Retention folder.
Notes
-
These subfolders are backed up, but they are not stubbed.
-
When a mailbox is placed under Litigation Hold or In-Place hold, the Exchange server maintains additional copies of edited messages in the Recoverable Items subfolders. Make sure that you allocate sufficient backup space to account for these additional messages.
Procedure
-
Enable the backup of the folders within the Recoverable Items folder.
-
From the CommCell Browser, expand Client Computers.
-
Right-click the Exchange Mailbox client, and then click Properties.
The Client Computer Properties dialog box appears.
-
Click Advanced.
The Advanced Client Properties dialog box appears.
-
Click the Additional Settings tab.
-
Click Add.
The Add Additional Settings dialog box appears.
-
In the Name box, type the name of the appropriate additional setting.
-
To back up the Purges folder, type nBackupPurges.
-
To back up the Versions folder, type nBackupDiscoveryHolds.
-
-
In the Value box, type 1.
-
Click OK.
-
-
Configure the backup of the Deleted Item Retention folder.
-
From the CommCell Browser, expand Client Computers > client.
-
Right-click the agent, and then click Properties.
The Exchange Mailbox (Classic) Properties dialog box appears.
-
On the General tab, select the Backup Deleted Item Retention check box.
-
Click OK.
-
Disabling Tracking Deleted Items in Incremental Backups
By default, deleted items are tracked during an incremental backup job. This might increase the time that it takes to run an incremental backup or increase the amount of disk space that is required.
To reduce the time it takes to perform the incremental backup job or decrease the amount of disk space that is required, you can disable tracking deleted items.
Note
If you disable tracking deleted items on an existing subclient, the change takes effect during the next cycle.
Procedure
-
From the CommCell Console, expand Client Computers > client > agent.
-
Right-click the appropriate subclient, and then click Properties.
The Subclient Properties dialog box appears.
-
Select the Do not track deleted items check box.
-
Click OK.
Purging Messages from the Recoverable Items Folder
Use the nPurgeDeletedItems additional setting to prevent messages from being moved to the Recoverable Items folder so that they are not backed up again. These messages are deleted permanently from the Exchange server.
Procedure
-
From the CommCell Console, at the Exchange Mailbox client level, add the nPurgeDeletedItems additional setting using the values shown in the following table.
For more information, see Adding or Modifying Additional Settings from the CommCell Console.
Property
Value
Name
Category
MSExchangeMBAgent
Type
Integer
Value
0 = Messages are not purged from the Recoverable Items folder. This is the default setting.
1 = Messages are purged according to the message rules, but not according to source pruning configurations.
2 = Messages are purged according to source pruning configurations, but not according to the message rules.
3 = Messages are purged according to the source pruning configurations and the message rules.
Delaying Stubbing
Delayed stubbing prevents data loss in the event that you must perform a disaster recovery (DR) restore. Without delayed stubbing, when you perform a DR restore, recalls might fail for files that were backed up after the DR backup that is selected to be restored. By delaying stubbing, you can roll back to a previous CommServe DR version (within the minimum DR backups setting) without any data loss.
Stubbing is delayed by the number of DR backups plus the number of days that must pass after a DR backup. By default, this is set to three (3) DR backups + two (2) days.
Delayed stubbing is disabled on a client when the agent is located initially and remains disabled until seven (7) days after the first backup job is run on the client. After those seven days have passed, delayed stubbing automatically becomes enabled using the default value of three DR backups plus two days. The default value is the minimum recommended value for effective data loss prevention. However, you can change the number of DR backups and the number of days to delay the stubbing process by configuring the nMinDRBackupBeforeStubbing (DR backups) and nMinDaysBeforeStubbing (days passed) additional settings at the CommServe level.
Important Considerations
Consider the following when you use synthetic full backups:
-
Synthetic full backup jobs must be run less frequently than the DR backup jobs.
-
Retention of the DR backup job must be longer than the frequency of the synthetic full backup job schedule.
-
The time interval between the synthetic full backup jobs must be greater than the maximum value of (m*x, n).
where m and n are nMinDRBackupBeforeStubbing and nMinDaysBeforeStubbing additional setting values respectively, and x is the DR backup frequency in days.
-
Each time a synthetic full backup job is run, the count for the number of DR backups and the number of days to delay the stubbing process is reset to additional setting values. If the additional settings are not present on the CommServe computer, then the count for the number of DR backups and the number of days to delay the stubbing process is reset to the default values of three and two respectively.
Notes
-
If the nMinDRBackupBeforeStubbing additional setting is not present (null) at the CommServe level, then stubbing is delayed by three DR backups.
-
If the nMinDaysBeforeStubbing additional setting is not present (null) at the CommServe level, then stubbing is delayed by two days.
-
Both the additional settings are required for delayed stubbing. To disable delayed stubbing, set the value of both additional settings to 0.
Procedure
Modify the number of DR backups to run before the stubbing process:
-
From the CommCell Console, right-click the CommServe, and then click Properties.
The CommCell Properties dialog box appears.
-
Click the Additional Settings tab.
-
Click Add.
The Add Additional Settings dialog box appears.
-
In the Name box, type nMinDRBackupBeforeStubbing.
-
In the Value box, type the number_of_DR_backups_to_delay_stubbing_after_backup.
-
Click OK.
Modify the number of days to delay the stubbing process:
-
From the CommCell Console, right-click the CommServe, and then click Properties.
The CommCell Properties dialog box appears.
-
Click the Additional Settings tab.
-
Click Add.
The Add Additional Settings dialog box appears.
-
In the Name box, type nMinDaysBeforeStubbing.
-
In the Value box, type the number_of_days_to_delay_stubbing_after_backup.
-
Click OK.
Example
To delay the stubbing process for 7 DR backups and 3 days, configure the settings as follows:
-
nMinDRBackupBeforeStubbing = 7
-
nMinDaysBeforeStubbing = 3
The delayed stubbing process involves two steps:
-
Find a DR backup that meets the requirement of 3 days, and greater than or equal to the 7th DR backup (counting from the latest DR job to the oldest DR job).
-
Any file that is backed up before the start time of the DR backup determined in the previous step will become eligible for stubbing.
Delayed Stubbing and Modified Messages
When you configure delayed stubbing, messages that were backed up and then modified before the next incremental backup job do not appear in the latest browse on the subclient. However, when the modified messages are backed up again in the next incremental backup job, they appear as expected in the latest browse.
Stubbing Messages Based on Body Length
You can choose to stub messages based on the body length. When messages are stubbed, the body of the message is kept when it is less than or equal to the length of the maximum value that you set. The maximum value is measured in the number of characters, including spaces.
Procedure
-
From the CommCell Browser, expand Client Computers.
-
Right-click the Exchange Mailbox client, and then click Properties.
The Client Computer Properties dialog box appears.
-
Click Advanced.
The Advanced Client Properties dialog box appears.
-
Click the Additional Settings tab.
-
Click Add.
The Add Additional Settings dialog box appears.
-
In the Name box, type MsgBodyLen.
-
In the Value box, type the maximum message body length that can be stubbed.
The maximum allowed value is 16000.
-
Click OK.
Preventing the Backup of Messages That Were Stubbed Previously
You can prevent messages that were stubbed during the previous backup job from being backed up again during the next incremental job. This applies only to mailboxes that remain within the subclient to which they were assigned. If the messages and stubs belong to a mailbox that is moved to a different subclient, the messages and stubs are backed up again.
Procedure
-
From the CommCell Browser, expand Client Computers.
-
Right-click the Exchange Mailbox client, and then click Properties.
The Client Computer Properties dialog box appears.
-
Click Advanced.
The Advanced Client Properties dialog box appears.
-
Click the Additional Settings tab.
-
Click Add.
The Add Additional Settings dialog box appears.
-
In the Name box, type nSkipStubs.
-
In the Value box, type 1.
-
Click OK.
Excluding Exchange Interpersonal Message (IPM) Classes from Stubbing
Certain IPM classes, such as tasks, calendar and contacts are backed up based on the backup mode selected. However, you can choose to exclude them from being stubbed to save space on the secondary storage as well as enhance backup performance.
Procedure
-
From the CommCell Browser, expand Client Computers > client > agent > backup_set.
-
Right-click the subclient, and then click Properties.
The Subclient Properties dialog box appears.
-
Select the Message Rule tab.
-
Select Create Stubs.
-
In the Exclude these message types area, select one or more options to be excluded from being archived:
-
Appointments
-
Contacts
-
Schedules
-
Tasks
-
Custom: Select this option to define any specific message class to be excluded.
For example "IPM.TASK.*"
-
-
Click OK.
Customizing Outlook for End-Users
Displaying Attachment Lists in an Archived Message Body
You can save the list of attachments for a message in the message body in addition to the Migrated Attachment List.txt file.
Procedure
-
From the CommCell Browser, expand Client Computers.
-
Right-click the Exchange Mailbox client, and then click Properties.
The Client Computers dialog box appears.
-
Click Advanced.
-
Click the Additional Settings tab.
-
Click Add.
-
In the Name box, type nShowMsgAttachList.
-
In the Value field, enter 1 to display the list of attachments in the message body.
-
Click OK.
-
Restart the services on the client computer.
Enhancing Recovery Performance
Several options are available for streamlining archive and recovery operations. Benefits include faster archive and recovery speed, reduced network bandwidth usage, and end-user computer resources.
Limiting Persistent Pipeline Usage During Idle Recoveries
Open persistent pipelines reserve bandwidth for data transfer. In cases where recoveries become idle, you might want to close these pipelines rather than keep them open with no data transfer occurring. By default, the idle timeout is set for 7 days. You can modify this time by using the additional setting nDMRSIDLETIMEOUT.
In this procedure, the client is the computer where the Web Server is installed.
Procedure
-
From the CommCell Browser, expand Client Computers.
-
Right-click the client,and then click Properties.
The Client Computers dialog box appears.
-
Click Advanced.
-
Click the Additional Settings tab.
-
Click Add.
-
In the Name box, type nDMRSIDLETIMEOUT.
-
In the Value field, enter the number of seconds after which the pipeline will close.
The valid range is 0 to 2,147,483,647 seconds.
-
Click OK.
-
Restart the services on the client computer.
Limiting the Number of Persistent Pipelines During Recoveries
You can increase the number of persistent pipelines allowed for recoveries, thereby potentially improving stub recall speed. However, increasing the number of persistent pipelines might impact overall computer performance. You should increase this number incrementally and monitor the performance.
Ideally, the value will be the number of possible media agents used for recoveries. For example, if you plan to use up to 4 media agents for stub recalls, set the value to 4.
In this procedure, the client is the computer where the Web Server is installed.
Procedure
-
From the CommCell Browser, expand Client Computers.
-
Right-click the client,and then click Properties.
The Client Computers dialog box appears.
-
Click Advanced.
-
Click the Additional Settings tab.
-
Click Add.
-
In the Name box, type nDMRMaxRestoreThreads.
-
In the Value field, enter the number of persistent pipelines to be allowed.
-
Click OK.
-
Restart the services on the client computer.
Enhancing Stub Recall Speed
By default, during each stub recall operation, a check is run to verify if the original data has been deleted from the media. In case the Delete Data feature is not enabled on the CommServe, you can use the nDMRSSkipEraseCheck additional setting to skip the delete check and enhance the recall speed.
In this procedure, the client is the computer where the Web Server is installed.
Procedure
-
From the CommCell Browser, expand Client Computers.
-
Right-click the client,and then click Properties.
The Client Computers dialog box appears.
-
Click Advanced.
-
Click the Additional Settings tab.
-
Click Add.
-
n the Name box, type nDMRSSkipEraseCheck.
-
In the Value field, enter 1 to disable delete check.
-
Click OK.
-
Restart the services on the client computer.
Configuring LDAP Discovery
A filtering option is provided to increase performance for auto-discovery operations in cases where the discovery process may take a long time to complete. The information is cached on the client computer and can be reused across multiple processes to balance load on the server.
Configuring LDAP Cache
The cached information on the client computer and can be reused across multiple processes and is refreshed every 30 minutes by default. However, you can use nMBDBRefreshInterval additional settings to modify the refresh interval time.
Procedure
-
From the CommCell Browser, expand Client Computers.
-
Right-click the Exchange Mailbox client,and then click Properties.
The Client Computers dialog box appears.
-
Click Advanced.
-
Click the Additional Settings tab.
-
Click Add.
-
In the Name box, type nMBDBRefreshInterval.
-
In the Value field, enter the time in minutes after which the information will be refreshed.
Time range can be a value between 1 to 10080 minutes.
-
Click OK.
-
Restart the services on the client computer.
Configuring LDAP Discovery Filters
An LDAP filtering example is provided below, which will filter out system mailboxes residing on the SERVERNAME server from discovery operations for these agents:
"(&(msExchHomeServerName=*/cn=SERVERNAME)(!(CN=SystemMailbox{*)))"
Use of this option requires expert-level knowledge of constructing LDAP queries. This is beneficial for successful filtering. Incorrect use of the LDAP filtering option can result in failed discovery and data protection operations. For more information on LDAP, refer to documentation from Microsoft Corporation.
Procedure
-
From the CommCell Browser, navigate to Client Computers > client.
-
Right-click the agent, and then click Properties.
The Exchange Mailbox (Classic) Properties dialog box appears.
-
Select the Filter For Discovery checkbox, and then specify the appropriate filter in the box.
-
Click OK.
The next time a discovery operation is run, the user-specified filter is used.
Selecting a Domain Controller to Use for Discovery
You might need to specify additional domain controllers for Archives in the following circumstances:
-
The Exchange Server is installed in a different domain from the schema master.
-
Multiple domain controllers exist that might not replicate to each other.
Procedure
-
From the CommCell Browser, expand Client Computers > client.
-
Right-click the agent, and then click Properties.
The Exchange Mailbox (Classic) Properties dialog box appears.
-
Click the AD Server tab.
-
Click Add.
The Add AD Server dialog box appears.
-
In the AD Server box, type the domain controller.
You can enter an IP address or the fully-qualified domain name of the Active Directory server. Depending on the circumstances, the domains to include should be either:
-
The schema master
-
Each domain controller in your environment
-
-
Click OK.
The domain name appears in the AD Server List.
-
Repeat this procedure for each domain controller that you want to include.
-
Click OK.
Setting Up Mailbox Delegation
By default, the mailbox delegations that are configured at the Exchange server are collected for indexing purposes and are automatically displayed to the user in the Web Console.
For information about configuring the ContentStore Email Viewer settings, see ContentStore Email Viewer (end-user documentation).
For information about viewing delegated mailboxes in the Web Console, see Viewing Mail Messages in Delegated Mailboxes in Web Console.
Configuring the Collection of Folder Sharing
By default, mailbox-level delegates are collected. To configure the collection of folder-level delegates, you must enable the nEnableFolderLevelDelegateCollection additional setting.
Procedure
-
From the CommCell Browser, expand Client Computers.
-
Right-click the Exchange Mailbox client, and then click Properties.
The Client Computers dialog box appears.
-
Click Advanced.
-
Click the Additional Settings tab.
-
Click Add.
-
In the Name box, type nEnableFolderLevelDelegateCollection.
-
In the Value field, enter 1 to enable folder-level delegate collection.
-
Click OK.
-
Restart the services on the client computer.
Setting Up Content Indexing
To run a content-based search on the mailbox items, you must enable content indexing.
Note
For Exchange data, this method of content indexing applies to the classic agent only. If you use the Exchange Mailbox Agent, see Content Indexing Messages Using the Exchange Mailbox Agent.
Procedure
-
Install the Search Engine. For details, see Installing the Search Engine.
-
Configure the Search Engine. For details see, Configuration - Search Engine.
-
After you have enabled content indexing , run a content indexing job. For details, see Content Indexing - Running First Job.
Filtering Subclients
Use one of the methods below to filter data from being archived. Filters help to minimize the use of protected storage and prevent folders (such as Junk or Spam) from being archived unnecessarily.
Excluding Specific Mailboxes
By default, the system creates a Do Not Archive subclient. You can assign mailboxes to this subclient so that the mailboxes are not archived.
Procedure
-
From the CommCell Browser, expand Client Computers > client > agent > backup_set.
-
Right-click the subclient, and then click Properties.
The Subclient Properties dialog box appears.
-
Click the Content tab.
-
Click Configure.
-
Click Discover to reveal all mailboxes.
-
Under the Subclient column, select Do Not Backup.
Alternatively, you can click the appropriate mailbox, and select Do Not Backup from the Change all selected mailboxes to box.
-
Click OK.
Filtering Folders Using Regular Expressions
You can also apply regular expressions or wildcards patterns to filter folders in mailboxes from data protection. For example, you may want to exclude all Sent Items folders that are not essential for recovery. The pattern you enter will be applied to all content defined for the subclient.
Wildcard Examples
|
Example |
Description |
|---|---|
|
Sent* |
To filter out a folder which begins with Sent, specify the name of the folder and the asterisk * wildcard with no delimiters. |
|
Sent Items\test* |
To filter out a subfolder called test, specify the full path including the leader \ backslash. |
|
*\test* |
To filter out any path that ends in a folder name, use the full path including the leader \ backslash and the asterisk * wildcard for the first level. |
Procedure
-
From the CommCell Browser, expand Client Computers > client > Backup Set.
-
Right-click the subclient, and then click Properties.
The Subclient Properties dialog box appears.
-
Click the Filters tab.
-
Click Add next to Exclude the folders that contain the following patterns.
-
Type the regular expressions or wildcard patterns. Enter each pattern on a separate line.
For a comprehensive wildcard list, see Wildcards.
-
Click OK.
Filtering Specific Folders
Procedure
-
From the CommCell Browser, expand Client Computers > client > agent > backup_set.
-
Right-click the subclient, and then click Properties.
The Subclient Properties dialog box appears.
-
Click the Filters tab.
-
Click Add next to Exclude the following folders.
-
Select the appropriate mailbox user, and expand the folders to select the folders that you want to exclude from archive operation, and then click Add.
-
Click OK.
Including Specific Folders
Procedure
-
From the CommCell Browser, expand Client Computers > client > agent > backup_set.
-
Right-click the subclient, and then click Properties.
The Subclient Properties dialog box appears.
-
Click the Content tab.
-
In the Include only these folders box, type or select the folder name.
-
Click OK.
Archiving Empty Subclients
By default, if a subclient is empty, the archive job fails. You can change the AllowEmptySubClientToSucceed additional setting so that archive job completes even when a subclient is empty.
Procedure
-
From the CommCell Browser, expand Client Computers.
-
Right-click the Exchange Mailbox client, and then click Properties.
The Client Computer Properties dialog box appears.
-
Click Advanced.
The Advanced Client Properties dialog box appears.
-
Click the Additional Settings tab.
-
Click Add.
The Add Additional Settings dialog box appears.
-
In the Name box, type AllowEmptySubClientToSucceed.
-
From the Category list, select MSExchangeMBAgent.
-
In the Value box, type 1.
-
Click OK.
Backing Up Messages That Meet the Message Rules
By default while running a backup, mailbox messages defined as the subclient content are backed up. However, you can also define the messages to be backed up based on the Message Rule rules. It means that only files and folders that meet the archiving rules will be backed up.
Procedure
-
From the CommCell Browser, expand Client Computers > client > agent > backup_set.
-
Right-click the subclient, and then click Properties.
The Subclient Properties dialog box appears.
-
Click the Contents tab and select Include only messages that meet the message rules.
-
Click OK.
-
Right-click the subclient, and click Backup.
-
Select Immediate, and then click OK.
-
To see the details of the job after the job completes, right-click the subclient, and then click Backup History.
-
Click OK.
-
Right-click the job, and then click View Backed Up Messages.
The files that satisfied the Message Rules are backed up.
Changing User Accounts for Exchange Agents
The Exchange agents require a user account that has Exchange administrator privileges to:
-
Perform backups and restores
-
Log on to the related server to access the data
Additional accounts should be established by the Exchange database administrator.
By default, when you add the agent, a user account with Exchange Administrator privileges is provided. You can change the user account at the agent level.
Procedure
-
From the CommCell Browser, expand Client Computers > client.
-
Right-click Exchange, and then click Properties.
The Properties dialog box appears.
-
Click Change Account.
-
Type the user name in the Exchange Administrator Account box.
-
Type the password in the Password box and reenter it in the Confirm Password box.
-
Click OK.
Modifying an Agent, Backup Set, or Subclient
There are several configurable properties available for your agent that can be modified from the agent, archive set or subclient level as per your need.
The following table describes the properties that can be configured from the agent, Backup Set and subclient levels.
|
Option |
Description |
Related Topics |
|---|---|---|
|
Change the Profile Name |
By default a new unique profile is created for every job. However the profile name can be manually changed for this agent as follows:
|
|
|
Change the Mailbox Name |
If the Mailbox name used for the backup account is changed in the Exchange server, it is not reflected in the Exchange Mailbox (Classic) Agent. However the Mailbox name can be manually changed for this agent as follows:
|
|
|
Change the Exchange Server Name |
You can modify the name of the Exchange Server that is used by the Mailbox Agent as follows:
|
|
|
Change the Exchange Version |
You can modify the version of the Exchange Server from the list.
|
|
|
Rename Backup Set and Subclient |
You can rename a backupset and subclient: Renaming backupsets:
|
|
|
Change Storage Policies |
You can modify the storage policies in any of the following situations:
|
Refer to Storage Policies. |
|
Data Transfer Options |
You can configure the available resources for transferring data secured by data protection operations from the subclient level. This includes the following:
|
Refer to Data Compression and Network Bandwidth Throttling. |
|
View Data Paths |
You can view the data paths associated with the primary storage policy copy of the selected storage policy or incremental storage policy. You can also modify the data paths including their priority from the subclient level.
|
|
|
Configure a Subclient for Pre and Post Processing of Data Protection |
You can add, modify or view Pre-processes and Post-processes for the subclient. These are batch files or shell scripts that you can run before or after certain job phases.
|
Refer to Pre-processes and Post-Processes. |
|
Configure Activity Control |
You can enable backup and restore operations from the agent and subclient level. However, you can enable restore operations only from the agent level.
|
Refer to Activity Control. |
|
Configure User Security |
You can configure user security from the agent or subclient level. You can perform the following functions:
|
Refer to User Administration and Security. |
|
Enable and Disable Data Encryption |
When you configure encryption at the client level, it is configured automatically for all the subclients that are associated with all the agents that are located on that client. However, you can disable or change the encryption at the subclient level. |
Refer to Configuring Data Encryption on a Subclient or an Instance. |
|
View Software Version |
At the client level, the Version tab of the Properties dialog box displays the software version of the component.
|
|
|
CommCell Configuration Report |
The CommCell Configuration Report provides the properties of the CommServe, MediaAgents, clients, agents, subclients, and storage policies within the CommCell based on the selected filter criteria.
|
Refer to CommCell Configuration. |
Deleting an Agent, Backupset, or Subclient
The following sections describe the steps involved in deleting an agent, backupset, or subclient.
When you delete a Archiveset or subclient, the associated data is logically deleted and you can no longer access the corresponding data from CommCell Console for recovery purposes.
Refer to the topic Recovering Data Associated with Deleted Clients and Storage Policies for information on how to recover data if you accidentally delete an entity.
Deleting an Agent
You need to remove or deconfigure the agent software from the client computer before deleting from CommCell Browser. After you delete the client software, you can either leave the corresponding data intact for appropriate action or you can remove the data immediately. If you choose to remove the data immediately, you must delete the agent from the CommCell Browser. If you delete the agent, all of the agent's data is irretrievably lost.
You cannot delete an agent while operations for that agent are running.
Procedure
-
From the CommCell Browser, expand Client Computers > client.
-
Right-click the agent, and then click Delete.
A confirmation message appears with the following message:
This operation will permanently delete the data backed up from this level and it cannot be restored.
-
Click OK to continue with the deletion operation, or click No to abort the deletion.
Deleting a Backup Set
Consider the following before deleting a Backup Set:
-
You cannot delete a default Backup Set.
-
Schedules associated with the Backup Set are also automatically deleted.
Procedure
-
From the CommCell Browser, expand Client Computers > client > agent.
-
Right-click the backup_set, and then click to All Tasks > Delete.
A confirmation message that asks you if you want to delete the backupset.
-
Click No to cancel the deletion and retain the Archive, or click Yes to continue the deletion.
Deleting a Subclient
Consider the following before deleting a subclient:
-
You cannot delete a default subclient.
-
Schedules associated with the subclient are also automatically deleted.
Procedure
-
From the CommCell Browser, expand Client Computers > client > agent>backup_set.
-
Right-click the subclient that you want to delete, and then click Delete.
A confirmation message appears that asks you if you want to delete the subclient.
-
Click No to cancel the deletion and retain the subclient, or click Yes to continue the deletion.