The Remote Installation Assistance Program (RIA) is a complimentary service included with the purchase of HyperScale X Appliance. This service will help guide you through the planning and installation process for your new appliance, so that you can start leveraging the capability of Commvault HyperScale as quickly and seamlessly as possible.
Program Overview
The RIA program will help you through the following steps to get you setup and running:
-
What to do before you receive yourHyperScale X Appliance.
-
Rack and stack scheduling and requirements.
-
How to prepare your HyperScale X Appliance once it arrives.
-
How to schedule your Remote Installation Session and what is required.
-
Where to get help once your HyperScale X Appliance is deployed.
Before Receiving Your Hardware
Make sure you have everything you need before your appliance arrives.
Space and Power Requirements
|
HS2300 |
HS4300 |
|
|---|---|---|
|
Required Rack Units (Per Node/Appliance) |
1U per node 3U per 3 node appliance |
2U per node 6U per 3 node appliance |
|
Mounting Rack Depth |
25.6” / 650mm |
25.5” / 647mm |
|
Power Requirements |
100-240v (50/60Hz) |
100-240v (50/60Hz) |
|
Max Current (Per Node) |
100 - 140Vac / 8 - 6A / 50-60Hz 200 - 240Vac / 4.5 - 3.8A / 50-60Hz |
100-127Vac / 13 – 9A / 50-60Hz 200-240Vac / 10 - 8A / 50-60Hz |
|
Power Cabling |
6x Power Cables 1m C13 to C14 connector (2x per node) |
6x Power Cables 1m C13 to C14 connector (2x per node) |
Network Infrastructure Requirements
HyperScale X Appliance is a high-performance backup and recovery platform, and has specific networking requirements in order to operate at peak performance.
|
Minimum Network Requirements |
Redundant Networking Requirements (Recommended setup) |
|---|---|
|
6x Ten-Gigabit (10G) Ethernet Ports (2x per node) 3x Gigabit (1G) Ethernet Ports for BMC (Hardware Controller) |
12x Ten-Gigabit (10G) Ethernet Ports (4x per node) 3x Gigabit (1G) Ethernet Ports for BMC (Hardware Controller) |
Cabling Requirements
The network interface cards included with the HyperScale nodes support the use of either optical fiber or direct attach copper (Twinax) cabling.
|
For Optical Fiber Connection |
For Direct Attach Copper (Twinax) Connections |
|---|---|
|
|
|
|
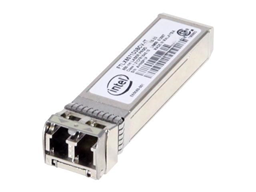
10G Base-SR SFP+ modules are included for all 4 interfaces on each node to support standard or redundant cabling. You will need to provide 10G Base-SR SFP+ modules for your switch and compatible OM3 or OM4 Multi-mode Fiber Cabling. |
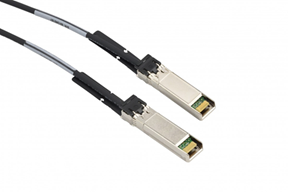
Direct Attach Copper cables are not included with an appliance purchase. When purchasing cables, ensure that they meet the following requirements:
|
10GBASE-T Support (Copper Twisted Pair)
10GBASE-T is not supported with the included SFP+ network interface cards.
Optional 10GBASE-T network cards are available instead of SFP-based configurations as an option at the time of order placement. Contact Commvault representative for more information.
Requirements For Integrating with Existing Commvault Environments
If you are an existing Commvault Customer, and will be adding the appliance to your current environment, you will need to ensure that your current software is at the same or newer version of the HyperScale X Appliance.
-
HyperScale X Appliance currently ships with the versions described in Current HyperScale Platform Versions.
-
If your Commvault environment is below this level, make sure to update to this version or higher before your RIA Session. For more information about Commvault feature release, see Service Pack and Hotfix Pack Updates.
Once You Receive Your Appliance
Once you receive your appliance, there are some steps that you need to complete before scheduling the RIA session. They are:
-
Racking your appliance
-
Retrieving your Windows product keys
-
Switch configuration, and cabling
-
Configuring the BMC Controller (IPMI)
-
Completing the pre-RIA (pre-installation) worksheet
-
Configuring DNS records
-
Scheduling the Remote Installation Assistance session
Racking Your Appliance
If you purchased the optional Rack and Stack service from Commvault, a Commvault Representative will be reaching out to confirm that your appliance has arrived, and schedule the service. This service includes unpacking the appliance, inspecting for damage and defective parts, mounting the nodes in your cabinet and performing the initial power-on and BMC configuration.
If you did not purchase the rack and stack service, you will need to unpack and install the servers in your cabinet. For rack mount instructions, please see the following documentation links:
Retrieving Your Windows Product Keys
Microsoft Windows Server 2019 Standard Product Key sticker can be found on the on the top side, front left side of the node. Carefully scratch the remainder of the key and make note of the Windows Product Key. Each node will have an individual license.

Switch Configuration and Cabling
Before cabling your appliance, we recommend configuring your switch for the appliance before connecting your 10G connections as this will simplify the cabling and configuration process.
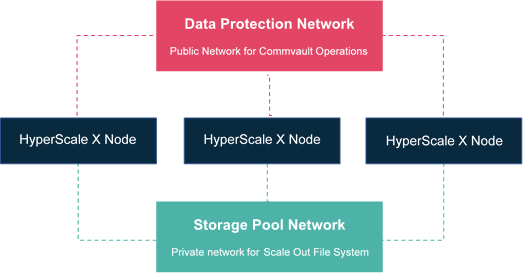
Each HyperScale node operates using two separate logical networks, a Data Protection network which is used for all Commvault communication and data transfer between MediaAgents and Clients, and a Storage Pool network which is used strictly for the scale-out file system.

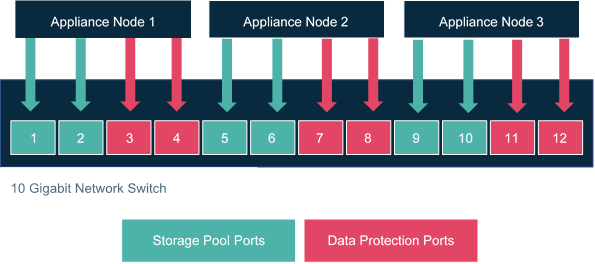
Your switch will need to be configured with two ports for the Data Protection network and two ports for the Storage Pool network for each node, when using a redundant configuration. For standard configurations the ports are reduced to one Data Protection and one Storage Pool port per node. The following configuration is recommended to simplify cabling of the appliance nodes:

It is important that the switch ports are configured properly for communication to work. Ports used for HyperScale X Appliances should have the following parameters set:
-
Should be in access mode also known as untagged
-
Port should not be part of a port channel or link aggregation group (LAG) unless using Link Aggregation Control Protocol (LACP) for bonding
Once your switch is configured the appliance should be cabled using the following guide(s):
Configuring the Baseboard Management Controller (BMC)
Once the appliance is cabled, you will need to configure the BMC to be able to remotely access the system console and perform power management operations. For more information on configuring the BMC, see Setting up a Static IP For IPMI.
Completing the Pre-Installation Worksheet
Before your Remote installation session can be scheduled, you will need to complete the following pre-install checklist.
Each node will require an IP Address for both the Data Protection and Storage Pool Networks. These will be used during your RIA session to configure your appliance.
|
Node 1 |
Node 2 |
Node 3 |
|
|---|---|---|---|
|
Data Protection IP Address* |
|
|
|
|
Data Protection Netmask* |
|
|
|
|
Data Protection Gateway* |
|
|
|
|
Data Protection DNS 1* |
|
|
|
|
Data Protection DNS 2 |
|
|
|
|
Data Protection DNS 3 |
|
|
|
|
Storage Pool IP Address* |
|
|
|
|
Storage Pool Netmask* |
|
|
|
* Required fields Next if you are a new Customer without an existing Commvault environment and would like to deploy the appliance as an all-in-one backup and recovery solution, two additional IP addresses and associated hostnames will be required. These will be used for two virtual machines that will house the Commvault Commserve role, which is a critical component of the Commvault architecture. It is responsible for coordinating all operations, storing metadata, and providing a central configuration and reporting server for your Commvault environment. On HyperScale X Appliances, it is deployed as active-passive pair to ensure availability in the event of a hardware or software failure.
Note
IP Addresses for each CommServe must reside in the same IP subnet as your node’s Data Protection interfaces.
|
Primary CommServe VM* |
Standby CommServe VM |
|
|---|---|---|
|
Fully Qualified Hostname (FQDN)* |
|
|
|
IP Address* |
|
|
* Required fields
Configuring DNS Records
When deploying a HyperScale X Appliance, DNS records may need to be created depending on the desired configuration.
-
For HyperScale Nodes, both forward and reverse DNS records are required for each node.
-
When deploying a Commserve VM on the appliance, both a forward and reverse DNS records are required for each VM being deployed.
Remote Installation Assistance Session
Now that you are ready for your RIA, there are a handful of things to have ready on the day of your session. During this session a Commvault representative will remotely control your desktop in order to access the appliance and configure it. The machine used for this session should meet the following requirements:
-
Should be a Physical or Virtual Machine running a current Windows based operating system.
-
Should be on the Data Protection subnet. (Not required but highly recommended.)
-
Will need to be able to join a Zoom session and perform remote screen sharing/control. You can test join a zoom call using this site: http://zoom.us/test.
-
Must have a modern web-browser installed, such as Google Chrome, Mozilla Firefox, or Microsoft Edge. Internet Explorer is not supported for HyperScale installs.
-
Putty or similar ssh client installed for remote access and/or troubleshooting.
What to Do Next
If plan to setup the appliance using the RIA program:
Your appliance will be deployed, and you are ready to start harnessing the capability of Commvault.
Here is a collection of resources that will help leverage the capabilities of your appliance :
If you plan to setup the appliance on your own:
Follow the steps outlined in the Getting Started to setup the nodes.


