Creating a Virtual Machine Using a Point-in-Time Backup
By default, the latest data and configuration settings of the client computer, backed up in the default backup set, is used to create the virtual machine. However, you can create a virtual machine with the data and configuration settings that was backed up at any point in time.
-
From the CommCell Browser, expand Client Computers.
-
Right-click the appropriate client, point to All Tasks > Virtualize Me > Agent.
The Virtualize Me wizard is displayed.
-
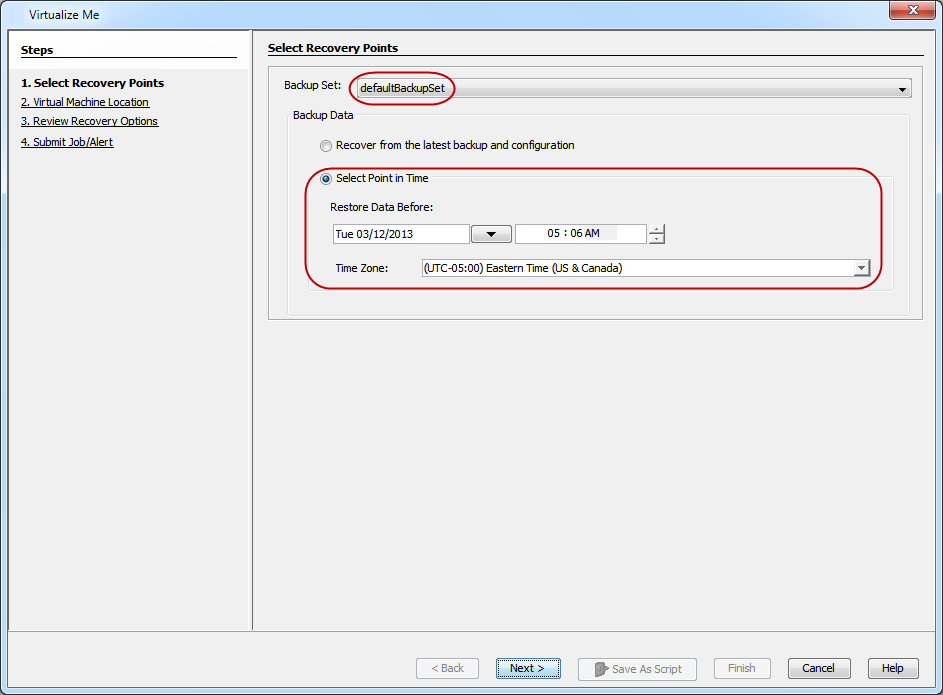
In the Select Recovery Points page, complete the following steps:
-
Click Select Point in Time.
-
Select a date and time to specify the point in time. All of the data that was backed up before the specified point in time is restored when the virtual machine is created.
-
The default time zone of the CommServe is used to determine the point in time. If you want to restore data that was backed up in a different time zone, select the required Time Zone.
-
Click Next.
-
-
In the Virtual Machine Location page, complete the following steps:
-
Perform one of the following:
-
For VMware, select a vCenter, Virtualization Client, ESX Server, and a Data Store. Specify the ISO Path on the ESX server.
-
For Hyper-V, select a Hyper-V instance, Hyper-V Host, and a location for the virtual machine in the Storage box. Select the location for the ISO Path on the Hyper-V server.
-
-
Click Next.
-
-
In the Review Recovery Options page, click Next.
-
In the Submit Job/Alert page, click Finish.
Refer Logging and Log File Collection during Recovery Failures in case of recovery failure at any phase.
Creating a Virtual Machine Using a User Defined Backup Set
By default, the latest data and configuration settings of the client computer, backed up in the default backup set is used to create the virtual machine. You can create a backup set to back up the data and configuration settings for the Virtualize Me operation. This is useful when you want to back up only selected data on the client computer and create a virtual machine with the selected data.
-
From the CommCell Browser, expand Client Computers.
-
Right-click the appropriate client, point to All Tasks > Virtualize Me > Agent.
The Virtualize Me wizard is displayed.
-
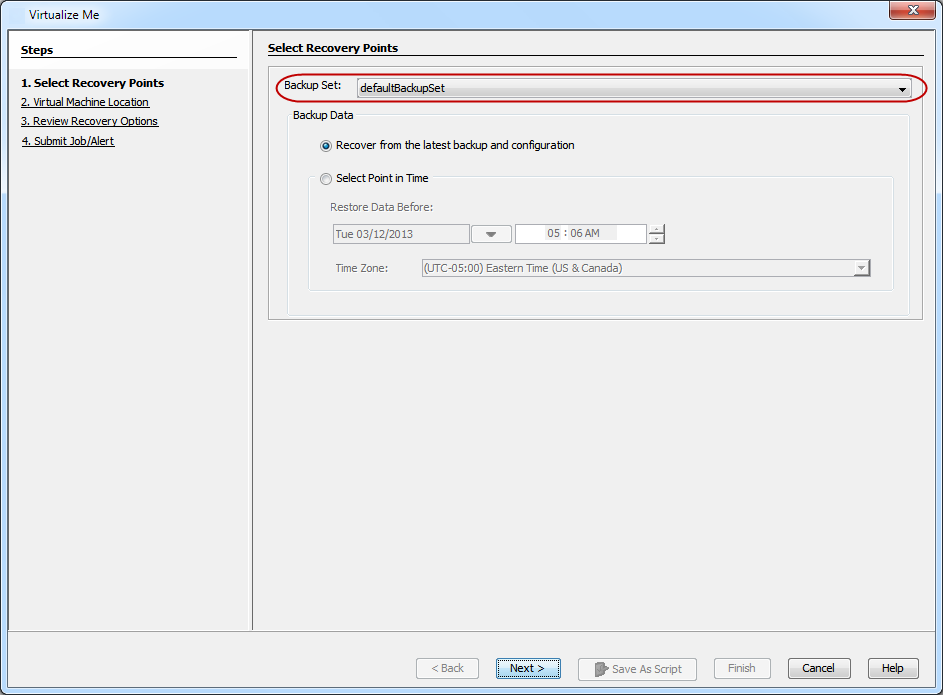
In the Select Recovery Points page, select a Backup Set from the Backup Set list, and then click Next.
-
In the Virtual Machine Location page, complete the following steps:
-
Perform one of the following:
-
For VMware, select a vCenter, Virtualization Client, ESX Server, and a Data Store. Specify the ISO Path on the ESX server.
-
For Hyper-V, select a Hyper-V instance, Hyper-V Host, and a location for the virtual machine in the Storage box. Select the location for the ISO Path on the Hyper-V server.
-
-
Click Next.
-
-
In the Review Recovery Options page, click Next.
-
In the Submit Job/Alert page, click Finish.
Refer Logging and Log File Collection during Recovery Failures in case of recovery failure at any phase.
Firewall Settings for Virtualize Me Clients
Firewalls provide security by blocking unauthorized access to networked computing and communications resources. Internet Protocol (IP) ports are configured in firewalls, permitting specific kinds of information to flow to and from opened IP address:port combinations, in specific directions (in, out or both). Firewall functionality is most often provided by either a stand-alone network appliance, or firewall software running on a general-purpose computer.
Commvault provides additional network route configurations, which you configure from the CommCell Console.
Before You Begin
-
During One-Way network route configuration, only the client can initiate a connection with a CommServe.
-
During Perimeter Network Using Network Gateway configuration, only the network gateway computer can initiate a connection.
-
In the Certificate Administration dialog box, Force per-client certificate authentication on CommServe option must be set to No. If the option is set to Yes, the firewall configuration will not work.
-
If you have Data Interface Pairs (DIPs) configured on your CommCell, make sure that you remove them. For instructions, see Deleting Data Interface Pairs.
Procedure
-
Choose one of the following methods to configure firewall on the CommServe computer depending on your requirement:
-
Perimeter Network Using Commvault Network Gateway (also known as a DMZ)
-
Create a Client Computer Group and add the Virtualize Me clients to the Client Computer Group.
-
On the CommCell Browser, right-click the CommServe and click Properties. The CommCell Properties dialog box appears.
-
In the CommCell Properties dialog box:
-
Click the Network Route Configuration tab and click the Configure Network Route Settings check box.
-
Click Add.
The Connections to CommServe dialog box opens.
-
In the Connections to CommServe dialog box:
-
In the From box, select the newly-created client group.
-
In the To box, select Restricted.
-
Click OK.
-
-
Click OK.
-
-
Right-click the Client Computer Group and click Properties. The Client Group dialog box opens.
-
In the Client Group dialog box:
-
Click the Network Route Configuration tab, click the Configure Network Route Settings check box, and click Advanced. A Warning dialog box is displayed.
-
Click OK on the Warning dialog box and click Add.
The Connections to Client_Group_Name dialog box appears.
-
In the Client_Group_Name dialog box:
-
In the From box, type or select a client or client group that has firewall restrictions to communicate with the CommCell entity.
-
In the To box, select Restricted.
-
-
Click OK.
-
During recovery, if you have a firewall configured between the client and the CommServe, in the Client Group Name box, type the name of the client computer group that you created with the firewall configuration and click Next.
Choosing a Different Backup Copy for Virtualization
You can use a specific copy of the backup data to create the virtual machine. By default, the virtual machine is created with the backup data from the storage policy copy that has the lowest copy precedence. Follow these steps to specify the copy precedence of the backup copy.
-
From the CommCell Browser, expand Client Computers.
-
Right-click the appropriate client, point to All Tasks > Virtualize Me > Agent.
The Virtualize Me wizard is displayed.
-
In the Select Recovery Points page, click Next.
-
In the VirtualMachine Location page, complete the following steps:
-
Perform one of the following:
-
For VMware, select a vCenter, Virtualization Client, ESX Server, and a Data Store. Specify the ISO Path on the ESX server.
-
For Hyper-V, select a Hyper-V instance, Hyper-V Host, and a location for the virtual machine in the Storage box. Select the location for the ISO Path on the Hyper-V server.
-
-
Click Next.
-
-
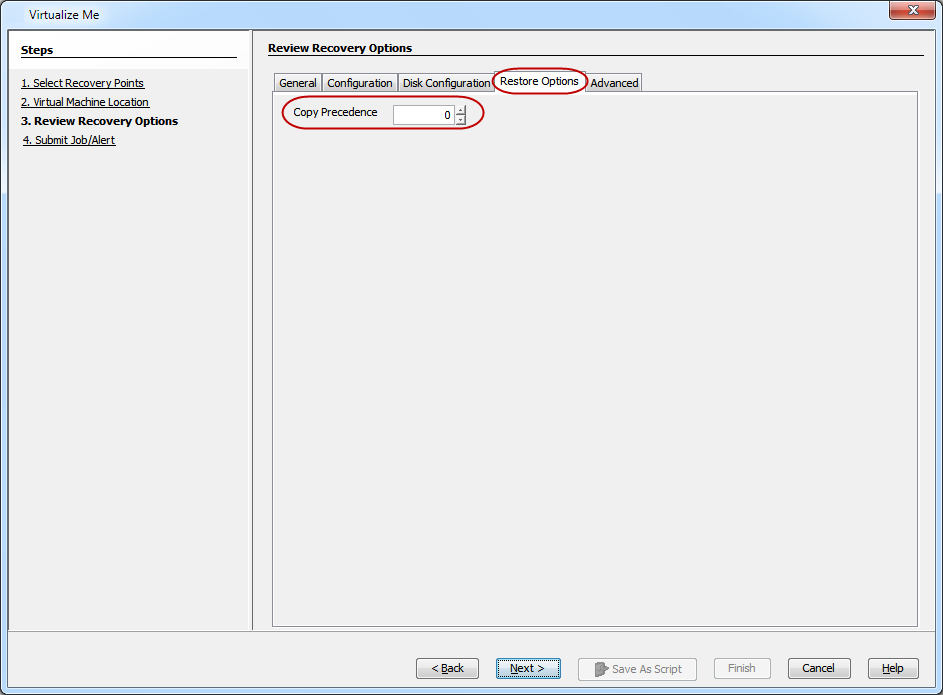
In the Review Recovery Options page, in the Restore Options tab, enter the Copy Precedence of the copy that you want to use to create the virtual machine, and then click Next.
-
In the Submit Job/Alert page, click Finish.
Using an Alternate User Account for Virtualization
By default, the user account that you have used to log into the CommCell Console is used to perform the virtualization job. However, if you use the Active Directory User account to log into the CommCell console, you must enter the password for the user account. If you have logged in as the CommCell Console administrator, you do not need the password to perform the virtualization job.
The Administrator can create a separate user account to perform the virtualization job. For more information on the required permissions, see User Security Permissions and Permitted Actions by Feature.
If you want to use an administrator account to perform the virtualization job, complete these steps:
-
From the CommCell Browser, expand Client Computers.
-
Right-click the appropriate client, point to All Tasks > Virtualize Me > Agent.
The Virtualize Me wizard is displayed.
-
In the Select Recovery Points page, click Next.
-
In the Virtual Machine Location page, complete the following steps:
-
Perform one of the following
-
For VMware, select a vCenter, Virtualization Client, ESX Server, and a Data Store. Specify the ISO Path on the ESX server.
-
For Hyper-V, select a Hyper-V instance, Hyper-V Host, and a location for the virtual machine in the Storage box. Select the location for the ISO Path on the Hyper-V server.
-
-
Click Next.
-
-
In the Review Recovery Options page, complete the following steps:
-
Click Use a different user account.
-
Enter the credentials for the user account which you want to use to perform the virtualization job.
-
Click Next.
-
-
In the Submit Job/Alert page, click Finish.
Scheduling the Virtualization Operation
Scheduling jobs help to ensure that certain operations are automatically performed on a regular basis without user intervention. Follow these steps to schedule the virtualization of a physical machine.
-
From the CommCell Browser, expand Client Computers.
-
Right-click the appropriate client, point to All Tasks > Virtualize Me > Agent.
The Virtualize Me wizard is displayed.
-
In the Select Recovery Points page, click Next.
-
In the Virtual Machine Location page, complete the following steps:
-
Perform one of the following:
-
For VMware, select a vCenter, Virtualization Client, ESX Server, and a Data Store. Specify the ISO Path on the ESX server.
-
For Hyper-V, select a Hyper-V instance, Hyper-V Host, and a location for the virtual machine in the Storage box. Select the location for the ISO Path on the Hyper-V server.
-
-
Click Next.
-
-
In the Review Recovery Options page, click Next.
-
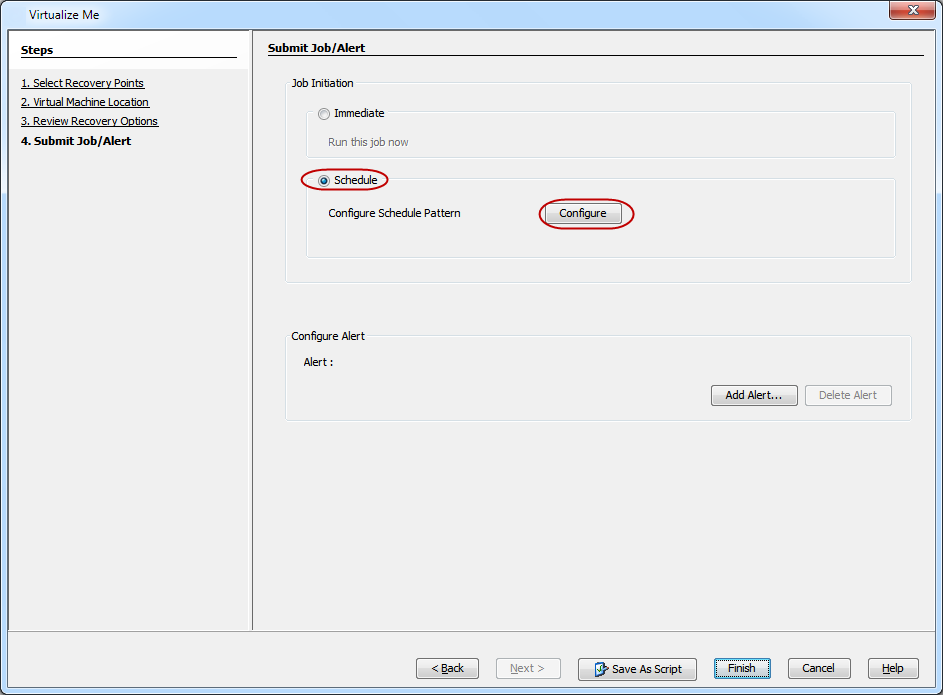
In the Submit Job/Alert page, complete the following steps:
-
Click Schedule, and then click Configure.
-
Select the appropriate scheduling options.
-
Click OK to close the Schedule Details dialog box.
-
Click Finish.
-
Setting Up Alerts for the Virtualization Operation
You can set up alerts for a Virtualize Me job from the CommCell Console. If the Virtualize Me job starts or fails or completes with errors, the configured users will receive an alert notification.
For more information on alert criteria, see Available Alerts.
-
From the CommCell Browser, expand Client Computers.
-
Right-click the appropriate client, point to All Tasks > Virtualize Me > Agent.
The Virtualize Me wizard is displayed.
-
In the Select Recovery Points page, click Next.
-
In the Virtual Machine Location page, complete the following steps:
-
Perform one of the following:
-
For VMware, select a vCenter, Virtualization Client, ESX Server, and a Data Store. Specify the ISO Path on the ESX server.
-
For Hyper-V, select a Hyper-V instance, Hyper-V Host, and a location for the virtual machine in the Storage box. Select the location for the ISO Path on the Hyper-V server.
-
-
Click Next.
-
-
In the Review Recovery Options page, click Next.
-
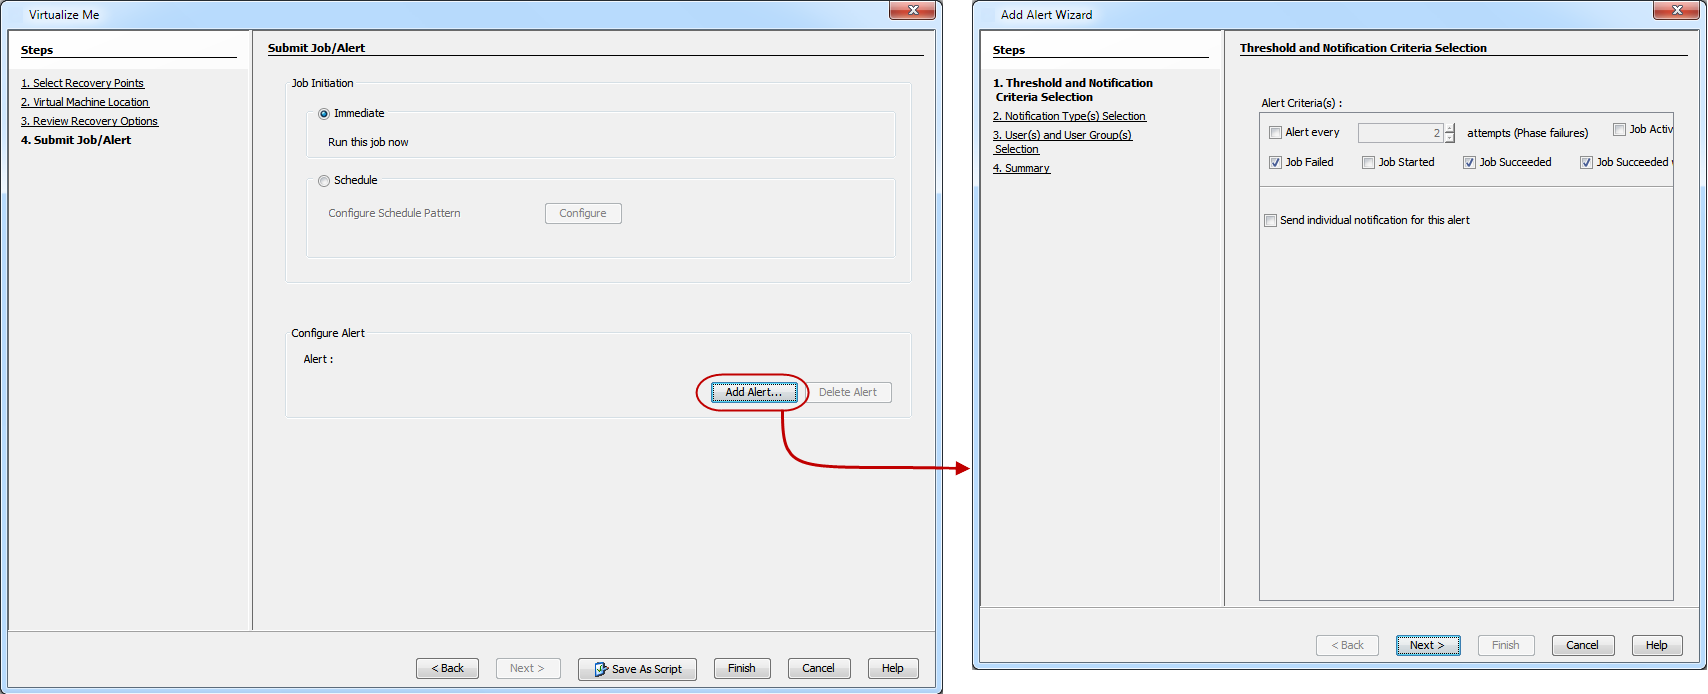
In the Submit Job/Alert page, click Add Alert..., complete the following steps:
-
From the Add Alert Wizard, select the threshold and notification criteria, and then click Next.
-
Select the way in which the alert is to be sent to its intended recipient, and then click Next. For example, you can click Select [Email] for notification to send the alert as an email.
-
Select the CommCell users and/or user groups that will receive the alert, and then click Next.
-
Review the options that you selected in the Summary tab, and then click Finish.
-
Setting an Expiration Date for the Virtual Machine
You can set an expiration date for the virtual machine. Follow these steps to set the expiration date of the virtual machine.
-
From the CommCell Browser, expand Client Computers.
-
Right-click the appropriate client, point to All Tasks > Virtualize Me > Agent.
The Virtualize Me wizard is displayed.
-
In the Select Recovery Points page, click Next.
-
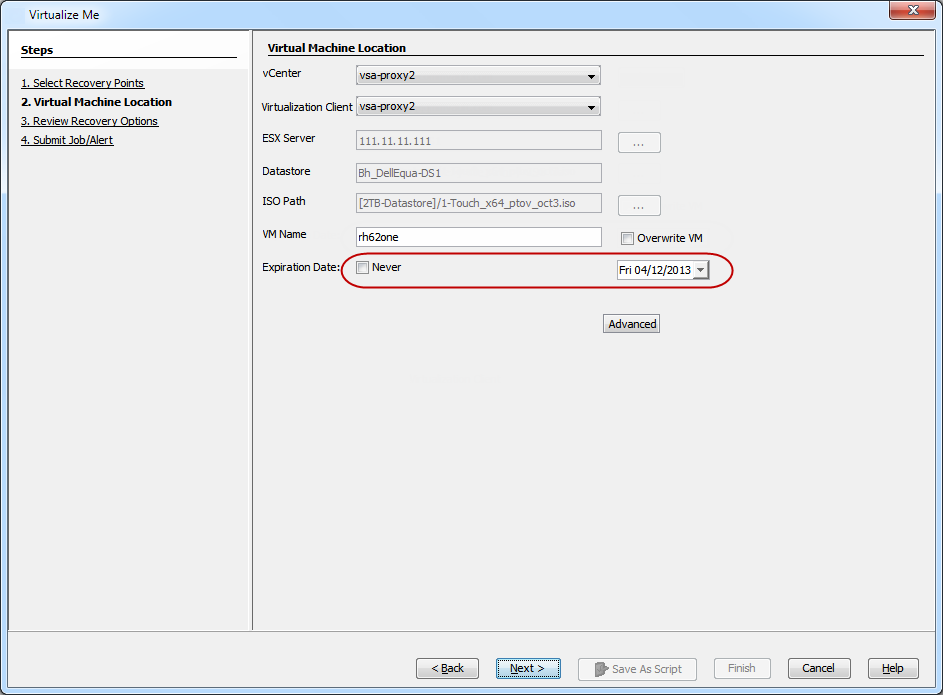
In the Virtual Machine Location page, complete the following steps:
-
Perform one of the following:
-
For VMware, select a vCenter, Virtualization Client, ESX Server, and a Data Store. Specify the ISO Path on the ESX server.
-
For Hyper-V, select a Hyper-V instance, Hyper-V Host, and a location for the virtual machine in the Storage box. Select the location for the ISO Path on the Hyper-V server.
-
-
Clear the Never check box next to Expiration Date, and then select an expiration date from the calendar.
-
Click Next.
-
-
In the Review Recovery Options page, click Next.
-
In the Submit Job/Alert page, click Finish.
After the expiration date, the virtual machine is powered off and decommissioned. However, if you have performed regular backups of the virtual machine using the Virtual Server iDataAgent, you can recover a decommissioned virtual machine at any time. We recommend that you use the Virtual Server iDataAgent to perform regular backups of the virtual machine.
You can use the VM Lifecycle management feature to change the expiration date later. For more information about how to set up this feature, refer to VM Lifecycle Management Administrator Overview.
Once you set up the VM Lifecycle management feature, refer to Renew a Virtual Machine.
Modifying the Configuration of the Virtual Machine
When you convert the client computer into a virtual machine, you can modify the disk configuration of the client computer so that the virtual machine is created with the modified disk configuration.
Refer to Logging and Log File Collection during Recovery Failures in case of recovery failure at any phase.
Select Mount Points
Select specific mount points on the client computer. You can select only the system mount points, and then add the non-system mount points later. This feature is useful when the non-system mount points reside on disks provisioned by iSCSI or SAN.
Follow these steps to select mount points on the client computer:
-
From the CommCell Browser, expand Client Computers.
-
Right-click the appropriate client, point to All Tasks > Virtualize Me > Agent.
The Virtualize Me wizard is displayed.
-
In the Select Recovery Points page, click Next.
-
In the Virtual Machine Location page, complete the following steps:
-
Perform one of the following:
-
For VMware, select a vCenter, Virtualization Client, ESX Server, and a Data Store. Specify the ISO Path on the ESX server.
-
For Hyper-V, select a Hyper-V instance, Hyper-V Host, and a location for the virtual machine in the Storage box. Select the location for the ISO Path on the Hyper-V server.
-
-
Click Next.
-
-
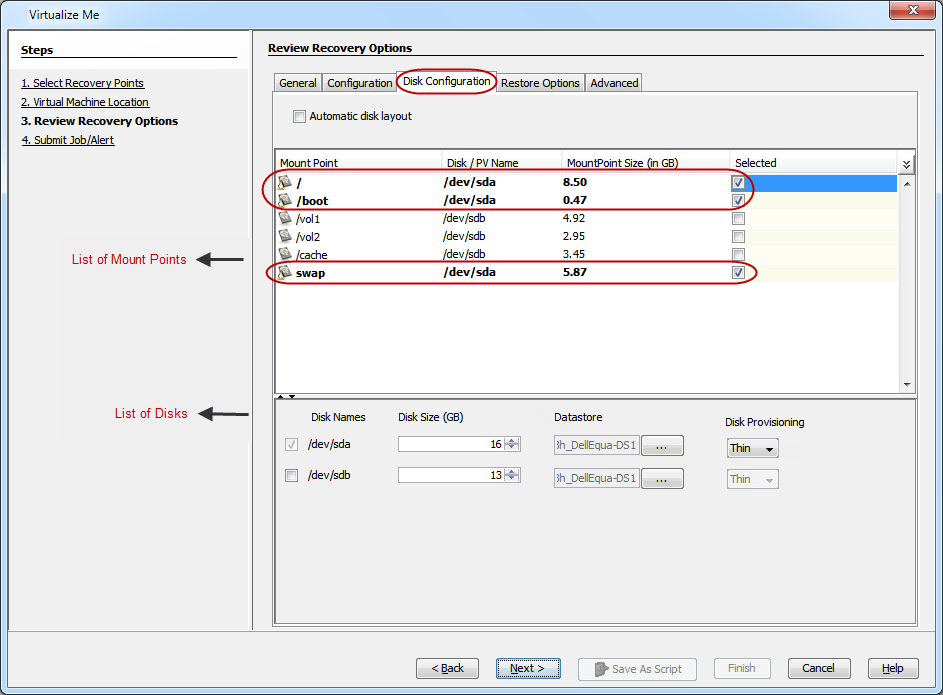
In the Review Recovery Options page, in the Disk Configuration tab, complete the following steps:
-
The list of mount points that are on the client computer is displayed. You can also view the disks corresponding to the selected mount point. If the mount point spans across multiple disks or physical volumes (PVs), then the list of disks/ PVs used for the mount point can be seen by clicking in the Disk / PV Name column. Note that this is just a view of the underlying disks for the mount point and does not provide a mechanism to alter the selection. Mount point size cannot be altered. If you wish to have a greater control over mount point sizes, refer to Auto Disk Layout section.
-
Select the required mount points from the list. The virtual machine is created with the Selected mount points.
You can also alter selection of disks. Mount point selection will be toggled if the disk selection is toggled here. Disk size can be only increased. If you wish to have a greater control over disk sizes, refer to Auto Disk Layout section.
-
Click Next.
-
-
In the Submit Job/Alert page, click Finish.
Modify Mount Point Size Using Automatic Disk Layout
You can increase or decrease the mount point size for all of the non-system mount points on the client computer.
-
From the CommCell Browser, expand Client Computers.
-
Right-click the appropriate client, point to All Tasks > Virtualize Me > Agent.
The Virtualize Me wizard is displayed.
-
In the Select Recovery Points page, click Next.
-
In the Virtual Machine Location page, complete the following steps:
-
Perform one of the following:
-
For VMware, select a vCenter, Virtualization Client, ESX Server, and a Data Store. Specify the ISO Path on the ESX server.
-
For Hyper-V, select a Hyper-V instance, Hyper-V Host, and a location for the virtual machine in the Storage box. Select the location for the ISO Path on the Hyper-V server.
-
-
Click Next.
-
-
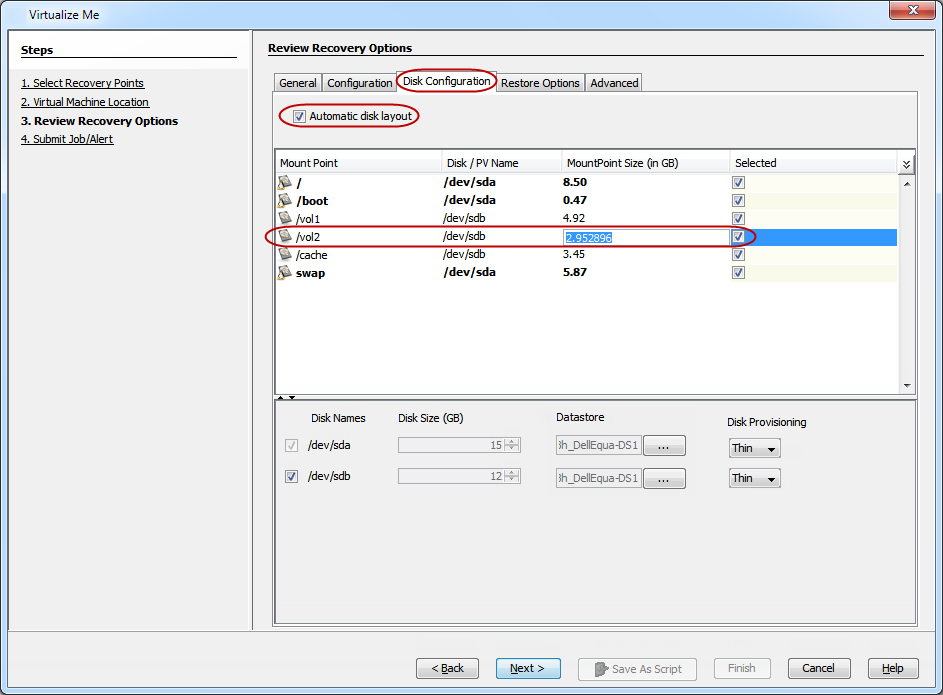
In the Review Recovery Options page, in the Disk Configuration tab, complete the following steps:
The list of mount points that are available on the client computer is displayed. You can also view physical disks for each mount point.
-
Select the Automatic disk layout check box.
-
When you select Automatic Disk Layout*, the disk size increases automatically when you increase the mount point size.
-
Select the required mount points from the list. The virtual machine is created with the Selected mount points.
-
Click in the MountPoint Size column, and then enter the mount point size for each mount point.
-
If you decrease the mount point size, make sure that the mount point size is greater than the actual data size on the mount point.
-
Click Next.
-
-
In the Submit Job/Alert page, click Finish.
* When the Automatic Disk Layout option is selected, the storage configuration is migrated to a LVM based layout and two distinct volume groups are created, VolGroup00 and VolGroup01.
-
VolGroup00 contains a logical volume for each system mount point selected by the user.
-
VolGroup01 contains a logical volume for each non-system mount point selected by the user.
Each volume group uses one disk. So irrespective of the disks used on the backed up machine, only two disks will be created on the machine being recovered.
Automatic Disk Layout option provides these benefits:
-
Allows complete flexibility of changing the size of each mount point and/ or deselecting any non-system mount points.
-
Extra disk space will not be consumed as disks are provisioned with a size that is just sufficient to host the selected mount points.
-
Since LVM is used, it is easy to add extra disks or volumes and mount points later after the recovery is complete.
This option can, however, be used only when the total disk size of each of the disks is less than the maximum disk size permitted on the vCenter data store (which is defined by the block size of the vCenter data store).
Modify Disk Size
You can increase the disk size for all of the disks of the client computer.
Note: When performing a recovery from block-level backups, you cannot decrease the volume size because the destination volume cannot be smaller in size than the source volume.
-
From the CommCell Browser, expand Client Computers.
-
Right-click the appropriate client, point to All Tasks > Virtualize Me > Agent.
The Virtualize Me wizard is displayed.
-
In the Select Recovery Points page, click Next.
-
In the Virtual Machine Location page, complete the following steps:
-
Perform one of the following:
-
For VMware, select a vCenter, Virtualization Client, ESX Server, and a Data Store. Specify the ISO Path on the ESX server.
-
For Hyper-V, select a Hyper-V instance, Hyper-V Host, and a location for the virtual machine in the Storage box. Select the location for the ISO Path on the Hyper-V server.
-
-
Click Next.
-
-
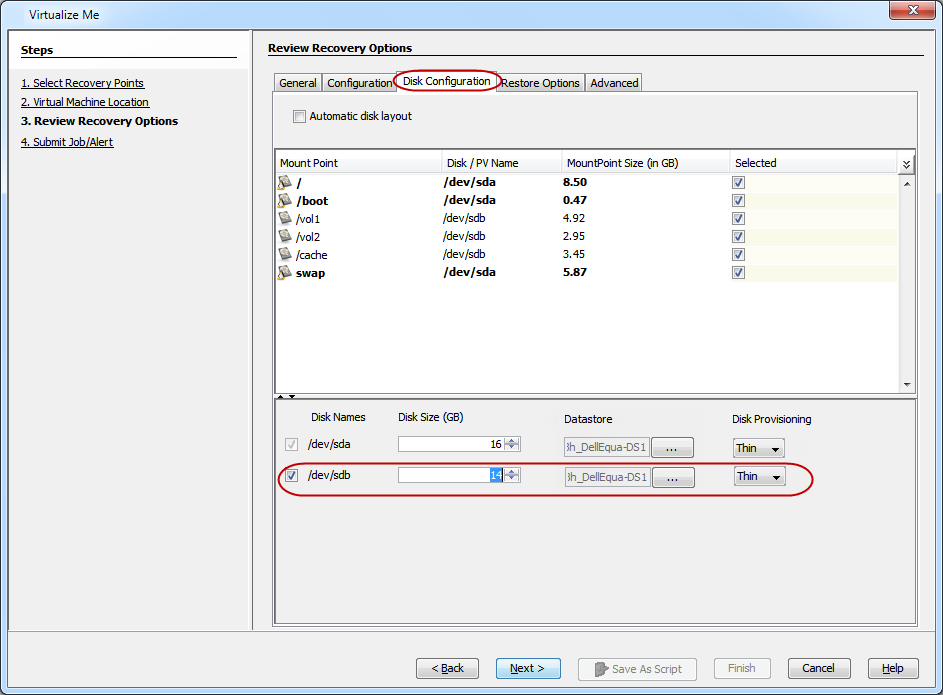
In the Review Recovery Options page, in the Disk Configuration tab, complete the following steps:
The list of mount points that are available on the client computer is displayed. You can also view physical disks for each mount point.
-
Select the required mount points from the list. The virtual machine is created with the Selected mount points.
-
In the Disk Size (GB) box, increase the size of the disk.
Note that you can only increase the disk size.
-
Click Next.
-
-
In the Submit Job/Alert page, click Finish.
Select the Virtual Machine Location
When you create a virtual machine, all of the mount points on the disk are created in the default location that you specified in the Virtual Machine Location dialog box. You can select a different location.
-
From the CommCell Browser, expand Client Computers.
-
Right-click the appropriate client, point to All Tasks > Virtualize Me > Agent.
The Virtualize Me wizard is displayed.
-
In the Select Recovery Points page, click Next.
-
In the Virtual Machine Location page, complete the following steps:
-
Perform one of the following:
-
For VMware, select a vCenter, Virtualization Client, ESX Server, and a Data Store. Specify the ISO Path on the ESX server.
-
For Hyper-V, select a Hyper-V instance, Hyper-V Host, and a location for the virtual machine in the Storage box. Select the location for the ISO Path on the Hyper-V server.
-
-
Click Next.
-
-
In the Review Recovery Options page, in the Disk Configuration tab, complete the following steps:
The list of mount points that are available on the client computer appears. You can also view the disk information at the bottom of the mount point list.
-
Select the required mount points from the list. If you do not select any mount point from a disk, the disk is not selected.
-
The list of disks displays the location where the disks are created.
-
Select a location for the disks:
-
For VMWare, click the ellipsis button to select a Datastore.
-
For Hyper-V, click the ellipsis button to select a Storage.
-
-
Click Next.
-
-
In the Submit Job/Alert page, click Finish.

Configure Disk Provisioning
By default, thin provisioning is used for disk space allocation for all disks. You can configure disk provisioning for each disk.
-
From the CommCell Browser, expand Client Computers.
-
Right-click the appropriate client, point to All Tasks > Virtualize Me > Agent.
The Virtualize Me wizard is displayed.
-
In the Select Recovery Points page, click Next.
-
In the Virtual Machine Location page, complete the following steps:
-
Perform one of the following:
-
For VMware, select a vCenter, Virtualization Client, ESX Server, and a Data Store. Specify the ISO Path on the ESX server.
-
For Hyper-V, select a Hyper-V instance, Hyper-V Host, and a location for the virtual machine in the Storage box. Select the location for the ISO Path on the Hyper-V server.
-
-
Click Next.
-
-
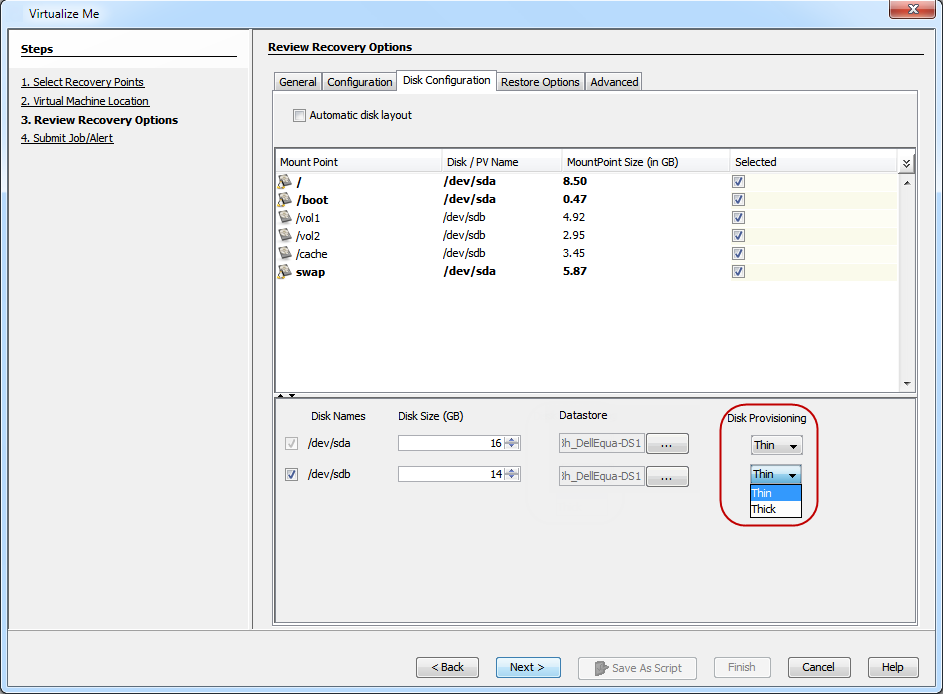
In the Review Recovery Options page, in the Disk Configuration tab, complete the following steps:
-
The list of mount points that are available on the client computer appears. You can also view disk information for each mount point at the bottom of the mount point list.
-
Select the required mount points from the list. If you do not select any mount points from a disk, the disk is not selected.
-
Choose the type of disk provisioning for the selected disks:
-
For VMware, select Thin or Thick.
-
For Hyper-V, select Dynamic or Fixed.
-
-
Click Next.
-
-
In the Submit Job/Alert page, click Finish.
Modify Network Configuration
When you convert a client computer into a virtual machine, you can modify its network configuration such as NIC name, IP address, default gateway, and so on.
-
From the CommCell Browser, expand Client Computers.
-
Right-click the appropriate client, point to All Tasks > Virtualize Me > Agent.
The Virtualize Me wizard is displayed.
-
In the Select Recovery Points page, click Next.
-
In the Virtual Machine Location page, complete the following steps:
-
Perform one of the following:
-
For VMware, select a vCenter, Virtualization Client, ESX Server, and a Data Store. Specify the ISO Path on the ESX server.
-
For Hyper-V, select a Hyper-V instance, Hyper-V Host, and a location for the virtual machine in the Storage box. Select the location for the ISO Path on the Hyper-V server.
-
-
Click Next.
-
-
In the Review Recovery Options page, in the Configuration tab, complete the following steps:
-
Select the network configuration, and then click Edit.
-
Modify the IP address or any other network configuration details.
Click Use DHCP if you want to use a dynamic IP address instead of a static IP address.
-
Click OK.
-
Click Next.
-
-
In the Submit Job/Alert page, click Finish.
Note: The modified network configuration is used only during virtualization operation. After the virtualization operation ends and the virtual machine reboots, you must perform the network configuration again.
Assign a Network Label
Virtual Center uses labels to identify the virtual network adapter that is associated with a physical network. If you want to associate the network adapter of the VM with a specific virtual server network, follow these steps.
-
From the CommCell Browser, expand Client Computers.
-
Right-click the appropriate client, point to All Tasks > Virtualize Me > Agent.
The Virtualize Me wizard is displayed.
-
In the Select Recovery Points page, click Next.
-
In the Virtual Machine Location page, complete the following steps:
-
Perform one of the following:
-
For VMware, select a vCenter, Virtualization Client, ESX Server, and a Data Store. Specify the ISO Path on the ESX server.
-
For Hyper-V, select a Hyper-V instance, Hyper-V Host, and a location for the virtual machine in the Storage box. Select the location for the ISO Path on the Hyper-V server.
-
-
Click Next.
-
-
In the Review Recovery Options page, in the Configuration tab, complete the following steps:
-
Select the network configuration, and then click Edit.
-
Select a network label from the Network Label list. This list displays all of the network labels that are available on the vCenter or the Hyper-V Manager.
-
Select a virtual network adapter from the Interface Adapter list.
-
Click OK.
-
Click Next.
-
-
In the Submit Job/Alert page, click Finish.
Modify Memory Size
When you convert the client computer into a virtual machine, you can increase or decrease its memory size.
-
From the CommCell Browser, expand Client Computers.
-
Right-click the appropriate client, point to All Tasks > Virtualize Me > Agent.
The Virtualize Me wizard is displayed.
-
In the Select Recovery Points page, click Next.
-
In the Virtual Machine Location page, complete the following steps:
-
Perform one of the following:
-
For VMware, select a vCenter, Virtualization Client, ESX Server, and a Data Store. Specify the ISO Path on the ESX server.
-
For Hyper-V, select a Hyper-V instance, Hyper-V Host, and a location for the virtual machine in the Storage box. Select the location for the ISO Path on the Hyper-V server.
-
-
Click Next.
-
-
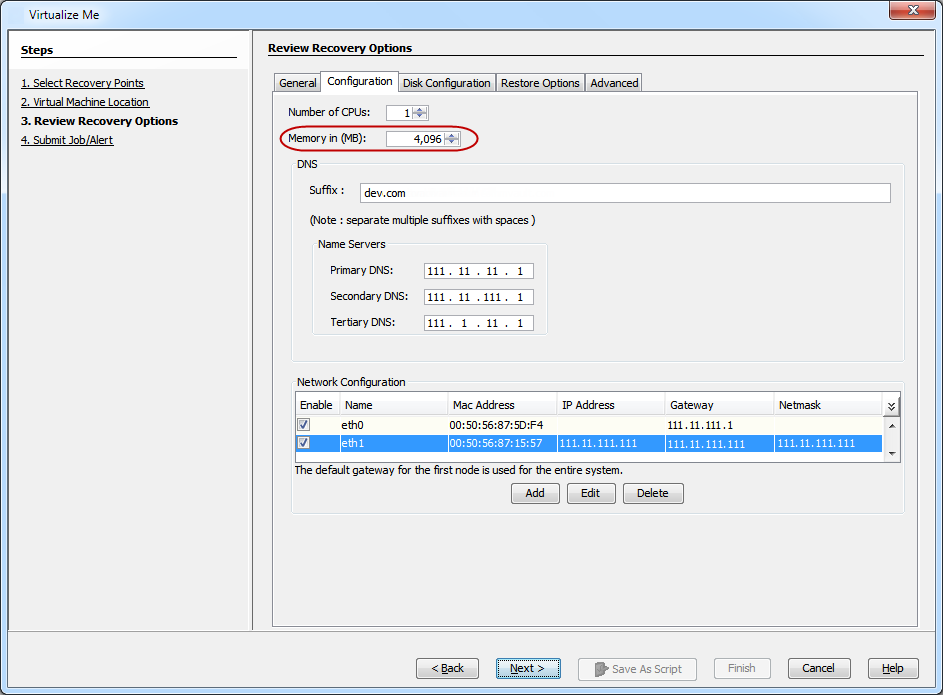
In the Review Recovery Options page, in the Configuration tab, complete the following steps:
-
In the Memory in (MB) box, increase or decrease the size of the memory.
-
Click Next.
-
-
In the Submit Job/Alert page, click Finish.
Modify the Number of CPUs
When you convert the client computer into a virtual machine, you can increase or decrease the number of virtual CPUs.
-
From the CommCell Browser, expand Client Computers.
-
Right-click the appropriate client, point to All Tasks > Virtualize Me > Agent.
The Virtualize Me wizard is displayed.
-
In the Select Recovery Points page, click Next.
-
In the Virtual Machine Location page, complete the following steps:
-
Perform one of the following:
-
For VMware, select a vCenter, Virtualization Client, ESX Server, and a Data Store. Specify the ISO Path on the ESX server.
-
For Hyper-V, select a Hyper-V instance, Hyper-V Host, and a location for the virtual machine in the Storage box. Select the location for the ISO Path on the Hyper-V server.
-
-
Click Next.
-
-
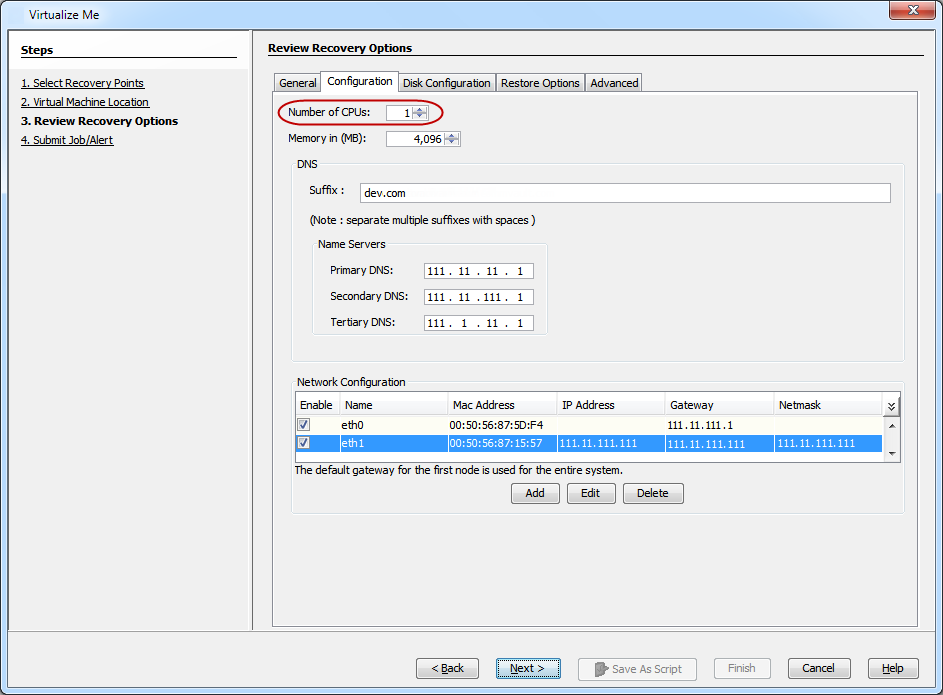
In the Review Recovery Options page, in the Configuration tab, complete the following steps:.
-
In the Number of CPUs box, increase or decrease the number of CPUs.
-
Click Next.
-
-
In the Submit Job/Alert page, click Finish.
Related Reports
Job Summary Report
You can use the Virtualize Me Job Summary Report to review information that is related to all of the Virtualize Me jobs that are run in the CommCell during the specified time period. This report is useful if you need information about:
-
All Virtualize Me jobs with a specified status during a specified time period
-
The user who set up the job
-
The client for which the job run
-
The failure reasons, if applicable
-
From the CommCell Browser, right-click the CommServe node, point to View, and then click Admin Job History.
The Admin Job History Filter dialog box appears.
-
From the Job Type list, select Virtualize Me.
-
Click OK.